Configuration
CONFIGURATION Window
GENERAL DESCRIPTION
The window Configuration is the central and administrative control panel of Kardex Tauro. From here the global parameters of the system are set, the company master data is managed, the users and their permissions are administered, and the database connections and external devices are configured.
This window acts as the "brain" of the program, allowing the software to be adapted to the specific needs of each business before starting daily operation.
ACCESS AND SECURITY RESTRICTIONS
- Location: Accessed through the button "Configuration" located in the left side menu of the main window of the program.
- Access Restriction: Access to this window is exclusively restricted to users with an Administrator profile. If a normal user tries to access, the system will simply hide the option or deny access, guaranteeing that only authorized personnel can modify the structure and the critical parameters of the system.
WINDOW STRUCTURE (CONFIGURATION TABS)
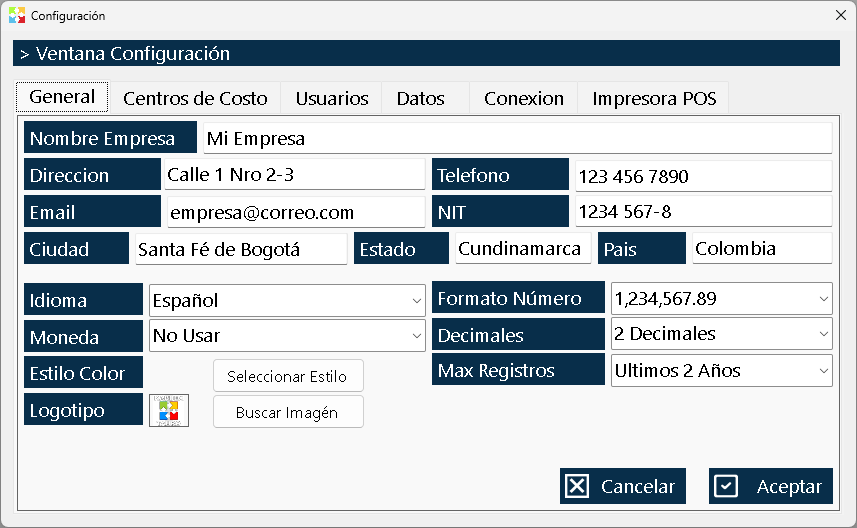
The window is organized into six tabs that group the different configuration areas. Below is a general overview of each one.
(Note: To learn the details of the fields, buttons and procedures of each section, consult the specific technical help of each tab).
1. General Tab
Contains the basic and identifying information of the company. Here the company data is configured (name, address, contact data), the interface language, the number display format (such as the number of decimals to show) and the logo that will appear in the reports and printed documents.
2. Cost Center Tab
Allows the management of the different warehouses, branches or locations. From here you can create new cost centers, edit the information of the existing ones and organize the physical or logical structure where the inventory will be handled.
3. Users Tab
It is the access and security administration module. It allows you to add, edit or delete users from the system. In addition, it is the point where the granular permissions of each user are assigned, elevated or restricted to control exactly which windows and operations they can perform.
4. Data Tab
Designed for the mass loading of initial information, this tab contains 5 fundamental tools:
- Import Inventory: Allows you to load multiple products simultaneously into the system.
- Import Third Parties: Allows you to load the database of customers, suppliers, employees, etc.
- Delete Data: Allows you to safely delete information from the different tables.
- Create Backup: Create a backup of the database in the location you want.
- Restore Backup: Restore the information from a backup.
- Note: The system is highly flexible and allows you to import data from any spreadsheet format, regardless of the source application.
5. Connection Tab
Manages the storage of the system database through a wizard that guides the user to configure the connection.
- Local Mode (Default): The program uses a SQLite database hosted in the same folder as the executable file.
- Remote Mode: Allows connecting the program to a database hosted on a web server or remote server, ideal for environments where centralized or multiuser access is required.
6. POS Printer Tab
Specific configuration for point-of-sale hardware. Here the thermal printer that will be used is selected and configured exclusively to print POS invoices and sales receipts.
- Supports various connection methods, including local printers and network printers by IP.
- Important note: The other reports, standard invoices and system documents will be printed using the default printer configured in the Windows operating system. This tab only affects POS tickets.
GENERAL CONFIGURATION RECOMMENDATIONS
- Configure in order: It is recommended to start the system configuration by first filling in the General Tab, then create the Cost Centers, register the Users and finally use the Data Tab for the mass import of products and third parties.
- Make backups: Before making massive changes in the Data Tab or modifying the Connection Tab, make sure you have a backup of your current database.
- Test the POS printer: After configuring the printer in its corresponding tab, perform a test print to verify the paper width and alignment before using it in a real production environment with customers.
- Protect access: Make sure that only the most trusted people have Administrator credentials, since they are the only ones who can access this window and modify the global operation of the program.
Created with HelpNDoc's Personal Edition: Update your help files and your workflow with HelpNDoc's WinHelp HLP to CHM conversion