Create AP
CREATE ACCOUNTS PAYABLE Window
General Description
The window Create Accounts Payable is the module where the debts that the company has with its suppliers or third-party creditors are recorded manually. This window is used when you need to create an account payable that does not come automatically from a purchase order, or when you need to edit an existing account that is still in open status.
This window shares the same interface and layout as the Create Account Receivable window, with the fundamental difference that here obligations are managed with creditors (those to whom money is owed) instead of debtors.
When Is This Window Used?
The Create Account Payable window is used in two main situations:
Manual Creation:
When you need to record a debt with a supplier that does not come from a purchase order of the system. Typical examples:
- Services received that were not registered through a purchase order
- Operating expenses pending payment
- Debts acquired directly with suppliers
- Accounting adjustments that generate payment obligations
- Purchases made outside the system that must be recorded
Editing Existing Accounts:
When you need to modify the information of an account payable that is in open status (without registered payments). Once the account receives its first payment, it can no longer be edited.
Window Structure
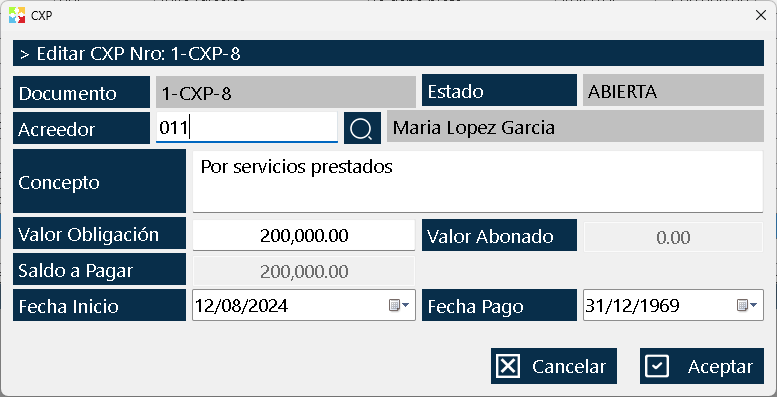
The window is organized in a simple and direct way, with all the fields necessary to record the obligation:
Upper Zone - Document Information
Document Number:
- If you are creating a new account, this field shows the number that the system will assign automatically.
- If you are editing an existing account, it shows the number already assigned.
- This field is read-only and cannot be modified.
Status:
Shows the current status of the account:
- Open: The account can be edited (it has not received payments).
- Partial: The account has received some payments but still has a pending balance.
- Closed: The account has been fully canceled.
- This field is read-only and reflects the current status of the account.
Central Zone - Account Data
Creditor:
- Third Party Code: Code of the supplier or third party to whom it is owed. This field is selected through a selector with a search button (magnifying glass) that opens the list of third parties.
- Third Party Name: It automatically shows the name of the selected third party.
- This field is required and must be a valid third party registered in the system.
Concept:
Text field where the motive, reason, or circumstance for which this account payable is created is described. Examples:
- "Air conditioning equipment maintenance service"
- "Purchase of office supplies"
- "Warehouse rent payment January 2026"
- "Monthly cleaning service"
- This field is required and must be descriptive to facilitate later identification of the account.
Obligation Amount:
Editable numeric field where the total value of the debt is entered. This is the initial amount of the account payable.
- If you are creating a new account, the total value is entered.
- If you are editing an existing account, the value can be modified (only if it has not received payments).
- This field is required.
Amount Paid:
Shows the total of payments that have been made to this account.
- If you are creating a new account, this value is zero.
- If you are editing an existing account, it shows the registered payments.
- This field is read-only and is updated automatically when payments are registered.
Amount Payable:
Shows the pending balance of the account (Obligation Value minus Paid Value).
- This field is read-only and is calculated automatically.
- When the balance reaches zero, the account moves to closed status.
Dates:
Start Date:
Date on which the obligation originates. By default it takes the current date, but it can be modified if the debt originated on a different date.
Payment Date:
Deadline or expected date for the payment of the obligation. This field is informative and helps to plan the payments. It can be left blank if there is no specific date.
Lower Zone - Action Button
OK Button:
It is the only button at the bottom of the window. Its function depends on the context:
- If you are creating a new account: Creates the account payable with the entered information.
- If you are editing an existing account: Saves the changes made.
System Validations
The window implements several validations to guarantee data integrity:
Creditor Validation:
- The creditor must be a valid third party registered in the system.
- If a nonexistent code is entered, the system shows an error.
- Use the search button (magnifying glass) to select the creditor from the list of third parties.
Concept Validation:
- The concept field is required.
- It must contain descriptive text (it cannot be empty).
Amount Validation:
- The obligation value must be a positive number greater than zero.
- Negative or zero amounts are not allowed.
- If you are editing an account with payments, the new value must be greater than or equal to the value already paid.
Date Validation:
- The start date must be valid.
- The payment date, if entered, must be later than or equal to the start date.
Validation When Editing:
- Only accounts in open status can be edited.
- If the account already has payments, it cannot be edited and the system will show a message.
Typical Workflow
Scenario 1: Create a manual account payable
- The need to record a debt with a supplier that does not come from a purchase order is identified.
- You go to the Accounts Payable List window.
- Click the "Create Account" button.
- The Create Accounts Payable window opens.
- The system automatically assigns the document number.
- The creditor is selected using the search button (magnifying glass).
- The descriptive concept of the debt is entered.
- Enter the obligation amount.
- Check or adjust the start date.
- Optionally, the expected payment date is entered.
- Click the "OK" button.
- The account is created in OPEN status and appears in the accounts payable list.
Scenario 2: Edit an existing account payable
- The information of an account payable in open status needs to be modified.
- You go to the Accounts Payable List window.
- Select the account to be edited.
- Click the "Edit Account" button.
- The Create Account Payable window opens with the current data.
- The necessary fields are modified (concept, value, dates).
- Click the "OK" button.
- The changes are saved and reflected in the accounts payable list.
Scenario 3: Try to edit an account with payments
- An account payable that already has registered payments needs to be modified.
- You go to the Accounts Payable List window.
- Select the account.
- Click the "Edit Account" button.
- The system shows a message indicating that the account cannot be edited because it already has payments.
- The account remains unchanged.
Relationship with Other Windows
Accounts Payable List Window:
It is the window from which this window is accessed through the "Create Account" and "Edit Account" buttons. Here all the created accounts are displayed.
Third Parties List Window:
Provides the list of suppliers and third parties used in the creditor selector. Creditors must be registered as third parties in the system.
Cash Window:
When payments are recorded against accounts payable, the money leaves the cash. Cash movements are linked to the payments made.
Purchase Orders List Window:
Accounts payable generated automatically from purchase orders also appear in the accounts payable list, but they cannot be edited from this window (they are created automatically).
Usage Recommendations
Be descriptive in the concept:
Use clear and detailed concepts that allow the reason for the debt to be easily identified. This will facilitate reconciliation and later analysis.
Verify the creditor before saving:
Be sure to select the correct creditor before clicking "Accept". An error in the creditor can cause reconciliation problems with suppliers.
Use realistic dates:
Enter start and payment dates that reflect the reality of the obligation. This helps with payment planning and the analysis of aging balances.
Do not edit accounts with payments:
Remember that once an account receives its first payment, it can no longer be edited. If you need to correct information, do it before registering any payment.
Validate the obligation amount:
Make sure the entered amount is correct before saving. An error in the amount can cause financial and reconciliation problems.
Use the search button for creditors:
Instead of typing the creditor code, use the search button (magnifying glass) to select from the list. This avoids typing errors.
Document manual accounts:
If you are creating a manual account that does not come from a purchase order, use the notes to document additional information or attach references to physical invoices.
Reconcile with suppliers:
After creating manual accounts payable, reconcile with the suppliers to ensure that the registered obligations match the real invoices or agreements.
Plan payments:
Use the payment date to plan when the obligation should be paid. This helps with cash flow management.
Review the accounts created:
After creating or editing an account, review it in the accounts payable list to ensure that all the information is correct.
Train staff:
Make sure all users who can create accounts payable understand when to use this window and when accounts are generated automatically from purchase orders.
Do not overuse manual creation:
Whenever possible, use purchase orders to generate accounts payable automatically. Use manual creation only when strictly necessary.
Keep the dates in order:
Enter the dates in a consistent format to facilitate analysis and report generation.
Use standardized concepts:
If possible, use standardized concepts for recurring types of expenses (rent, services, supplies, etc.). This facilitates analysis by type of expense.
Document the origin of the debt:
If the account payable comes from a physical invoice or external document, mention that document's number in the concept or in the notes.
Review the balances before paying:
Before recording a payment, verify the current balance of the account to ensure that the payment is correct.
Integrate with accounting:
If you have an external accounting system, periodically export the accounts payable information so that it can be incorporated into the formal accounting.
Monitor old accounts:
Periodically review accounts payable with old start dates to identify obligations that should have been paid.
Train on the use of dates:
Make sure the staff understands the difference between the start date (when the debt originates) and the payment date (when it should be paid).
Kardex Tauro - Professional Inventory Management System
Created with HelpNDoc's Personal Edition: Revolutionize the output of your CHM help file with HelpNDoc