Accounts Payable
Window ACCOUNTS PAYABLE LIST
General Description
The window Accounts Payable List is the module where all the outstanding debts that the company has with its suppliers are managed. It works as a master-detail form that presents all the accounts payable in a consolidated way, allowing you to view both the headers (the accounts payable themselves) and the details (the payments made to each account).
This window is essential for the financial control of the business, since it allows you to monitor how much is owed, to whom it is owed, what payments have been made and how much remains to be paid. It is an essential tool for treasury management and planning payments to suppliers.
What is an Accounts Payable?
An Account Payable is the record of a debt that the company has with a supplier as a consequence of a credit purchase. It represents the payment obligation that arises when merchandise or services are acquired without paying the total at the time of the transaction.
Key features:
- It is generated automatically upon finalizing a purchase order with partial payment or on credit.
- It can also be created manually to record debts not derived from purchases.
- It can be settled in a single payment or in multiple partial payments.
- Shows the total value of the debt and the value that has already been settled.
- It can only be edited while it is in open status (without payments).
- Once it receives the first payment, it moves to partial status and can no longer be edited.
- When the settled value equals the total value, it moves to closed status.
Origin of accounts payable:
- Automatic: Upon finalizing a purchase order where the cash paid is less than the total of the purchase, the system automatically creates an account payable for the difference.
- Manual: Accounts payable can be created manually to record debts with suppliers that do not come from a purchase order (services, expenses, etc.).
Window Structure
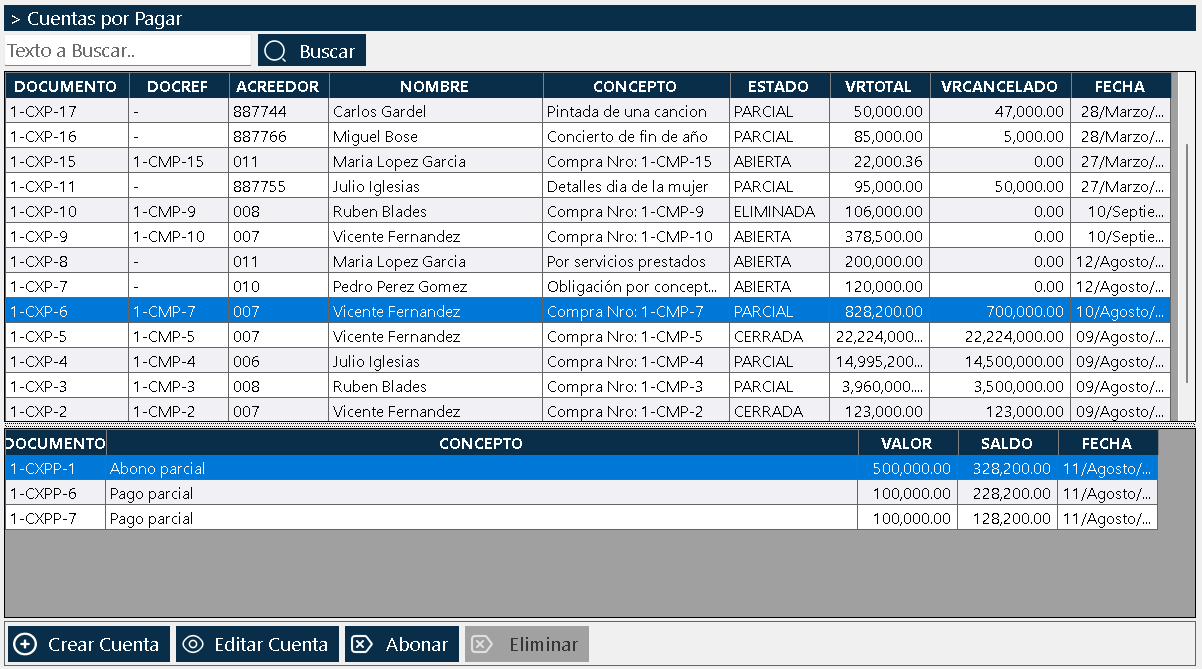
The window is organized into three clearly differentiated areas, following the master-detail pattern:
Top Area - Global Search Box
At the very top there is a real-time search text box. It allows you to type any data (document number, creditor name, concept, status, or any text contained in the accounts payable) and the system filters automatically, showing only the matching elements. When you clear the text in the search box, all the elements are shown again.
Upper Central Area - Master Grid (Accounts Payable)
Below the search box, a grid is presented with all the accounts payable registered in the system. The main columns include:
- Source Document: Number of the document that originated the account payable (usually the number of the purchase order). If the account was created manually, this field may be empty or show "MANUAL".
- Creditor Code: Code of the supplier or third party to whom it is owed.
- Creditor Name: Name or business name of the supplier.
- Concept: Description of the reason for the debt (purchase of merchandise, services, etc.).
- Status: Current status of the account (open, partial, closed, deleted).
- Total Value: Total amount of the original debt.
- Settled Value: Amount already paid through partial payments.
- Date: Creation date of the accounts payable.
When you click on a row, the account payable is selected and its details (payments made) are shown in the lower area.
Lower Central Area - Detail Grid (Payments)
In the lower part, the detail of the account payable selected in the upper list is shown. Here the payments that have been made to that specific account appear. The columns are:
- Document Number: Number of the generated payment document.
- Concept: Description of the payment (partial payment, full settlement, etc.).
- Amount: Amount of the payment made.
- Balance: Outstanding balance after that payment.
- Date: Date on which the payment was made.
Behavior of the detail grid:
- If the account payable is in open status (without payments), the lower grid appears empty.
- If the account received a single payment that settled it completely, only one line will appear in the lower grid.
- If the account has been settled in multiple installments, a record will appear for each payment made, showing the evolution of the balance.
Bottom Area - Action Buttons
Four main buttons that control the operations on the accounts payable:
Create Account: Creates a new account payable manually. This button is used when you need to record a debt with a supplier that does not come from a purchase order.
Edit Account: Allows you to modify the information of an account payable that is in open status (without payments). Once the account receives its first payment, it can no longer be edited.
Apply Payment: Opens the payment registration window for the selected account. From this window you can settle the account in full or make a partial payment.
Delete: Removes the account payable from the system. This button is only active for accounts in open status. Accounts that have already received payments cannot be deleted.
Document Statuses
Accounts payable go through four different statuses throughout their life cycle:
Status OPEN:
- The account has just been created and has not received any payment.
- The account information can be edited.
- The account can be deleted.
- It cannot be paid (although technically the button is active, it is the first step to change status).
- The settled value is zero.
PARTIAL status:
- The account has received at least one payment, but there is still an outstanding balance.
- The account can no longer be edited.
- It cannot be deleted.
- More payments can be made until the total payment is completed.
- The settled value is less than the total value.
CLOSED status:
- The account has been fully canceled.
- The settled value is equal to the total value.
- No more payments can be made.
- It cannot be edited or deleted.
- The document remains as a historical record of the completed payment.
Status DELETED:
- The account was voided and removed from the system.
- It can only be consulted as a historical record.
- It cannot be edited, paid or deleted again.
Typical status flow:
1
2
3
Context Menu - Upper List (Accounts Payable)
When you right-click on any account payable in the upper list, a menu is displayed with the following options:
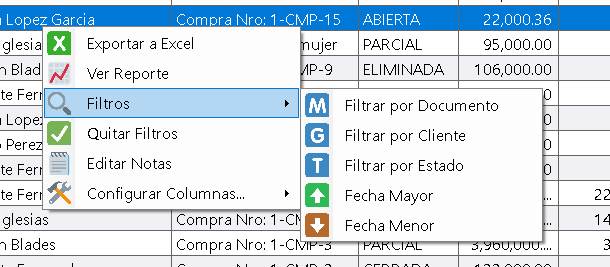
Export to Excel
Generates an Excel file with the accounts payable currently visible in the list. If there are applied filters, only the accounts that meet those criteria are exported.
View Report
Shows a printable report with the accounts payable that appear in the list. If the list has applied filters, the report will reflect exactly those same criteria. This is a very powerful tool for generating outstanding debt reports.
Filters
Allows you to apply advanced filtering criteria on the accounts payable list:
- By source document
- By creditor (supplier)
- By status (open, partial, closed)
- By total value greater than
- By total value less than
- By date greater than
- By date less than
The filters are stackable, which means that several can be combined simultaneously. For example, you can request to show all the accounts payable of supplier ABC in partial status with a value greater than one million.
Remove Filters
Restores the complete view by removing all applied filters, showing all the accounts payable of the system again.
Edit Notes
Allows you to open a window to edit the general notes of the selected account payable.
Configure Columns
Allows you to show or hide columns in the upper accounts payable list. It also allows you to modify the width of the columns. The system remembers this configuration when the window is closed and reopened.
Context Menu - Bottom List (Payments)
When you right-click on the payments in the lower detail grid, a menu is displayed with a single option:
Configure Columns
Allows adding or removing columns from the lower grid, modifying the width and customizing the visualization. As in the upper list, this configuration is remembered when closing the window.
The Power of the Filter System
The filter menu at the top is an extremely powerful tool for debt analysis. Everything shown in the upper list after applying filters becomes directly a report when the "View Report" option is used.
Examples of practical use:
Pending accounts payable report:
Apply the status filter "PARTIAL" to see all the accounts that still have an outstanding balance. This allows you to quickly identify which suppliers have balances to pay.
Debt analysis by supplier:
Apply the creditor filter (select a specific supplier) to see all the accounts payable of that supplier, including those already closed and those pending.
High-value accounts payable:
Apply the value greater than filter (a significant amount) to identify the largest debts and prioritize their payment.
Old pending accounts:
Combine the status filter "PARTIAL" with the date less than filter (an old date) to identify accounts payable that have been pending payment for a long time.
Payment flow analysis:
Apply date filters to generate reports of payments made in a specific period, useful for treasury analysis.
This functionality turns the window into an ad-hoc accounts payable report generation tool without the need for additional modules.
Typical Workflow
Scenario 1: Account generated automatically from a purchase order
- A purchase order for a value of $1.000.000 is created and finalized.
- Upon completion, $600.000 is paid in cash.
- The system automatically creates an account payable for $400.000.
- The account appears in the list in OPEN status.
- Later, you go to the Accounts Payable List window.
- The accounts payable is selected.
- The "Apply Payment" button is clicked.
- The payment registration window opens.
- The payment value is entered ($400.000 for full settlement, or a smaller amount for a partial payment).
- The payment is confirmed.
- The account moves to CLOSED status (if it was a full settlement) or PARTIAL (if it was a partial payment).
- The payment appears in the bottom grid.
Scenario 2: Account created manually
- The need to record a debt with a supplier that does not come from a purchase order is identified (for example, a service received).
- You go to the Accounts Payable List window.
- Click the "Create Account" button.
- The account payable creation window opens.
- The supplier (creditor) is selected.
- The concept, total value and date are entered.
- The account is saved.
- The account appears in the list in OPEN status.
- Later, the necessary payments are made until the account is settled.
Scenario 3: Multiple partial payments
- There is an account payable of $1.000.000 in OPEN status.
- A first payment of $300.000 is made.
- The account changes to PARTIAL status.
- The lower grid shows the first payment with an outstanding balance of $700.000.
- Weeks later, a second payment of $400.000 is made.
- The account remains in PARTIAL status.
- The lower grid now shows two lines: the first payment and the second, with an outstanding balance of $300.000.
- Finally, a third payment of $300.000 is made.
- The account changes to CLOSED status.
- The lower grid shows three lines, one for each payment made.
Relationship with Other Windows
Purchase Orders List Window:
Accounts payable are linked to the purchase orders that originated them. From the purchasing module you can consult the accounts payable history of a specific supplier.
Cash Window:
When a payment is made against an account payable, the money leaves the cash. Cash movements are linked to the payments made.
Window List of Third Parties (Suppliers):
Provides the information of the suppliers that appear as creditors in the accounts payable.
Accounts Receivable List Window:
It is the counterpart of this window. While accounts payable are debts with suppliers, accounts receivable are outstanding balances of customers.
Window Create Purchase Order:
Upon finalizing a purchase order with partial payment, the corresponding account payable is generated automatically.
Usage Recommendations
Use the search box for quick location:
The real-time search box is the most efficient way to find specific accounts payable when some reference data is known, such as the supplier name.
Take advantage of the stackable filters:
Combine multiple filters to generate specific accounts payable reports by supplier, status, period or value. Filters are the key to accurate debt analysis.
Use "View Report" for treasury analysis:
After applying filters, use "View Report" to generate printable documents that reflect exactly the selected criteria. Ideal for payment planning meetings.
Monitor accounts in PARTIAL status:
Use the status filter "PARTIAL" to quickly identify all the accounts that still have an outstanding balance. This allows you to prioritize payments and manage cash flow.
Review old pending accounts:
Accounts that have been in PARTIAL status for a long time may indicate liquidity problems or long-term payment agreements. Use date filters to identify and manage them properly.
Pay in a timely manner:
Do not accumulate accounts payable without paying them. Keep a payment schedule to avoid problems with suppliers and maintain good business relationships.
Document the concepts:
Use the document notes to record relevant information about the account payable, especially for accounts created manually that do not have a clear source document.
Customize the columns:
Configure the visible columns according to your role and work needs. The system remembers your preferences.
Keep the record limit reasonable:
Do not excessively increase the record display period from the Configuration, since it will affect the system's performance.
Respect the status of the accounts:
Remember that accounts in PARTIAL or CLOSED status cannot be edited. If you need to modify an account, you must do so before making the first payment.
Delete only accounts in an appropriate status:
The Delete button only works for accounts in OPEN status. Respect this restriction to maintain historical integrity.
Reconcile accounts payable with suppliers:
Periodically reconcile the accounts payable with the suppliers' account statements to detect discrepancies or unrecorded payments.
Plan payments:
Use the accounts payable reports to plan the payments of the period, ensuring that there is enough liquidity in cash to cover the obligations.
Analyze the aging of balances:
Identify accounts payable with old outstanding balances and evaluate whether it is necessary to renegotiate payment terms or regularize the situation.
Train staff in the use of filters:
Filters are a powerful tool for debt analysis. Make sure that all the personnel who need to generate reports know how to use them correctly.
Integrate accounts payable with accounting:
If you have an external accounting system, periodically export the accounts payable information so that it is incorporated into the company's formal accounting.
Keep order in payments:
Keep strict control of the payments made, making sure that each payment is correctly recorded in the system.
Review accounts payable before new purchases:
Before making new purchases from a supplier, review whether there are pending accounts payable with that supplier to evaluate the overall financial situation.
Use manual accounts with judgment:
Although the system allows you to create accounts payable manually, use this functionality only when necessary. Most accounts should be generated automatically from purchase orders to maintain traceability.
Document the payments:
When you make payments, make sure to correctly document the concept and the payment reference to facilitate future reconciliation.
Monitor the cash flow:
Use the accounts payable information to project future payments and ensure that there is enough cash in the register to cover the obligations.
Kardex Tauro - Professional Inventory Management System
Created with HelpNDoc's Personal Edition: Maximize the efficiency of your documentation with a help authoring tool