Create Loan
CREATE LOANS AND CONSIGNMENTS window
General Description
The window Create Loans and Consignments is the module where the temporary delivery of products from the inventory to third parties (employees, salespeople, customers, workshops) is formalized, with the obligation that these products be returned later. This window serves multiple functions depending on the document status: create new consignments from scratch, edit existing consignments that have not been finished, or view already closed consignments in read-only mode.
This window has the same form, structure and procedure as the Warehouse Consumptions, Internal Transfers, Shrinkages and Returns windows, following the same design pattern as all the document creation windows in Kardex Tauro. However, it presents fundamental differences in its purpose and effects, since a consignment represents a temporary loan of products that must be reinstated, not a definitive outflow from the inventory.
What is a Loan or Consignment?
A Loan or Consignment is the document that formalizes the temporary delivery of products from the inventory to a third party, maintaining the company's ownership over those products. Unlike a sale, consumption, shrinkage or return, the merchandise is not lost or definitively transferred; it is delivered with the commitment that it will be returned (reinstated) in the future.
Key features:
- When finalizing it, deducts the stock on hand from the inventory (the products leave temporarily).
- Generates the corresponding entries in the Kardex as an outbound consignment.
- The products can be reinstated partially or totally using the "Reinstate" button of the List of Loans and Consignments window.
- As products are reinstated, the stock on hand gradually returns to the inventory.
- When all the loaned product has been reinstated, the document moves to FINISHED status.
- It does not generate accounts receivable or payable (it is a loan, not a sale).
- It validates that there are products available in the inventory before allowing the consignment.
- It can only be printed when it is closed or in later states.
- If the products use serial numbers, these are linked to the consignment and must match when reinstating.
- The main third party is the Consignee (who receives the products on loan).
Document statuses:
- Open: Document in editing process, products can be added or modified.
- Closed: Finished document, the products have been delivered to the consignee. It can no longer be edited. It can be printed. It can be reinstated.
- Partial: One or more reinstatements have been made, but there is still product left to return.
- Completed: All the loaned product has been completely reinstated. The loan cycle has been completed.
- Deleted: Document voided, visible only as a historical record.
Typical use cases:
- Tools or equipment delivered to employees for their work
- Products delivered to external salespeople so that they offer them to their customers
- Machinery or equipment sent to workshops for repair
- Products in the possession of customers for testing or demonstration
- Merchandise sent to fairs or events for exhibition
- Products delivered to distributors under a sale-with-return agreement
- Commercial samples delivered temporarily
Window Structure
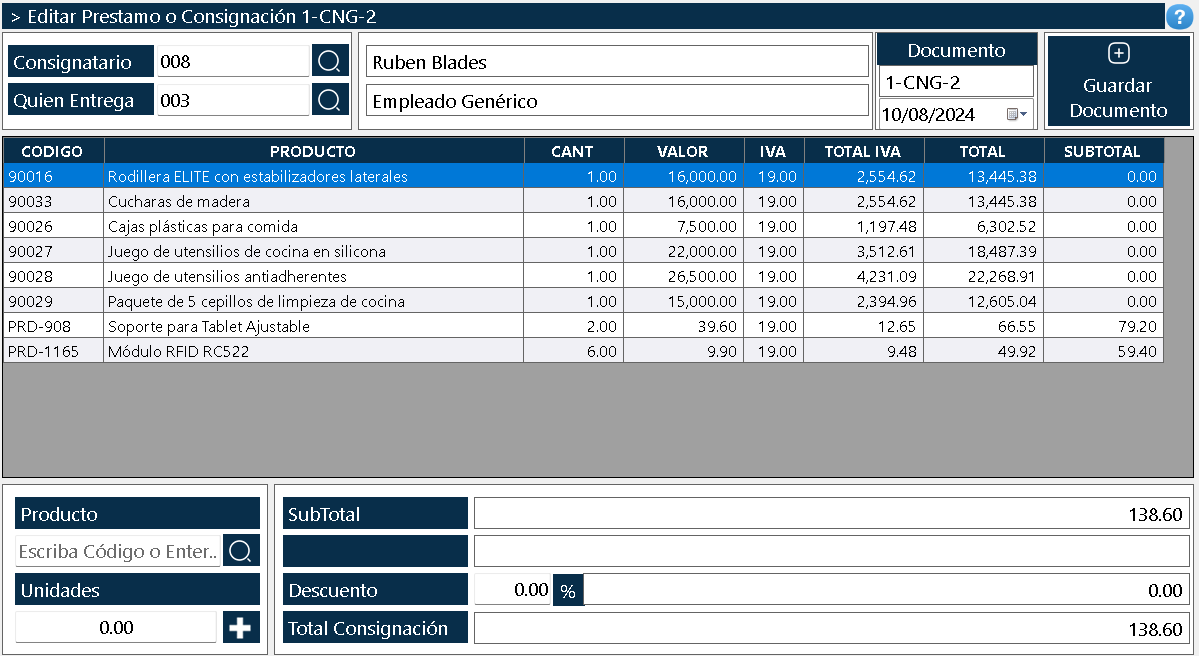
The window is organized into several clearly differentiated zones:
Upper Zone - Third Party Selectors
In the upper part there is a double selector that identifies the parties involved in the consignment:
Consignee Selector:
It allows selecting the third party (employee, salesperson, customer, workshop) who receives the products on loan. The selector works in three complementary ways:
- Text field: The consignee code can be typed directly.
- Search button: When you click the button with the magnifying glass icon, a dialog box opens where you can search for and select the consignee from a complete list.
- Name label: It automatically shows the name of the selected consignee.
Deliverer Selector:
It allows identifying which employee of the company is delivering the products to the consignee. It works in the same way as the consignee selector, with a text field, magnifying glass button and name label.
Real-time validation:
If a nonexistent consignee or person delivering code is entered in either of the two selectors, the field is set with red background color, immediately indicating that this code does not exist in the database. This validation also runs before saving the document, guaranteeing that both third parties really exist.
Mandatory requirement:
Both selectors are required in order to carry out the consignment: the consignee and the person delivering. Without both, the system will not allow you to save the document.
Upper Zone - Document Information
Document number:
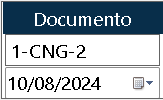
- When a new consignment is being created, the word appears in this field "NEW", indicating that the document has not yet been saved and therefore has no assigned number.
- After saving the document, the system automatically assigns a unique consecutive number.
Date selector:
It allows setting the consignment date. By default it takes the current date, but it can be modified if necessary.
Save Document Button:
At the top right there is a large, prominent button that says "Save document". This button starts the process of saving and finalizing the document.
Central Product Grid
Central Area - List of Loaned Products
In the center of the window there is a grid that shows the products that are going to be loaned to the consignee. The columns of the grid are:
- Code: Unique identifier of the product.
- Name: Product description.
- Quantity: Number of units being loaned.
- Amount: Unit value of the product.
- Total IVA: IVA amount in money.
- Total: Total value of the product including IVA.
- Subtotal: Value of the product before IVA.
By default, this grid appears empty when a new consignment is created. Products are added using the controls located at the bottom.
Add Products to the Consignment
Bottom Left Zone - Product Selector
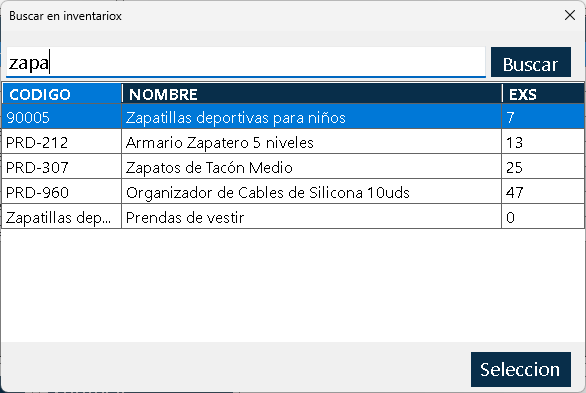
To add products to the consignment, the controls located in the lower left are used:
Product selector:
- Text field: The product code can be typed directly.
- Magnifier button: Clicking the button with the magnifying glass icon opens a dialog box where the product can be searched for and selected from a complete drop-down list.
Units field:
Numeric field where you type the number of units that are going to be loaned of the selected product.
Add button:
A button with the "+" symbol that transfers the selected product with the specified quantity to the central product grid.
Adding process:
- Select the product in the selector (by code or with the magnifying glass).
- Enter the number of units to loan.
- Click the "+" button.
- The product is automatically added to the central grid.
- As many products as necessary can be added.
Stock on hand validation:
The system automatically validates that there are products available in the inventory. If you try to type a quantity greater than the stock on hand, the control turns red, indicating that you cannot loan more than you have. This validation prevents loans of unavailable products.
Existing product validation:
If the code of a nonexistent product is entered in the selector, the control turns red, indicating that this product does not exist in inventory. This visual aid prevents typing errors.
Editing Products in the Grid
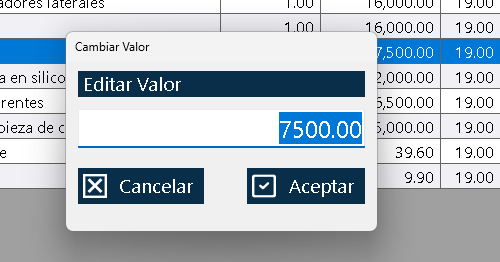
Once the products have been added to the central grid, it is possible to modify their information before finalizing the document:
Quantity editing:
To modify the quantity of a product already added:
- Select the product by clicking on it in the grid.
- Double-click the "Quantity" column.
- A small window is displayed where the new number can be written.
- The system validates that the new quantity does not exceed the available stock on hand.
- Totals are recalculated automatically.
Amount and IVA editing:
The unit value and the IVA percentage of each product can be modified by double-clicking the corresponding columns. When any of these values is changed, the system automatically recalculates the subtotals, IVA and totals of the product and of the entire document.
Financial Information of the Consignment
Lower Right Zone - Financial Summary
To the right of the product selector the consolidated financial information of the consignment is shown. This information is simple and direct:
- SubTotal: Total value of the loaned products before VAT.
- Total Consignment: Final value of the consignment including VAT.
Differences with other windows:
In the consignment, the following are NOT shown:
- Detailed taxable base.
- Discount information.
- Payment information, cash, credit or change (there is no financial transaction, it is a loan).
These totals are automatically recalculated every time the quantities, values or IVA of the products in the grid are modified.
Saving and Finalizing the Document
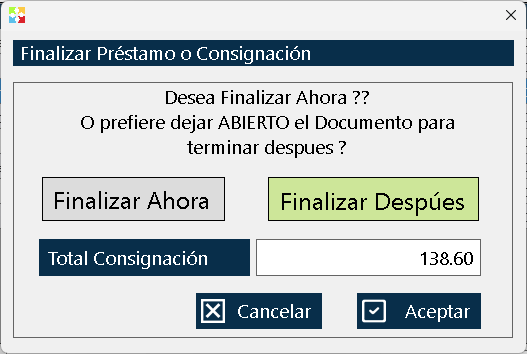
The saving process is similar to that of other windows: when clicking the button "Save document", the system shows a confirmation pop-up window that allows deciding the status of the document.
"Finish Loan or Consignment" window
This pop-up window presents the following options:
Information displayed:
- The Total of the Consignment for informational purposes.
- NO payment information is displayed (cash, credit, change) because a consignment does not generate financial transactions.
Main question:
"Do you want to finish now or do you prefer to leave the document open to finish it later?"
Available options:
Finalize now:
- The document is completely finished and closed.
- It can no longer be edited.
- Moves to the status CLOSED.
- The document can be printed.
- The stock on hand is automatically deducted from inventory.
- The corresponding entries are generated in the Kardex.
- The document is ready to accompany the physical delivery of the products to the consignee.
- The "Reinstate" button is enabled in the List of Loans and Consignments window to begin recording the returns.
Finalize later:
- The document remains in draft or "open" status.
- It can continue to be edited at any future time.
- Products can be added, modified or deleted later.
- It cannot be printed.
- It does not affect inventory or Kardex yet.
- Useful when the consignment is incomplete or additional information is being awaited.
Critical implications of the choice:
The decision between finishing now or later is fundamental because it determines whether the inventory and the Kardex are updated:
- If it is finished later, the document remains editable but has no effect on the inventory or the Kardex. The products are not deducted until it is finalized.
- If you finish now, the document is locked for editing, moves to CLOSED status, and the inventory and the Kardex are automatically updated. The products are deducted and recorded as loaned to the consignee.
Recommendation:
You should only choose "Finish now" when you are completely sure that all the products to be loaned are correctly recorded, the physical inventory matches what is going to be recorded, and the merchandise is going to be physically delivered to the consignee.
Document Life Cycle and Statuses
Once the consignment is finished, the document goes through different states as the reinstatements are made:
CLOSED status:
- The document is finished and the products have been delivered to the consignee.
- It cannot be edited.
- It can be printed.
- It can be reinstated (it is the status where the consignee is expected to return the products).
- The stock on hand is deducted from the inventory.
- It is the status where the document remains while the reinstatement is awaited.
PARTIAL status:
- One or more reinstatements have been made from the List of Loans and Consignments window.
- There is still product left to return.
- It cannot be edited.
- It can be printed.
- You can continue reinstating the pending product.
- It is an intermediate status where the return process is in progress.
FINISHED status:
- All the loaned product has been completely reinstated.
- It cannot be edited.
- It can be printed.
- It can no longer be reinstated (there is no pending product).
- The stock on hand has completely returned to the inventory.
- The loan cycle has been completed successfully.
Typical status flow:


1
2
3
4
5
System Validations
The window implements several validations to guarantee data integrity:
Real-time third party validation:
- If a nonexistent consignee or person delivering code is entered, the field immediately gets a red background.
- This validation also runs before saving the document.
Product validation:
- Only products that exist in inventory can be added.
- If a nonexistent product code is typed, the control turns red.
- The product selector with the magnifying glass only shows valid products.
Stock on hand validation:
- The available quantities in inventory are validated.
- You cannot loan more units than are available.
- If an attempt is made to type a quantity greater than the stock on hand, the control turns red.
- This validation prevents loans of unavailable products.
Quantity validation:
- Quantities must be positive numbers.
- The system does not allow negative or zero quantities.
Amount validation:
- Unit values must be valid numbers.
- IVA percentages must be within valid ranges.
Validation on finalizing:
- The system verifies that there is at least one product in the consignment before allowing you to finish.
- All totals are recalculated to guarantee consistency.
- It validates that the two mandatory selectors (consignee and person delivering) have been captured.
Typical Workflow
The complete process of creating a loan or consignment follows these steps:
Step 1: Identify the actors
- Open the "Create Loans and Consignments" window.
- Select the consignee using the text field or the magnifying glass button.
- Verify that the name appears correctly (field without a red background).
- Select who delivers the products.
- Verify that both selectors are correctly identified.
Step 2: Add products
- For each product to loan:
- Select the product in the bottom selector (by code or with the magnifying glass).
- Verify that the code is valid (no red background).
- Enter the number of units to loan.
- Verify that the quantity does not exceed the available stock on hand (no red background).
- Click the "+" button to add it to the central grid.
- Repeat for all the required products.
Step 3: Adjust information
- Review the central product grid.
- If necessary, double-click quantities, values or IVA to edit.
- Verify that the totals (SubTotal and Total Consignment) are correct.
Step 4: Save the document
- Click the "Save document" button at the top right.
- The "Finish Loan or Consignment" window opens.
Step 5: Decide the document status
- If the consignment is incomplete: Choose "Finish later" to continue editing later.
- If the consignment is complete and is going to be delivered: Choose "Finish now" to close the document, deduct the inventory and generate the entries in the Kardex.
Step 6: Confirm effects
- If "Finalize now" was chosen:
- The document is closed and moves to CLOSED status.
- The inventory is automatically updated with the deduction of the loaned products.
- The entries are generated in the Kardex.
- The document can be printed to accompany the physical delivery.
- The "Reinstate" button is enabled in the List of Loans and Consignments window.
Step 7: Deliver the products
- Print the consignment document.
- Physically deliver the products to the consignee.
- The consignee signs the document as proof of receipt.
- The printed document serves as support for the loan.
Step 8: Manage the reinstatements
- When the consignee returns products, go to the "List of Loans and Consignments" window.
- Select the corresponding consignment.
- Click the "Reinstate" button.
- Specify which products and in what quantities are being returned.
- The document will move to PARTIAL or FINISHED status as applicable.
Relationship with Other Windows
Loans and Consignments List window:
It shows all the consignments created, allowing you to search, filter, view, print, reinstate and delete consignments. It is the management center of the loan process and control of assets in the possession of third parties. From this window the "Reinstate" button is used to record the product returns.
Inventory Window:
It is automatically updated when a consignment is finished, deducting the stock on hand of the loaned products. As products are reinstated, the stock on hand gradually returns to the inventory.
Kardex Window:
It automatically records the outbound movement when a consignment is finished. Each reinstatement generates an inbound movement. Complete traceability of the loan and return cycle is maintained.
Third Parties List Window:
It provides the list of employees, salespeople, customers or workshops used in the selectors of this window.
Serial Numbers List Window:
If the loaned products use serial numbers, the serial numbers captured during the consignment are recorded and can be consulted from this window. The reinstated serial numbers are also recorded.
Usage Recommendations
Always verify the third parties
Before adding products, make sure that both the consignee and the person delivering are correctly selected. Check that the fields do not have a red background, which would indicate nonexistent codes.
Use the magnifying glass search when you do not know the codes
If you do not remember the exact code of a consignee or product, use the magnifying glass button to search by name. It is more practical and avoids typing errors.
Respect the stock on hand validations
If the control turns red when typing a quantity, it means that there is not enough stock on hand. Do not try to force the system; verify the real inventory or adjust the quantity.
Document the expected return date
Use the document notes to record when the consignee is expected to return the products. This makes tracking and control easier.
Add products accurately
Carefully verify the quantities before adding each product. Although they can be edited later (if the document is not finalized), it is more efficient to do it correctly from the start.
Edit directly in the grid
Take advantage of the double-click functionality to edit quantities, values and IVA directly in the central grid. It is faster than deleting and re-adding products.
Review the totals before saving
Make sure that the SubTotal and Consignment Total correctly reflect the products to be loaned. These values will be the ones recorded in the Kardex.
Carefully decide between finishing now or later
- Choose "Finish later" only if you really need to continue editing later.
- Choose "Finish now" only when the consignment is complete and is going to be delivered physically.
- Remember that only upon finalizing is the inventory deducted and the entries generated in the Kardex.
Print the document for delivery
Once finished, print the consignment to physically accompany the products during delivery to the consignee. The consignee must sign as proof of receipt.
Do not finalize prematurely
If you have doubts about any product, quantity, or value, it is better to save with "Finish later" and review before definitively processing the consignment.
Keep traceability of serial numbers
If the loaned products use serial numbers, make sure to correctly capture the serial numbers during the consignment process to maintain complete traceability of serialized equipment or tools.
Manage reinstatements in a timely manner
As the consignee returns products, record the reinstatements immediately from the List of Loans and Consignments window to keep control up to date.
Monitor pending consignments
Use the List of Loans and Consignments window to identify consignments in CLOSED or PARTIAL status that require follow-up. Actively follow up with consignees to ensure they return the products.
Train the staff
Make sure that all employees who manage loans or consignments understand how the system works, the automatic validations, and the importance of correctly documenting the information.
Establish loan policies
Clearly define who can authorize loans or consignments, especially for high-value products or loans to external third parties.
Document the reason for the loan
Use the document notes to record why the products are being loaned (repair, external sale, demonstration, work tool, etc.). This information is valuable for analysis and control.
Reconcile periodically
Compare active consignments with the physical inventory held by third parties to detect discrepancies or unreported products.
Analyze loan patterns
Use the reports in the List of Loans and Consignments window to identify which third parties request the most loans, which products are loaned most frequently, and optimize the loan and reinstatement processes.
Establish maximum terms
Define maximum deadlines for the return of loaned products and actively follow up on consignments that exceed those deadlines.
Integrate consignments with audits
Consignments are an important component in fixed asset and inventory audits. Keep clear and up-to-date records to facilitate the audit process.
Document with signed proof records
Always obtain the consignee's signature on the printed document at the time of delivery. This proof is essential for resolving disputes or losses.
Review old consignments
Periodically review consignments in CLOSED status that have gone a long time without reinstatements. They may indicate problems, oversights, or products that must be regularized.
Use partial reinstatements when necessary
The consignee does not need to return all the product at once. Partial reinstatements can be made as the consignee returns the products.
Train the consignees
Make sure that the third parties who receive products on loan understand their responsibility to return the products and are familiar with the reinstatement process.
Kardex Tauro - Professional Inventory Management System
Created with HelpNDoc's Personal Edition: Produce electronic books easily