POS Printer
POS PRINTER TAB - CONFIGURATION WINDOW
GENERAL DESCRIPTION
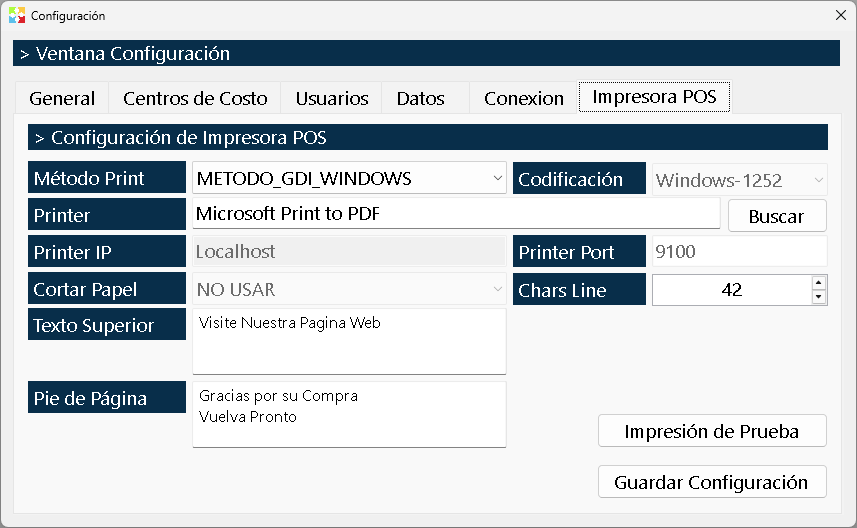
The POS Printer Tab is the exclusive module of the Configuration window intended to establish communication between Kardex Tauro and the point-of-sale (POS) thermal printer.
Exclusive Purpose: This configuration is used exclusively to print the receipts or sales invoices in POS format (ticket format). It is important to note that these tickets can only be printed from sales invoices that have already been completed/closed.
Note: Any other report, large invoice or system document will be printed using the Windows default printer, completely ignoring this configuration.
The system offers four different connection methods to guarantee that, regardless of the brand, model or type of connection of your thermal printer, the program can communicate with it and print correctly.
CONNECTION METHODS
At the top of the tab is the "Connection method" selector. Depending on how your printer is physically or network connected, you must choose one of the following four options:
1. Windows GDI Method
- Description: It uses the standard drivers installed in the Windows operating system.
- Configuration: When selecting this method, a standard Windows dialog box appears for you to select the printer installed on your computer.
- When to use it: It is the simplest and recommended option if your thermal printer is already installed correctly in Windows and works when printing from Notepad or any other program.
2. Direct Port Method
- Description: The program sends the data directly to the physical port of the computer (such as COM1, COM2, LPT1, virtual USB, etc.) without going through the Windows spooler.
- Configuration: It requires manually writing the name of the port to which the printer is connected.
- When to use it: Ideal for dot-matrix or old thermal printers, or when the Windows drivers generate conflicts or slowness. This method enables the advanced encoding and paper cutting settings (see below).
3. TCP/IP Method (Network)
- Description: It is used for POS printers connected to the local network (Ethernet or Wi-Fi).
- Configuration: Requires entering the IP Address of the printer and the Port of communication (usually 9100).
- When to use it: When the printer is not connected by USB or serial cable to the PC, but is on a shared network. Like the direct port, this method enables the advanced encoding and paper cutting settings.
4. Shell Print Method
- Description: It uses the default printing function configured in the operating system registry for the print.
- Configuration: It does not require additional port or IP parameters.
- When to use it: It is a "wildcard" or fallback method. If the GDI, Direct Port and TCP/IP methods fail to print, this method tries to force printing using the native system associations.
ADVANCED CONFIGURATION (Direct Port and TCP/IP only)
If you select the Direct Port Method or the TCP/IP Method, the system enables critical options for the correct operation of specific thermal printers:
A. Character Encoding (Encoding)
Thermal printers do not use Windows fonts, but their own character tables. If when printing the receipts the letters such as accents (á, é, í) or the "ñ" come out as strange symbols, you must change this setting.
- Available options: The program suggests multiple standards so that you can find the one your printer understands.
- Most common:
- Windows-1252 (Latin standard).
- Windows-1250 (Central Europe).
- IBM-437 (US/legacy standard).
- IBM-850 (Latin multilingual standard).
- Recommendation: Try with Windows-1252 or IBM-850 first. If the accents are still wrong, try the others until you find the correct one.
B. Paper Cut Commands
It allows specifying whether the printer should cut the paper when finishing the ticket and which hexadecimal command to send to achieve it.
- Option: Cut paper / Do not cut paper.
- Supported brands: The system includes the standard commands of the main brands on the market: Epson, Star Micronics, Bixolon, Zebra, Citizen, Samsung, among others.
- Recommendation: Select the brand of your printer. If your printer is generic or "cloned", the standard method of Epson usually works for 90% of the thermal printers on the market.
TICKET CUSTOMIZATION
In the central zone of the tab are the fields to adapt the ticket content to the corporate image and the paper size:
1. Header and Footer Texts
- Top Text: It is the message that will be printed in the ticket header, just below the company data. Ideal for greetings or promotions (E.g.: "Welcome to our store", "Visit our website: www.ejemplo.com").
- Footer: It is the message that will be printed at the end of the ticket, before the barcode or the cut. Ideal for thanks or policies (E.g.: "Thank you for your purchase", "Keep this ticket for any return").
2. Characters per Line (Chars per line)
- Description: It is a numeric field that defines how many characters fit in a single horizontal line of the thermal paper.
- Importance: It is critical for the receipt format. If this number is incorrect, the text will look cut off, misaligned or with excessive blank spaces.
- Standard values:
- For 58 mm: Generally 32 characters per line.
- For 80 mm: Generally 42 or 48 characters per line.
- Recommendation: Adjust this number based on the test print until the margins and the total columns look perfectly aligned.
ACTION BUTTONS
At the bottom of the tab are two fundamental buttons to validate and apply the configuration:
|
Button |
Function |
|
Test print |
It sends a test ticket to the printer with the current configuration. If the communication is successful, the system will show a message on screen saying: "Printer connected, OK". If there is a port, IP or driver error, it will show a failure message. |
|
Save configuration |
It persists all the changes made in the tab (method, port, encoding, texts, etc.). If you do not click here, the configuration will not be applied when leaving the window. |
USAGE RECOMMENDATIONS AND TROUBLESHOOTING
- The logical configuration order:
- First select the Connection method correct one.
- Then configure the Port or IP.
- Adjust the Characters per line.
- Click on Test print.
- If it prints but the accents come out wrong, adjust the Encoding.
- If it prints well but does not cut, adjust the Cut command.
- Finally, click on Save configuration.
- The printer does not respond when clicking "Test print":
- If you use GDI, verify in Windows that the printer is not "Offline" or "Paused".
- If you use Direct Port, confirm in the Windows Device Manager the exact COM port number.
- If you use TCP/IP, make sure the printer IP is static (it does not change when restarting the router) and that the port (usually 9100) is not blocked by the Windows Firewall.
- The ticket comes out with strange symbols instead of accents:
- This is a problem of Encoding. Change the encoding method (e.g. from IBM-437 to Windows-1252) and do the test print again until the letters read correctly.
- The ticket comes out cut off or with misaligned totals:
- This is a problem of Characters per line. If you use 80mm paper and have 32 configured (which is for 58mm), the printer will cut off the text. Increase the number of characters per line until the format looks centered and complete.
- The printer does not cut the paper at the end:
- Make sure the "Cut paper" option is enabled.
- Try changing the cutting command standard. If your printer is an "Epson TM-T20" but it does not cut, try selecting "Standard" or "Star Micronics", since many generic Chinese printers emulate commands of specific brands slightly differently.
- Exclusive use for closed sales:
- Remember that from the window of Sales Invoice List, the option to print a POS ticket will only be available (or will only work correctly) if the selected invoice has the status CLOSED. Invoices in "Open" or "Draft" status must not be printed as a definitive fiscal ticket.
Created with HelpNDoc's Personal Edition: Creating CHM, PDF, DOC and HTML help from a single place