User Permissions
USER PERMISSIONS Window
GENERAL DESCRIPTION
The window User Permissions is the access control and security module of Kardex Tauro. Unlike other systems that use predefined roles (such as "Administrator", "Salesperson" or "Warehouse Keeper"), Kardex Tauro implements a system of granular permissions that confer specific and independent capabilities to view or execute each system process.
This granular approach offers a unprecedented flexibility in the access configuration, allowing user profiles to be designed exactly tailored to each person's operational needs, without being limited to preset roles.
⚠️ FUNDAMENTAL PRINCIPLE: When a new user is created in Kardex Tauro, has no permission assigned. This means that, initially, the user cannot perform any operation in the system. It is the administrator's responsibility to explicitly assign the necessary permissions so that the user can perform their functions.
WINDOW INTERFACE
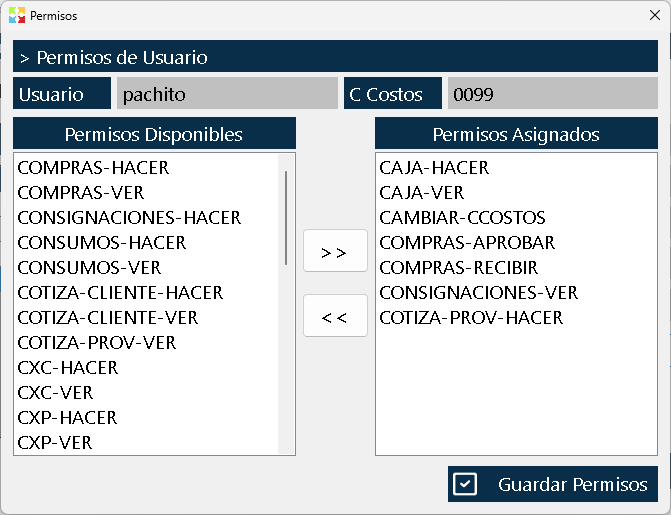
The window is organized into three clearly differentiated areas:
Top Area - User Identification
Shows the basic information of the user being configured:
- User name: Identification of the user whose permissions are being edited.
- Assigned cost center: Warehouse or branch where the user will operate by default.
⚠️ IMPORTANT ABOUT THE COST CENTER:
- Each user is assigned to a single cost center.
- The user cannot see or interact with other warehouses or cost centers.
- Exception: If the permission is assigned "Change cost center", the user will be able to switch between different warehouses during their session.
- This restriction guarantees the segregation of operations between branches and prevents unauthorized access to information from other locations.
Central Area - Permission Management
Two parallel lists with transfer buttons:
Left List - "Available Permissions":
- Contains all the permissions that the system offers.
- Represents the complete catalog of configurable capabilities.
- The permissions not assigned to the user remain here.
Right List - "Assigned Permissions":
- Contains the permissions currently active for the user.
- In a newly created user, this list appears completely empty.
- The permissions here are the ones the user can use.
Transfer Buttons (located between both lists):
- Button with arrows (→): Transfers the selected permission from "Available" to "Assigned".
- Button with arrows (←): Removes the selected permission from "Assigned", returning it to "Available".
Lower Zone - Action Button
- "Save permissions" Button: Only action available at the bottom. Persists the changes made in the permission lists.
PERMISSION ASSIGNMENT METHODS
Kardex Tauro offers two intuitive methods to transfer permissions between the lists:
Double-Click Method (Recommended)
To assign a permission:
- Locate the desired permission in the list "Available Permissions" (left).
- Click double-click on the permission.
- The permission will be transferred automatically to the list "Assigned Permissions" (right).
To remove a permission:
- Locate the permission in the list "Assigned Permissions" (right).
- Click double-click on the permission.
- The permission will automatically return to the list "Available Permissions" (left).
Advantages:
- Faster and more efficient method.
- Ideal for assigning individual permissions.
- Reduces the number of necessary clicks.
Transfer Button Method
To assign a permission:
- Select the permission in the list "Available Permissions" (a single click).
- Click the button with arrows pointing to the right (→).
- The permission will be transferred to the list "Assigned Permissions".
To remove a permission:
- Select the permission in the list "Assigned Permissions".
- Click the button with arrows pointing to the left (←).
- The permission will return to the list "Available Permissions".
Advantages:
- Traditional method, familiar to users of other systems.
- Allows visual review before confirming the transfer.
Confirmation of Changes
⚠️ CRITICAL RULE: The changes made in the lists are NOT applied automatically. It is mandatory to click the button "Save permissions" for the changes to take effect.
- If you close the window without saving, the changes will be lost.
- The system does not request confirmation when closing without saving.
- The saved changes immediately affect the user, who will be able to (or will no longer be able to) perform the corresponding operations.
COMPLETE PERMISSION CATALOG
Kardex Tauro offers a wide range of granular permissions. Below is the complete catalog organized by modules:
Cash Permissions
|
Permission |
Type |
Description |
|
View cash |
Query |
Allows opening and viewing the cash window |
|
Operate cash |
Operation |
Allows performing cash movements (opening, closing, cash count) |
Cost Center Permissions
|
Permission |
Type |
Description |
|
Change cost center |
Navigation |
Allows the user to operate in different warehouses/branches |
Purchasing Permissions
|
Permission |
Type |
Description |
|
View purchases |
Query |
Allows viewing the purchasing module |
|
Approve purchases |
Authorization |
Allows approving purchase orders |
|
Make purchases |
Operation |
Allows creating and managing purchase orders |
|
Receive purchases |
Operation |
Allows receiving merchandise against purchase orders |
Consignment Permissions
|
Permission |
Type |
Description |
|
View consignments |
Query |
Allows viewing the consignments module |
|
Make consignment |
Operation |
Allows creating and managing consignments |
Consumption Permissions
|
Permission |
Type |
Description |
|
View consumptions |
Query |
Allows viewing the internal consumptions module |
|
Make consumptions |
Operation |
Allows recording internal product consumptions |
Customer Quotation Permissions
|
Permission |
Type |
Description |
|
View customer quotation |
Query |
Allows viewing customer quotations |
|
Make customer quotation |
Operation |
Allows creating and managing quotations for customers |
Supplier Quotation Permissions
|
Permission |
Type |
Description |
|
View supplier quotation |
Query |
Allows viewing supplier quotations |
|
Make supplier quotation |
Operation |
Allows requesting and managing quotations from suppliers |
Accounts Receivable Permissions
|
Permission |
Type |
Description |
|
View accounts receivable |
Query |
Allows viewing the accounts receivable module |
|
Make accounts receivable |
Operation |
Allows managing accounts receivable (credits, adjustments) |
Accounts Payable Permissions
|
Permission |
Type |
Description |
|
View accounts payable |
Query |
Allows viewing the accounts payable module |
|
Make accounts payable |
Operation |
Allows managing accounts payable (payments, adjustments) |
Return Permissions
|
Permission |
Type |
Description |
|
View returns |
Query |
Allows viewing the returns module |
|
Make returns |
Operation |
Allows processing merchandise returns |
Group Permissions
|
Permission |
Type |
Description |
|
View groups |
Query |
Allows viewing the groups and subgroups window |
|
Make groups |
Operation |
Allows creating, editing and deleting groups and subgroups |
Warehouse Receipt Permissions
|
Permission |
Type |
Description |
|
View warehouse receipts |
Query |
Allows viewing the warehouse receipts window |
|
Make warehouse receipts |
Operation |
Allows recording direct merchandise receipts |
Inventory Permissions
|
Permission |
Type |
Description |
|
View inventory |
Query |
Allows opening and viewing the inventory window |
|
Create inventory |
Operation |
Allows creating and editing products in inventory |
Kardex Permissions
|
Permission |
Type |
Description |
|
View Kardex |
Query |
Allows viewing the Kardex (movement history) |
|
Kardex plus |
Operation |
Allows performing positive adjustments in the Kardex |
|
Kardex minus |
Operation |
Allows performing negative adjustments in the Kardex |
Shrinkage Permissions
|
Permission |
Type |
Description |
|
View shrinkages |
Query |
Allows viewing the shrinkage module |
|
Make shrinkages |
Operation |
Allows recording shrinkages and inventory losses |
Production Permissions
|
Permission |
Type |
Description |
|
View production |
Query |
Allows viewing the production orders module |
|
Make production |
Operation |
Allows creating and executing production orders |
Reinstatement Permissions
|
Permission |
Type |
Description |
|
View reinstatements |
Query |
Allows viewing the reinstatement module |
|
Make reinstatements |
Operation |
Allows processing customer returns (reinstatements) |
Third Party Permissions
|
Permission |
Type |
Description |
|
View third parties |
Query |
Allows viewing the third parties window (customers, suppliers) |
|
Make third parties |
Operation |
Allows creating, editing and managing third parties |
Internal Transfer Permissions
|
Permission |
Type |
Description |
|
View internal transfers |
Query |
Allows viewing the transfers between warehouses module |
|
Make internal transfers |
Operation |
Allows creating and managing transfers between warehouses |
Sales Permissions
|
Permission |
Type |
Description |
|
View sales |
Query |
Allows viewing the sales module |
|
Make sales |
Operation |
Allows creating and processing sales |
Print Permissions
|
Permission |
Type |
Description |
|
Print permission |
Operation |
Allows printing documents (invoices, reports, labels) |
VIEW vs DO PRINCIPLE: THE DUALITY OF PERMISSIONS
One of the most important concepts in Kardex Tauro is the distinction between permissions of query (View) and permissions of operation (Make). This duality is essential for implementing effective security controls.
"View" Permissions (Query)
Features:
- They grant only visual access to the window or module.
- They allow viewing information without modifying it.
- They do not allow creating, editing, deleting or executing operations.
- They are the minimum basis for a user to be able to "view" something in the system.
Examples:
- View inventory: The user can open the inventory window and see products, stock on hand and prices, but cannot create new products or edit existing ones.
- View sales: The user can see the history of completed sales, but cannot create new sales.
- View Kardex: The user can consult the movement history, but cannot make adjustments.
"Make" Permissions (Operation)
Features:
- They grant the ability to execute operations in the module.
- They allow create, modify, delete or process documents.
- They require the corresponding "View" permission to work (you cannot "do" without being able to "view").
- They are the permissions that truly enable user productivity.
Examples:
- Make sales: The user can create new sales, but also needs "View sales" to access the module.
- Create inventory: The user can create and edit products, but also needs "View inventory".
- Make purchases: The user can create purchase orders, but needs "View purchases".
The Golden Rule: "View" + "Do" = Complete Functionality
For a user to be able to fully perform a function, they need both permissions:
Practical example - Salesperson:
- ❌ Only "View sales": Can see sales but not create them. INCOMPLETE
- ❌ Only "Do sales": The system does not allow access to the module. INCOMPLETE
- ✅ "View sales" + "Do sales": Can see and create sales. COMPLETE
5.4 Print Permissions: A Special Case
The print permission is independent and transversal to all modules. It controls the ability to generate physical or digital documents from any window in the system.
Behavior:
- Without this permission, the user can view and operate in the modules, but cannot print any document.
- With this permission, the user can print from any module where they have access.
- It is a permission unique (there is no "view printing" or "do printing", only "printing permission").
Complete example - Salesperson with printing capability:
✅ View sales → Can open the sales module
✅ Do sales → Can create and process sales
✅ Printing permission → Can print invoices, tickets, reports
Without the print permission:
✅ View sales → Can open the sales module
✅ Do sales → Can create and process sales
❌ Printing permission → CANNOT print invoices (limitation)
USER TYPES IN KARDEX TAURO
Kardex Tauro handles two fundamental types of users, each with distinct characteristics and capabilities:
Administrator User
Main features:
- Total access: It implicitly has all the permissions of the system.
- Without restrictions: Can access any window, module or operation.
- Does not require permission assignment: The system does not allow (nor need) assigning individual permissions to an administrator.
- Access to configuration: Only administrators can open the window of Configuration, where the permissions of the other users are managed.
- User management: Can create, edit and delete system users.
Typical use cases:
- Managers or business owners.
- IT staff or technical support.
- Accountants or auditors who need full access.
- General supervisors with responsibility over all operations.
Security considerations:
- There must be minimum administrator users in the system.
- Each administrator must have a robust and unique password.
- Administrator actions should be documented and audited.
- Do not share administrator credentials among multiple people.
Normal User (User)
Main features:
- Restricted access: Can only perform operations for which they have explicit permissions.
- Requires permission assignment: When created, they have no permissions. They must be configured by an administrator.
- Limited to its cost center: Can only operate in the assigned warehouse/branch (unless they have the "Change cost center" permission).
- No access to configuration: Cannot open the Configuration window or manage permissions.
Typical use cases:
- Point-of-sale salespeople.
- Warehouse keepers or warehouse staff.
- Cashiers.
- Buyers.
- Customer service staff.
- Production operators.
Advantages of the granular approach:
- Allows creating users with permissions exactly adjusted to their functions.
- Reduces the risk of unauthorized operations.
- Facilitates compliance with segregation of duties policies.
- Allows precise audits of who can do what.
The Super-Administrator (super-admin)
Special features:
- Permanent user: It exists since the system installation and cannot be deleted.
- Immutable: It cannot be edited, modified or disabled.
- Maximum authority: Has all permissions implicitly and is the only user that guarantees access to the system under any circumstance.
- Security backup: If all the other administrators lose their credentials or are deleted, the super-admin can still access the system.
Importance of the super-admin:
- Access recovery: It is the last resort if the credentials of other administrators are lost.
- Continuity guarantee: Ensures that there is always at least one user with full access to the system.
- Reference point: Serves as a reference for initial configurations.
Security recommendations:
- Protect the super-admin password with the maximum level of security.
- Do not use the super-admin for daily operations; use it only for critical administrative tasks.
- Document the password in a safe place (enterprise password manager, safe).
- Change the password periodically following security policies.
- Limit the knowledge of the super-admin password to people of maximum trust.
ACCESS TO THE PERMISSIONS WINDOW
The User Permissions window is protected by multiple layers of security:
Access Requirements
To access the User Permissions window, the following must be met all the following conditions:
- Be an Administrator type user: Only administrators can manage permissions.
- Have access to the Configuration window: This window is only visible to administrators.
- Be authenticated: You must have logged in with valid credentials.
Behavior for Normal Users
If a normal user (non-administrator) tries to access the Configuration window:
- The menu option will not appear or will be disabled.
- If they somehow try to open it, the system will show an informative message indicating that they do not have permissions.
- No system error is generated; access is simply restricted.
WORKFLOW TO ASSIGN PERMISSIONS
Below is the complete process for configuring a user's permissions:
Step 1: Access as Administrator
- Log in to Kardex Tauro with administrator credentials.
- Verify that you have access to the Configuration window.
Step 2: Navigation to the User
- Open the window of Configuration.
- Find the section of Users.
- Select the user you want to configure from the list.
- Open the window of User Permissions for that specific user.
Step 3: Verification of Top Information
- Confirm that the user name shown is correct.
- Verify the cost center assigned.
- If you need to change the cost center, do it before assigning permissions.
Step 4: Identification of Necessary Permissions
Before assigning permissions, determine what functions the user will perform:
Key questions:
- Which modules does the user need to use?
- Does the user need only to query or also to operate?
- Does the user need to print documents?
- Do they require access to multiple cost centers?
- Do they need to approve operations of other users?
Step 5: Permission Assignment
Recommended method (double-click):
- Review the list of "Available Permissions" (left).
- Identify the permissions needed for the user.
- For each required permission:
- Click double-click on the permission.
- The permission will be transferred to "Assigned Permissions" (right).
- Repeat until you have all the necessary permissions.
Step 6: Verification of Assigned Permissions
- Review the list of "Assigned Permissions" (right).
- Confirm that it contains all the necessary permissions.
- Verify that there are no unnecessary or excessive permissions.
- Make sure the "View" and "Do" permissions are balanced as appropriate.
Step 7: Saving Changes
- Click the button "Save permissions" at the bottom.
- The system will confirm the save.
- The changes will take effect immediately for the user.
⚠️ WARNING: If you close the window without clicking "Save permissions", all the changes made will be lost.
Step 8: Operational Test
- Log out as administrator.
- Log in with the configured user.
- Verify that:
- You can access the expected modules.
- You cannot access unauthorized modules.
- You can perform the allowed operations.
- You cannot perform operations that are not allowed.
- Printing works (or not) according to the assigned permission.
RECOMMENDED USER PROFILES
Although Kardex Tauro allows fully customized configurations, below are typical profiles that serve as a reference:
Profile: Point of Sale Salesperson
Functions: Serve customers, process sales, print invoices, consult inventory.
Recommended permissions:
✅ View sales
✅ Make sales
✅ Print permission
✅ View inventory (view only)
✅ View customer quotation
✅ Make customer quotation
✅ View third parties (view only)
Permissions NOT recommended:
❌ Create inventory (should not modify products)
❌ View Kardex (does not need to see the complete history)
❌ Make purchases (must not buy)
❌ Make reinstatements (supervisors only)
Profile: Warehouse Keeper / Warehouse Staff
Functions: Receive merchandise, organize inventory, perform transfers, count stock.
Recommended permissions:
✅ View inventory
✅ View warehouse receipts
✅ Make warehouse receipts
✅ View transfers
✅ Make transfers
✅ View Kardex (query)
✅ View purchases
✅ Receive purchases
Permissions NOT recommended:
❌ Make sales (must not sell)
❌ Make purchases (must not approve purchases)
❌ Kardex plus/minus (adjustments only by supervisors)
❌ View accounts payable/receivable
BUSINESS CONTEXT: SECURITY THROUGH GRANULAR PERMISSIONS
The Kardex Tauro permission system implements advanced IT security principles adapted to the inventory management context.
Principle of Least Privilege (PoLP)
The Principle of Least Privilege establishes that each user must have only the permissions minimum necessary to perform their functions, and nothing more.
Application in Kardex Tauro:
- Do not assign permissions "just in case" or "for the future".
- Assign only the permissions the user needs currently.
- If the user changes functions, adjust their permissions accordingly.
- Periodically review the assigned permissions.
Benefits:
- Reduces attack surface: Fewer permissions = fewer risks.
- Limits damage from errors: A user with limited permissions cannot cause extensive damage.
- Prevents internal fraud: It makes it harder for an employee to carry out unauthorized operations.
- Facilitates audits: It is easier to verify that each user has only what is necessary.
Segregation of Duties (SoD)
The Segregation of Duties is an internal control that distributes responsibilities among different people to prevent fraud and errors.
Application in Kardex Tauro:
No single person controls the entire cycle, reducing the risk of fraud.
The salesperson cannot collect payment or authorize returns, preventing collusion.
The person who counts is not the one who adjusts, and the one who adjusts is not the one who approves.
Defense in Depth
Kardex Tauro implements multiple layers of security:
Layer 1 - Authentication:
- Username and password to log into the system.
- Each person has unique credentials.
Layer 2 - User type:
- Distinction between Administrator and User.
- Only administrators manage permissions.
Layer 3 - Granular permissions:
- Specific control per operation.
- View/Make duality for each module.
Layer 4 - Restriction by cost center:
- Users limited to their warehouse/branch.
- It prevents unauthorized access to other locations.
Layer 5 - Print permissions:
- Independent print control.
- Prevents leakage of printed information.
Layer 6 - Super-administrator:
- Backup user that guarantees access to the system.
- Protects against total loss of credentials.
Regulatory Compliance
The Kardex Tauro permission system makes it easier to comply with various regulations:
Accounting Standards (NIIF/IFRS):
- Traceability of who performed each operation.
- Segregation of duties for internal controls.
- Audit of inventory adjustments.
Data Protection Laws:
- Access control for sensitive information.
- Restriction by cost center.
- Log of accesses and operations.
Quality Standards (ISO 9001):
- Qualified personnel for specific functions.
- Control of critical operations.
- Process traceability.
Tax Regulations:
- Billing control (printing permission).
- Segregation between sales and cash.
- Audit of returns and reinstatements.
Comparison with Role-Based Systems
- ✅ Easy to configure.
- ❌ Rigid, does not adapt to specific needs.
- ❌ If a salesperson needs an additional permission, their role must be changed.
Kardex Tauro - Granular system:
- ✅ Total flexibility to adjust to each person.
- ✅ Allows special situations (a salesperson who also creates quotations).
- ✅ Does not require creating artificial roles.
- ❌ Requires more initial analysis to define permissions.
BEST PRACTICES IN PERMISSION MANAGEMENT
Assignment Policies
Define clear policies:
- Document which permissions correspond to each type of position.
- Establish who can assign permissions (only specific administrators).
- Define the process for requesting and approving permissions.
Use the principle of least privilege:
- Start with the minimum necessary permissions.
- Add permissions only when strictly necessary.
- Review periodically and remove unused permissions.
Document the decisions:
- Keep a record of which permissions each user has and why.
- Document permission changes with date and reason.
- Keep evidence of approvals for sensitive permissions.
Credential Security
Robust passwords:
- Minimum 8 characters.
- Combination of uppercase, lowercase, numbers and symbols.
- Do not use personal information (dates, names).
- Change periodically (every 90 days recommended).
Protection of the super-admin:
- Extremely robust password.
- Known only by people of maximum trust.
- Stored in a secure password manager.
- Consider two-factor authentication if possible.
Do not share credentials:
- Each person must have their own user.
- Never share passwords between employees.
- If someone needs access, create their own user for them.
Session lock:
- Configure automatic lock after inactivity.
- Log out at the end of the shift.
- Never leave a session open on shared computers.
Periodic Review
Scheduled audits:
- Review permissions quarterly or semi-annually.
- Verify that they match current functions.
- Detect obsolete or excessive permissions.
Review upon changes:
- When an employee changes position, adjust permissions.
- When an employee is promoted, evaluate additional permissions.
- When an employee is transferred, update the cost center.
Employee termination:
- Delete or disable users immediately when staff leave.
- Do not keep users "temporarily disabled" for a long time.
- Document the termination in the audit log.
Staff Training
Initial training:
- Teach each user what they can and cannot do.
- Explain why they have certain permissions and not others.
- Provide examples of permitted operations.
Security awareness:
- Explain the importance of not sharing passwords.
- Teach how to identify social engineering attempts.
- Promote a security culture in the organization.
Updates:
- When permissions change, inform the user.
- When new modules are added, train staff on their use.
- Keep staff informed about security policies.
Monitoring and Detection
Review the Kardex:
- Identify unusual or out-of-pattern operations.
- Detect accesses at unusual times.
- Monitor inventory adjustments (Kardex plus/minus).
Set up alerts:
- Configure notifications for critical operations.
- Monitor failed access attempts.
- Review high-value operations.
Keep records:
- Document security incidents.
- Keep a log of permission changes.
- Archive audit reports.
SPECIAL SITUATIONS AND SOLUTIONS
User Forgot Their Password
Solution:
- An administrator must access the user configuration.
- Reset the password of the affected user.
- Communicate the new password to the user securely.
- Ask the user to change the password at their next login.
Prevention:
- Use enterprise password managers.
- Establish password recovery policies.
- Keep a secure channel for reset requests.
All Administrators' Credentials Were Lost
Solution:
- Use the user super-admin (cannot be deleted or modified).
- Log in with super-admin.
- Create a new administrator user or reset credentials.
- Document the incident and reinforce credential security.
Prevention:
- Always keep at least two people with access to administrator credentials.
- Document the super-admin password in a secure place.
- Perform periodic access recovery tests.
User Needs Temporary Permission
Situation: A salesperson needs to make reinstatements for a week because the supervisor is on vacation.
Solution:
- Assign the "Make reinstatements" permission temporarily.
- Document the change with start and end dates.
- Set up a reminder to remove the permission after a week.
- At the end of the period, remove the permission.
Alternative:
- If possible, temporarily reassign the functions to another supervisor.
- Avoid granting temporary permissions if there is another solution.
User Requires Access to Multiple Cost Centers
Situation: A supervisor needs to operate in 3 different branches.
Solution:
- Assign the permission "Change cost center".
- The user will be able to select among the different branches at login or during the session.
- Make sure the user understands the additional responsibility.
Considerations:
- This permission must be assigned with caution.
- Only for supervision or management staff.
- Document why this permission is granted.
User Reports That They "Cannot Do Something"
Diagnosis:
- Check which permissions the user has assigned.
- Identify the specific missing permission.
- Determine whether the permission is "View" or "Make" (or both).
- Check whether it requires print permission.
Solution:
- Assign the missing permissions as appropriate.
- Explain to the user which permissions were added.
- Ask the user to try the operation again.
- Document the permission change.
Inappropriate Use of Permissions Is Detected
Situation: A salesperson is making inventory adjustments (Kardex plus/minus) when they should not.
Action:
- Investigate the incident through the Kardex.
- Identify how the user obtained those permissions.
- Remove the inappropriate permissions immediately.
- Document the incident.
- Take corrective actions according to company policies.
- Reinforce the permission assignment policies.
Prevention:
- Periodic permission audits.
- Monitoring of critical operations.
- Continuous security training.
FREQUENTLY ASKED QUESTIONS
Q: What happens if I create a user and assign no permissions?
A: The user will be able to log in but will not be able to perform any operation. They will not see any module, will not be able to create documents, and will not be able to print anything. It is essential to assign permissions after creating the user.
Q: Can I assign permissions to an administrator user?
A: No. The program does not allow individual permissions to be assigned to Administrator-type users because they implicitly have all permissions. The permission assignment option is only available for User-type users.
Q: What is the super-admin and can I delete it?
A: The super-admin is a special user that exists from the system installation. It cannot be deleted, edited, or modified. It is the backup user that guarantees access to the system under any circumstance.
Q: Can I have multiple administrator users?
A: Yes, you can create as many administrator users as you need. However, it is recommended to keep the minimum necessary for security reasons.
Q: Can a user work in multiple cost centers?
A: By default, no. Each user is assigned to a single cost center. For them to work in multiple centers, they must have the special permission "Change cost center".
Q: What is the difference between "View sales" and "Make sales"?
A: "View sales" only allows opening the window and viewing sales information. "Make sales" allows creating and processing new sales. To sell, both permissions are needed.
Q: Why do I need the "Printing permission" if I already have "Make sales"?
A: They are independent permissions. "Make sales" allows processing sales, but "Printing permission" is the one that enables the printing function throughout the system. Without this permission, you will not be able to print invoices, tickets or reports.
Q: Can I assign permissions to my own user?
A: If you are an administrator, yes. If you are a regular user, no. Only administrators can assign permissions.
Q: What happens if I make a mistake when assigning permissions?
A: You can correct the permissions at any time. Open the user's permission window, adjust the lists and save the changes. The changes take effect immediately.
Q: Can permissions be assigned by groups or roles?
A: No. Kardex Tauro uses a granular system where each permission is assigned individually to each user. There are no predefined roles.
Q: Can I copy one user's permissions to another?
A: Kardex Tauro assigns permissions individually. If you want two users to have the same permissions, you must assign them manually to each one.
Q: What permissions does a user need to view reports?
A: It depends on the type of report. Generally, they need the "View" permission of the corresponding module and the "Printing permission" to generate the report.
Q: Can I restrict access to certain hours?
A: Kardex Tauro manages permissions by operations, not by schedules. For time restrictions, consider operational policies or complementary systems.
Q: What happens if a user tries to access something without permission?
A: The system will show an informative message indicating that they do not have permissions. It does not generate an error or block the system; it simply restricts the operation.
Q: Can I see which permissions each user has?
A: Yes, as an administrator you can open any user's permission window and see which permissions they have assigned.
Q: Are permissions applied immediately?
A: Yes, when you save the changes, the permissions are applied immediately. If the user is logged in, it is advisable for them to log out and log back in so that the changes are fully reflected.
Q: Can I disable a user without deleting them?
A: Kardex Tauro manages permissions through assignment. To "disable" a user, simply remove all their permissions. The user will be able to log in but will not be able to do anything.
Q: What permissions do I need to create products?
A: You need "View inventory" (to access the window) and "Create inventory" (to be able to create products).
Q: Can I give printing permissions selectively (only invoices, not reports)?
A: The "Printing permission" is unique and enables printing throughout the system. There is no way to restrict it to specific types of documents.
Q: What happens if I delete a user who had permissions?
A: The permissions are deleted with the user. If you create a new user with the same name, you must assign the permissions to them again from scratch.
Q: Can I assign permissions in bulk to several users?
A: Kardex Tauro assigns permissions user by user. For multiple users, you must configure each one individually.
Q: Are permissions inherited between cost centers?
A: No. Permissions are global for the user, but access to cost centers is restricted by the user's cost center assignment (unless they have permission to change cost center).
Q: Can I view a history of permission changes?
A: Kardex Tauro records the changes in the system. Consult your administrator or support to access permission audit reports.
Q: What permissions does an accountant need?
A: Generally "View" permissions for all financial modules (sales, purchases, accounts receivable/payable, Kardex) plus "Printing permission". They do not need "Make" permissions unless they must make adjustments.
Q: Can I recover permissions if I lost them?
A: If you are an administrator, you can reassign permissions. If you lost administrator access, use the super-admin to recover access.
Q: Do permissions affect system performance?
A: No. Permissions are validated in real time with no significant impact on performance.
Q: Can I export a user's permission list?
A: Yes, you can generate permission reports for documentation or auditing from the configuration window.
FINAL RECOMMENDATIONS
- Plan before assigning: Before creating users, define what functions each person will perform and what permissions they will need.
- Use the principle of least privilege: Assign only the strictly necessary permissions. It is easier to add permissions later than to remove them after an incident.
- Document the assignments: Keep a record of which permissions each user has and why. This facilitates audits and troubleshooting.
- Prioritize segregation of duties: Do not allow a single person to control complete processes (e.g. purchase and approve purchases, sell and collect payment).
- Protect administrator credentials: They are the keys to the system. Treat them with the maximum level of security.
- Do not share users: Each person must have their own user. Sharing credentials invalidates traceability and auditing.
- Train users: Explain what they can and cannot do. A user who understands their limitations makes fewer mistakes.
- Audit periodically: Every 3-6 months, review the permissions of all users and adjust them according to changes in functions.
- React quickly to changes: When an employee changes position, adjust their permissions immediately.
- Delete inactive users: Do not keep users of former employees. Delete them or remove all their permissions.
- Use the super-admin with caution: Do not use it for daily operations. It is the backup user for critical situations.
- Test the permissions: After assigning permissions, log out and log in with the user to verify that it works as expected.
- Keep backups: Back up the database regularly, including the user and permission configuration.
- Establish written policies: Document the permission assignment policies so that they are consistent over time.
- Monitor critical operations: Review the Kardex periodically to detect unusual or out-of-pattern operations.
- Educate on security: Technology alone is not enough. Raise staff awareness about the importance of access security.
- Take advantage of flexibility: The granular system allows adapting to unique situations. Do not limit yourself to standard profiles if reality requires it.
- Balance security and productivity: Too many restrictions hinder work; too few create risks. Find the middle ground.
- Involve supervisors: They know better than anyone what permissions their team needs.
- Keep the system updated: Kardex Tauro updates may include security improvements. Keep the system updated.
EXECUTIVE SUMMARY
The window User Permissions of Kardex Tauro is the fundamental security and access control component of the system. Through an approach of granular permissions (in contrast with role-based systems), offers unprecedented flexibility to configure exactly what each user can do.
Key features:
✅ Granular system: Each permission is assigned individually, allowing customized configurations.
✅ View/Make duality: It clearly separates the ability to consult from the ability to operate.
✅ Independent print permission: Specific control over the ability to generate physical documents.
✅ Two user types: Administrator (full access) and User (restricted access).
✅ Permanent super-administrator: It guarantees access to the system under any circumstance.
✅ Restriction by cost center: Isolates operations between branches/warehouses.
✅ No permissions by default: New users start without permissions, requiring explicit configuration.
Business benefits:
🔒 Robust security: Multiple layers of protection against unauthorized access.
📊 Segregation of duties: It facilitates compliance with internal controls.
🎯 Total flexibility: It adapts to any organizational structure.
📝 Full traceability: Each operation is linked to a specific user.
🛡️ Regulatory compliance: It facilitates audits and regulatory compliance.
The correct configuration of permissions is essential for the safe and effective use of Kardex Tauro. A well-configured system prevents errors, fraud and unauthorized access, while a poorly configured system can compromise the integrity of the entire operation.
Remember: Security is not a product, it is a process. Review, audit and adjust permissions periodically to maintain optimal protection of the system.
Kardex Tauro - Professional Inventory Management System
Created with HelpNDoc's Personal Edition: Free Kindle producer