Users
USERS TAB - CONFIGURATION WINDOW
GENERAL DESCRIPTION
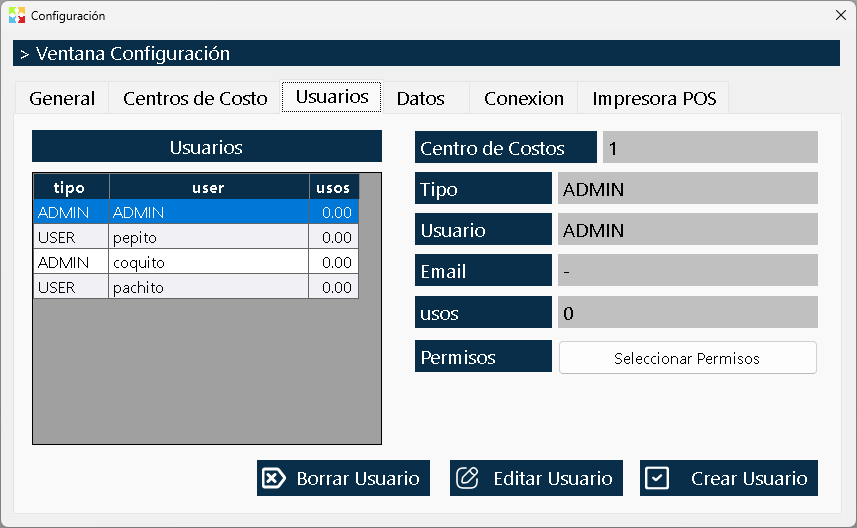
The Users Tab is the access administration and security module within the Configuration window. From here, all the identities that can enter the system are managed, their roles are defined (Administrator or standard User), and their scope of action is controlled through the assignment of Cost Centers and Granular Permissions.
This tab is fundamental to guarantee the integrity of the information, since it allows separating functions, limiting access to certain warehouses or branches, and ensuring that each person can only perform the operations for which they are authorized.
WINDOW STRUCTURE
Like the Cost Center tab, the interface is divided into two main panels that work in a coordinated way:
1. Left Panel: User List
It shows a list (grid) with all the users currently registered in the system.
- Function: To allow quick selection of the user to be queried or modified.
- View: It generally shows the user name (login) and the user type (Admin or User).
2. Right Panel: User Information
When selecting a user from the left list, this panel displays the complete details and specific configurations of that identity. Here the critical user information is viewed and, in some cases, edited.
USER TYPES
The system handles two fundamental categories of users, which determine how their permissions are managed:
1. ADMINISTRATOR User (Admin)
- Privileges: Has all the permissions of the system implicitly and in full.
- Permission Management: It is not necessary (nor possible) to assign individual permissions to this type of user, since it has access to all functions, windows and configurations, including the ability to manage other users and access the Configuration window.
- Usage: Reserved for owners, managers or IT staff who require total control of the system.
2. STANDARD User (User)
- Privileges: Initially has no permissions. If a User-type user is created and no permissions are assigned, upon entering the system they will not be able to see or do anything.
- Permission Management: It is mandatory to enter the option "Select permissions" to grant it the specific capabilities (View/Do) that it needs for its work.
- Usage: For operational employees (salespeople, warehouse keepers, cashiers) whose functions must be limited and controlled.
INFORMATION FIELDS (RIGHT PANEL)
In the right area, the following data of the selected user is shown:
|
Field |
Description |
Importance |
|
Cost Center |
It indicates the warehouse or branch to which the user belongs. |
CRITICAL: A standard user can only operate and view information from this one cost center. It cannot access data from other warehouses. This guarantees the segregation of information between branches. |
|
User Type |
Shows whether it is Admin or User. |
It determines whether the permission list should be configured or whether the user has total access. |
|
User |
The login name or unique code to sign in. |
It is the main identifier for access to the system. |
|
Name |
Full name or legal name of the person. |
Descriptive information for human identification. |
|
|
Associated email address. |
Useful for notifications, password recovery or contact. |
|
Number of Receipts |
Counter that shows how many times the user has logged into the system. |
It serves as an audit tool to verify the activity and use of the account by the employee. |
PERMISSION MANAGEMENT
Button "Select Permissions"
Located in the right panel, this button is the gateway to granular security configuration.
- Operation: When selecting a user of type User and click this button, a window (or modal) opens with two lists: "Available Permissions" and "Assigned Permissions".
- Action: It allows moving permissions from one list to another to define exactly which windows the user can see and in which ones they can execute actions (create, edit, delete).
- Note for Admin: If the selected user is of type Admin, this button may be disabled or irrelevant, since the administrator already has all capabilities.
ACTION BUTTONS (BOTTOM)
At the bottom of the tab are the three buttons for managing the user lifecycle:
- Create User:
- It opens the form to register a new identity.
- When creating it, you must mandatorily define which Cost Center it will belong to and what Type user type it will be.
- Recommendation: If you create a "User" type user, remember to immediately enter "Select permissions" to enable it.
- Edit User:
- It allows modifying the data of the selected user (name, email, password, and even changing their Cost Center).
- Warning: If you change a user's Cost Center, they will lose access to their current warehouse and will only see the new one.
- Delete User:
- It permanently deletes the identity from the system.
- CAUTION: When deleting a user, the traceability history associated with that name is lost. If the user has made sales, purchases or cash movements, it is recommended instead to "deactivate" them (removing all permissions) rather than deleting them, in order to keep the historical record of who performed each operation.
RESTRICTIONS AND SECURITY
The Cost Center Rule
The system imposes a physical and logical restriction: A User-type user is tied to a single Cost Center.
- If a salesperson works at "North Branch", their user must be configured with that cost center.
- Upon logging in, the system will automatically load the data of that warehouse.
- The salesperson will not be able to see the inventory, sales or customers of the "South Branch" or the "Central Warehouse".
- Exception: Only users with special "Change cost center" permissions (usually supervisors) can jump between warehouses.
Administration Recommendations
- Principle of Least Privilege: Assign to users of type User only the permissions necessary for their work. Do not grant "Do" (operation) permissions if they only need "View" (query).
- Receipt Auditing: Periodically review the "Login count" column. If a user has 0 logins or an unusually high number at odd hours, it may indicate a security problem or a shared account.
- Do Not Delete, Disable: If an employee leaves the company, do not delete their user. Simply remove all their permissions or change them to an inactive state. This preserves the history that "Juan Pérez" sold those products at the time.
- Be Careful with Admins: Limit the number of users of type Administrator. Only absolutely trusted people should have this profile, since they can modify prices, delete invoices and change the global configuration.
Created with HelpNDoc's Personal Edition: Transform your CHM help file creation process with HelpNDoc