Import Inventory
IMPORT INVENTORY FROM EXCEL WINDOW
GENERAL DESCRIPTION
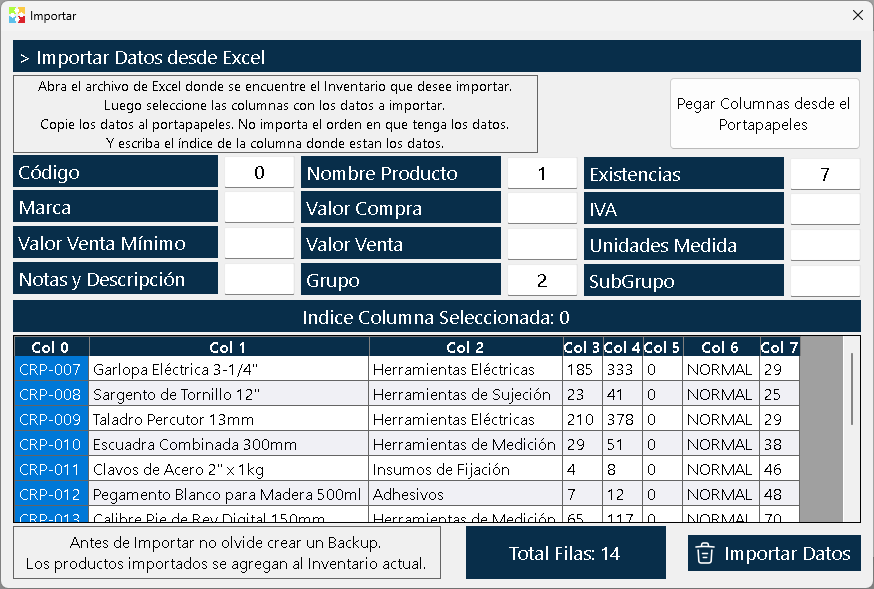
The window Import Inventory from Excel is a pop-up wizard that allows bulk-loading products into the system from any external spreadsheet. This tool is essential during the initial implementation of the system or when large volumes of products need to be updated quickly, eliminating the need to register products one by one.
Main feature: The system does not require a specific format or template. You can import data from any spreadsheet (Microsoft Excel, OpenOffice Calc, Google Sheets, LibreOffice, etc.), regardless of the order in which the columns are organized. The wizard allows you to "map" each field of the system with the corresponding column of your file.
WINDOW STRUCTURE
The window is organized into four clearly differentiated zones:
1. Top Zone - Informational Text
At the top a descriptive message is shown explaining the general procedure:
"Open the Excel file where the inventory you want to import is located, then select the columns with the data to import, copy the data to the clipboard. The order in which you have the data does not matter, and write the index of the column where the data is."
This text acts as a quick guide for the user, reminding the basic steps of the process.
2. Button "Paste columns from clipboard"
Next to the informative text there is a large, prominent button that performs the main action:
- Function: It reads all the information you have copied from your spreadsheet (using Ctrl + C or right-click → Copy) and loads it into the window grid.
- Behavior: On clicking, the system interprets the clipboard data and displays it in the lower grid, respecting the original row and column structure.
3. Central Zone - Mapping Fields
Below the button is the configuration section where you tell the system in which column of your file each type of data is located.
Fields available for mapping:
The window presents the following text fields, each accompanied by a descriptive label:
|
Field |
Description |
Example |
|
Code |
Index of the column where the product codes are |
"PROD001", "SKU-123" |
|
Product name |
Index of the column with the names or descriptions |
"Soda 400ml", "Laptop HP 15"" |
|
Stock on hand |
Index of the column with the stock quantities |
50, 120, 0 |
|
Brand |
Index of the column with the product brand |
"Coca-Cola", "HP", "Samsung" |
|
Purchase value |
Index of the column with the acquisition cost |
2500, 150000 |
|
VAT |
Index of the column with the VAT percentage |
19, 5, 0 |
|
Sale value |
Index of the column with the sale price |
3500, 200000 |
|
Units of measure |
Index of the column with the unit (Unit, Kg, Lt, etc.) |
"Unit", "Kg", "L" |
|
Notes |
Index of the column with remarks |
"Fragile", "Imported" |
|
Description |
Index of the column with extended description |
"Cola-flavored soda 400ml" |
|
Group |
Index of the column with the classification group |
"Beverages", "Electronics" |
|
Subgroup |
Index of the column with the subgroup |
"Sodas", "Laptops" |
How mapping works:
- Each field has a text box where you must enter the column number (index) of your Excel file where that type of data is located.
- It is not mandatory to map all fields: If your spreadsheet does not contain information for any field (for example, it has no "Notes" column), simply leave that field blank. The system will ignore it.
- Order does not matter: If in your Excel the "Name" is in column A and the "Code" in column Z, simply write "1" in the Name field and "26" in the Code field.
4. Lower Central Zone - Pasted Data Grid
After clicking "Paste columns from clipboard", a grid (table) is filled that shows all the information copied from your spreadsheet.
- Full view: The grid shows all the rows and columns you copied.
- Column indexes: When you click on the header of any column in the grid, the system shows the numeric index of that column. This number is exactly the one you must write in the mapping fields of the upper zone.
- Help function: This functionality prevents you from having to manually count the columns in your Excel file. Simply click on the desired column in the grid and the system will tell you its number.
5. Lower Zone - Information and Import Button
At the bottom there are two important elements:
Informational text:
"Before importing, do not forget to create a backup. The imported products are added to the current inventory."
⚠️ CRITICAL WARNING: This message reminds you that you must generate a backup of your database before running the import. If you make a mistake in the mapping (for example, assigning the "Cost" column to the "Sale Price" field), you could alter thousands of products in seconds. A backup allows you to revert the change.
Total Rows Information:
It shows the total number of rows that were copied and pasted into the program. This allows you to verify that all your information was loaded correctly before proceeding with the import.
Button "Import Data":
- Initial state: When opening the window, this button may appear enabled or disabled depending on whether there is pasted data.
- After pasting and mapping: Once you have pasted the information from the clipboard and written the corresponding column indices in the mapping fields, the button is activated and allows you to run the import.
- Action: On clicking, the system processes all the rows and creates the products in the system inventory, applying the mapping you defined.
STEP-BY-STEP WORKFLOW
Step 1: Prepare the Excel file
- Open your Excel file (or any spreadsheet) where you have the product information.
- Make sure the data is organized in clear columns.
- Recommendation: The first row must contain the column headers (e.g.: "Code", "Name", "Price", etc.) to facilitate identification.
- Verify that there are no interspersed empty rows or strange characters.
Step 2: Copy the data to the clipboard
- Select with the mouse all the rows and columns you want to import (including the headers if you wish).
- Copy the selection using Ctrl + C or right-click → Copy.
- Important: Copy only the data you want to import. If you have additional columns you do not need, you can omit them when selecting.
Step 3: Open the import window
- In Kardex Tauro, go to the menu Configuration → Data Tab → Import Section.
- Click the button "Import Inventory".
- The import pop-up window will open.
Step 4: Paste the data into the system
- Click the button "Paste columns from the clipboard".
- The system will read the information from the clipboard and display it in the lower grid.
- Verify that the Total rows shown matches the number of products you expect to import.
Step 5: Identify the column indexes
- Look at the grid with the pasted data.
- Click on the header of each column so that the system shows you its numeric index.
- Write down or memorize which index corresponds to each type of data (Code, Name, Price, etc.).
Step 6: Map the fields
- In the fields of the central zone, write the index of the corresponding column for each type of data.
- Practical example:
- If the "Code" is in column A (index 1), write 1 in the Code field.
- If the "Name" is in column B (index 2), write 2 in the Name field.
- If the "Sale Value" is in column F (index 6), write 6 in the Sale value field.
- Leave blank the fields that do not apply or that have no data in your file.
Step 7: Verify before importing
- Check that the mapping is correct.
- Confirm that the Total rows is the expected one.
- Make sure you have a recent backup of your database.
Step 8: Run the import
- Click the button "Import Data".
- The system will process all the rows and create the products in the inventory.
- When finished, the new products will be available in the Inventory window.
VALIDATIONS AND IMPORTANT CONSIDERATIONS
Automatic system validations:
- Duplicate codes: If you try to import a product with a code that already exists in the system, the system will alert you to avoid accidentally overwriting information.
- Mandatory fields: The system will verify that at least the "Code" field is mapped correctly, since it is the unique identifier of each product.
- Data format: The system will try to automatically interpret the numeric formats (decimals, thousands separators) according to the configuration of the General Tab.
Critical considerations:
- The code is immutable: Remember that once a product is created in Kardex Tauro, its code cannot be changed. When importing, pay special attention to the codes column.
- Groups and subgroups: If your file contains groups or subgroups, make sure they are already created in the system (from the Groups window) before doing the import, or write them exactly as you want them to be created.
- Units of measure: Verify that the units of measure in your file match those configured in the system.
- Numeric values: Make sure the purchase, sale and VAT values are in the correct format (without currency symbols such as $ or %, only numbers).
USAGE RECOMMENDATIONS
Before importing:
- Make a backup: Go to the Backups section of the Data Tab and generate a backup. If something goes wrong, you will be able to restore the system in minutes.
- Pilot test: If it is the first time you import or if you have thousands of products, do a test with only 5-10 rows to validate that the mapping works correctly.
- Clean your data: Delete empty rows, special characters or inconsistent formats in your Excel file before copying.
- Verify the groups: Make sure the groups and subgroups mentioned in your file already exist in the system.
During mapping:
- Use the grid indexes: Do not count the columns manually in your Excel. Click on each column in the grid to get its exact index.
- Map only what is necessary: If your file has additional columns that you do not need to import (such as "Creation Date" or "Supplier"), simply do not map them.
- Be careful with decimals: Verify that the decimal format in your file is compatible with the regional configuration of the system (period or comma as decimal separator).
After importing:
- Verify the results: Open the Inventory window and search for some imported products to confirm that the data was loaded correctly.
- Check prices and costs: Verify that the purchase and sale values were imported into the correct columns (a common error is swapping these fields).
- Confirm stock on hand: Verify that the stock quantities were imported correctly.
- If something went wrong: Restore the backup you made before importing and correct the mapping before trying again.
FREQUENTLY ASKED QUESTIONS
Q: Can I import from Google Sheets or LibreOffice?
A: Yes. The system reads data from the Windows clipboard, so it works with any spreadsheet application that allows copying data.
Q: What happens if my file has more columns than I need?
A: No problem. Simply map only the columns you want to import and leave blank the fields of the columns you do not need. The system will ignore the unmapped columns.
Q: Can I update existing products with this tool?
A: It depends on the wizard configuration. Generally, if the code already exists, the system can update the product or ignore it. Consult the system administrator about the specific behavior.
Q: What happens if I make a mistake in the mapping and the prices are loaded incorrectly?
A: If you have a backup, simply restore the database and import again with the correct mapping. This is why making a backup before importing is critical.
Q: Should I include the column headers when copying?
A: It is not mandatory, but it is advisable. If you include the headers, the system will display them in the grid and it will make it easier for you to identify the columns. You can exclude the first row when mapping if you wish.
Q: How many products can I import at a time?
A: There is no strict limit, but for bulk imports (more than 10,000 products), it is recommended to do pilot tests first and make sure the equipment has enough RAM memory.
Q: Are the groups and subgroups created automatically if they do not exist?
A: It depends on the configuration. Generally, it is advisable to create the groups and subgroups first in the corresponding window before importing the products.
Q: What format should the numeric values have?
A: The values must be in standard numeric format, without currency symbols ($, €, etc.) or percentage signs (%). Use the decimal separator configured in the General Tab (period or comma).
Q: Can I import product images?
A: No. Product images must be loaded individually from the product creation/editing window (Image Tab).
Q: What happens if two rows have the same code?
A: The system will detect it and alert you about duplicate codes. You must correct your Excel file before importing.
RELATIONSHIP WITH OTHER WINDOWS
- General Tab: The number, decimal and currency formats configured here are applied automatically when interpreting the numeric values of your file.
- Groups Window: The groups and subgroups mentioned in your file must previously exist in this window.
- Inventory Window: The imported products will appear here immediately after completing the import.
- Backups Section: Critical tool to protect your database before running the import.
- Delete Data Section: If a bulk import goes wrong and you do not have a backup, this section can be used as a last resort (with extreme caution).
EXECUTIVE SUMMARY
The window Import Inventory from Excel is a powerful tool that allows bulk-loading products into the system from any spreadsheet, without requiring specific formats or templates. Its mapping flexibility allows adapting the import to the data structure you already have organized.
Key points to remember:
- ✅ Copy the data from your spreadsheet to the clipboard.
- ✅ Paste the data into the system using the corresponding button.
- ✅ Identify the column indices by clicking on the grid headers.
- ✅ Map each field of the system with the corresponding column of your file.
- ✅ Make a backup before importing.
- ✅ Verify the Total rows before running the import.
- ✅ Click "Import Data" to complete the process.
A well-planned and executed import can save hours of manual work and guarantee that your inventory is correctly loaded into the system from the first day.
Created with HelpNDoc's Personal Edition: HelpNDoc Project Analyzer: amazing documentation assistant