Inter-warehouse transfer template in Excel: free download

Inter-warehouse transfer template in Excel: free download
If your business has more than one warehouse — a main one and a shipping one, a central warehouse and one for returns, or one per branch —, at some point you will need to move goods from one to another: take your fastest-moving products to the shipping point, transfer leftover stock from one location or send to another site what its team needs. This movement, called an inter-warehouse transfer, looks as simple as carrying a few boxes between shelves, but it needs its own document: an internal form where you write down what goods left a warehouse, in what quantity, to which warehouse they went and who was responsible for shipping and receiving them.
What happens when that movement is not recorded? The origin warehouse keeps showing on paper stock that is no longer there, the destination warehouse receives goods that never appear in its records and, at the first count, the list says one thing while the shelf shows another, with nobody able to explain why the inventory fell out of balance. A transfer recorded on the spot avoids all of that: it leaves evidence of the movement on the same day, with signatures.
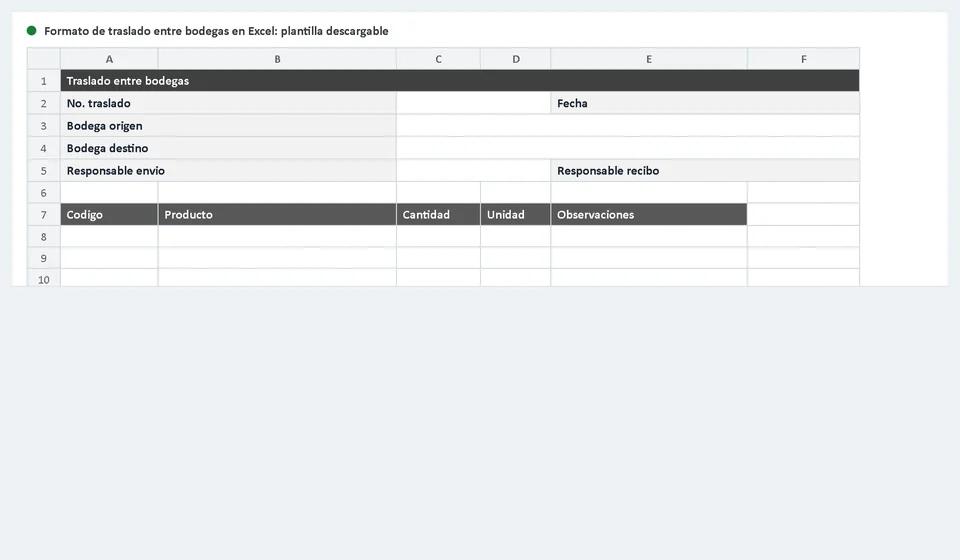
This inter-warehouse transfer template in Excel is ready to download for free and use the same day. The file includes the main sheet, called Inter-warehouse Transfer, where you type the number and date of the transfer, the origin warehouse, the destination warehouse, the people in charge of shipping and receiving, and every line of goods being moved. The second sheet, Instructions, explains how to use it, with a worked example and no advanced Excel skills required. The sheet is set up to print on A4 paper, so you can print the transfer, sign it at origin and destination, and file it as physical backup of the movement. Download it, open it and check the example included:
⬇ Download the inter-warehouse transfer template in Excel for freeWhat an inter-warehouse transfer is, and what it is not
An inter-warehouse transfer is an internal movement of goods: the boxes change location, but they do not change owner. That is the key difference from a sale or a purchase. When you sell, the goods leave your inventory, enter the customer's and your business receives income in exchange; when you buy, the opposite happens. In a transfer none of that occurs: the product is still yours, it stays in your inventory and its cost does not change. The only thing that changes is the physical place where it is stored and, therefore, the stock record of each warehouse: the origin one discounts and the destination one receives.
Mistaking a transfer for a sale or a purchase is one of the most expensive errors in a business with several warehouses. If you record the movement as a sale, you write off goods that are still yours, distort your income and costs; if you record it as a purchase, you bring in goods you already paid for and double their value. That is why a transfer is recorded for what it is: a movement between your own locations that touches neither the ownership nor the cost of the goods, only the place where they are.
What is inside the inter-warehouse transfer template
The template reproduces the form used by any well-organized warehouse to move goods between its own locations, with the data arranged in blocks so it can be filled in a few minutes without relying on memory. This is what you will find inside:
| Block | What it contains | What it is for |
|---|---|---|
| Transfer header | Transfer number and date | Identifying the movement so it can be found later among all the ones you make |
| Origin warehouse | Name of the warehouse handing the goods over | Knowing where the stock comes from and who must discount it from their records |
| Destination warehouse | Name of the warehouse receiving the goods | Knowing where the stock goes and who must add it to their records |
| Person in charge of shipping and receiving | Name of who dispatches at origin and who receives at destination | Making clear who is responsible for the goods on each side of the movement |
| Line table | Code, product, quantity, unit and observations for every item moved | Detailing what moves, how much and in which unit, line by line |
| Instructions sheet | Explanation of the purpose, the use and a worked example | Answering questions without advanced Excel skills |
The columns of the form, explained
The heart of the template is the line table, where every product changing warehouses is listed. There are five columns, and each one answers a specific question about the movement:
| Column | What you write | What it is for |
|---|---|---|
| Code | The internal product code, exactly as it appears in your stock card or inventory list | Identifying the item without ambiguity, so origin and destination talk about the same product |
| Product | The name or description of the goods | Confirming at a glance what the item is |
| Quantity | The number of units or boxes being moved | Stating how much the origin warehouse must discount and the destination warehouse must receive |
| Unit | The measure used to count the goods: box, unit, bundle, package, kilogram | Avoiding misunderstandings: moving twenty boxes is not the same as moving twenty units |
| Observations | Notes about that line: batches, expiration dates, damaged packaging | Recording the information that does not fit in the other columns and the destination must know |
An example: twenty boxes from the Main Warehouse to the North Warehouse
The template includes a worked example of the most typical transfer you will see in practice. Suppose the Main Warehouse has enough product A for weeks of sales, while the North Warehouse, the point where orders are dispatched, is running out of stock. The solution is not to buy more: it is to move twenty boxes of product A from the Main Warehouse to the North Warehouse. This is what that transfer looks like in the form:
Transfer No.: TR-014 | Date: the day the movement takes place. Origin warehouse: Main Warehouse | Destination warehouse: North Warehouse. Person in charge of shipping: who dispatches at the Main Warehouse | Person in charge of receiving: who receives at the North Warehouse.
| Code | Product | Quantity | Unit | Observations |
|---|---|---|---|---|
| PROD-A | Product A | 20 | Box | — |
The record says exactly what happens: the Main Warehouse hands over twenty boxes of product A, the North Warehouse receives them, and stock stays balanced between the two points, with nothing bought or sold. In a real transfer the table will have as many lines as products moving on that same trip.
How to use the template step by step
There is only one golden rule: goods do not leave one warehouse or get received in another without a numbered, signed transfer. With that rule in mind, this is the recommended order:
- Download the file and save it with a name that identifies the movement, for example Transfer-001.xlsx, so you do not mix it up with earlier versions.
- Read the Instructions sheet once to learn every cell and the example; then work on the Inter-warehouse Transfer sheet.
- Assign the next transfer number and write the real date of the movement, not the day you happen to type it.
- Type the name of the origin warehouse, the one handing the goods over, and the destination warehouse, the one receiving them.
- Write the person in charge of shipping at origin and the person in charge of receiving at destination.
- Count what you are about to move before writing anything in the table; if you can, do it with two people: one counts and the other writes.
- Register each product in its line: code, name, quantity and unit, and use Observations only when there is a note, such as a batch or an expiration date.
- Print the transfer and collect the first signature: the person dispatching signs as the person in charge of shipping, after verifying that what leaves matches what is written.
- Hand the document over together with the goods; at the destination warehouse, the person receiving counts against the transfer before signing as the person in charge of receiving.
- If something does not match — fewer boxes arrived than written, or an item came damaged —, write the difference in Observations before signing and solve it the same day.
- Once the transfer is signed on both sides, update your records: discount the goods from the origin warehouse, add them to the destination warehouse and keep a copy of the document in your movements file.
Tips so transfers do not throw your inventory out of balance
- Use consecutive numbering. Keep transfers numbered in order — TR-001, TR-002, TR-003 — and never reuse or skip numbers. Numbering lets you find any movement in seconds and notice at once if a document is missing.
- Require signatures at origin and destination. The person in charge of shipping signs after dispatching and the person in charge of receiving signs after counting and checking. A transfer with a single signature, or signed without counting, proves nothing when someone later asks what happened.
- If your system handles more than one warehouse, record the transfer as a transfer. Do not enter it as a sale, a purchase or an adjustment: only recording the transfer as an internal movement keeps each warehouse's stock correct without affecting income, costs or the ownership of the goods.
- Write it down the same day. A transfer recorded a week later is recorded badly or not at all: memory does not keep quantities or people in charge. The document is filled in when the goods move, not when someone remembers.
When to move from the template to software
The Excel template is an excellent first tool to formalize your transfers: it is free, works offline, anyone can understand it, and it is more than enough when you move goods between warehouses every now and then; if that is your case, use it with confidence and you need nothing else. The limit appears when the transfer stops being an isolated event and becomes part of a cycle: the box moved to the North Warehouse today must be discounted from one warehouse, added to the other and made available for the next sale or dispatch, and doing that by hand, transfer after transfer, starts to take time and opens the door to errors.
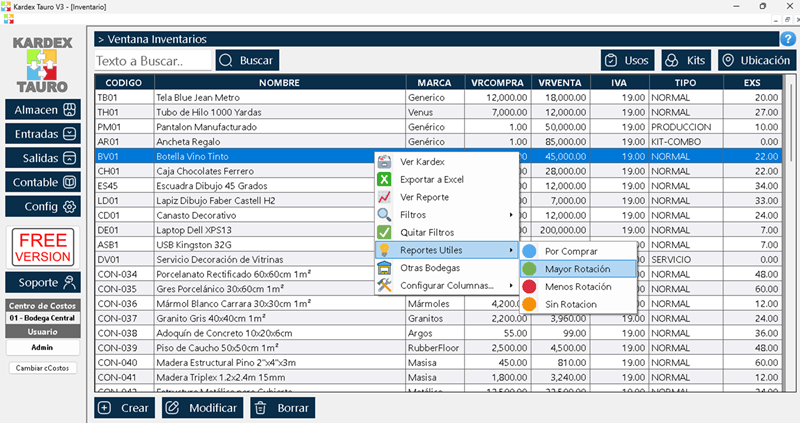
That is the moment for Kardex Tauro, management software for small businesses where the inter-warehouse transfer is recorded with the same pair of details you use in the template — origin warehouse, destination warehouse, product and quantity — and the system discounts from one and adds to the other automatically, keeping the stock card of every warehouse up to date without touching a spreadsheet. To be honest: if you are just starting to organize your inter-warehouse movements, stay with the template and master it first; when you notice you are losing time passing transfers into your inventory, or that one warehouse's stock never matches the other's, that is the moment to try a tool like Kardex Tauro.
In the end, moving goods between warehouses well is not a matter of tools but of method: number the transfer, write it down the same day, count at origin, check at destination and sign on both sides. With this downloadable template you have that method from today.
Frequently asked questions
What does a transfer between warehouses record?
Which product leaves one warehouse, in what quantity, to which one and on what date, with who dispatches and who receives.
Does it affect total inventory?
No: the company total does not change, the location does. Without the record, one warehouse shows a shortage and another a surplus.
Is it signed?
Yes, by whoever hands over and whoever receives. That paper is what lets you claim if something is missing on arrival.
Final note: the inter-warehouse transfer form is an internal control tool, not a fiscal document; check the requirements in your country if your activity calls for them and consult an adviser whenever you have doubts.
⬇ Download the inter-warehouse transfer template in Excel for free