How to Create a Product, Step by Step
How to Create a Product, Step by Step
Creating a product is the first real movement of any inventory. Until the product exists in the system you cannot buy it, sell it, consume it or transfer it: everything else hangs off this record. That is why the critical step is not filling in the form but confirming, before you start, which cost center you are working in, because the product is bound to that cost center and not to another one.
This guide follows the whole process on the application, with one screenshot per screen and the meaning of every numbered red box. The example creates an ergonomic chair with code MAN-EN01 in cost center 01 - Bodega Central: the same nine steps work for any product, whether it is a hardware reference, a workshop supply or a counter item.
Before you start
- Permission to create products in the inventory module.
- The right cost center active: it is shown at the bottom of the sidebar and is changed with «Change Cost Center».
- The product code decided in advance: it is required and cannot be repeated.
- The group and subgroup you want to classify the product under.
Step by step
Step 1 — The main window
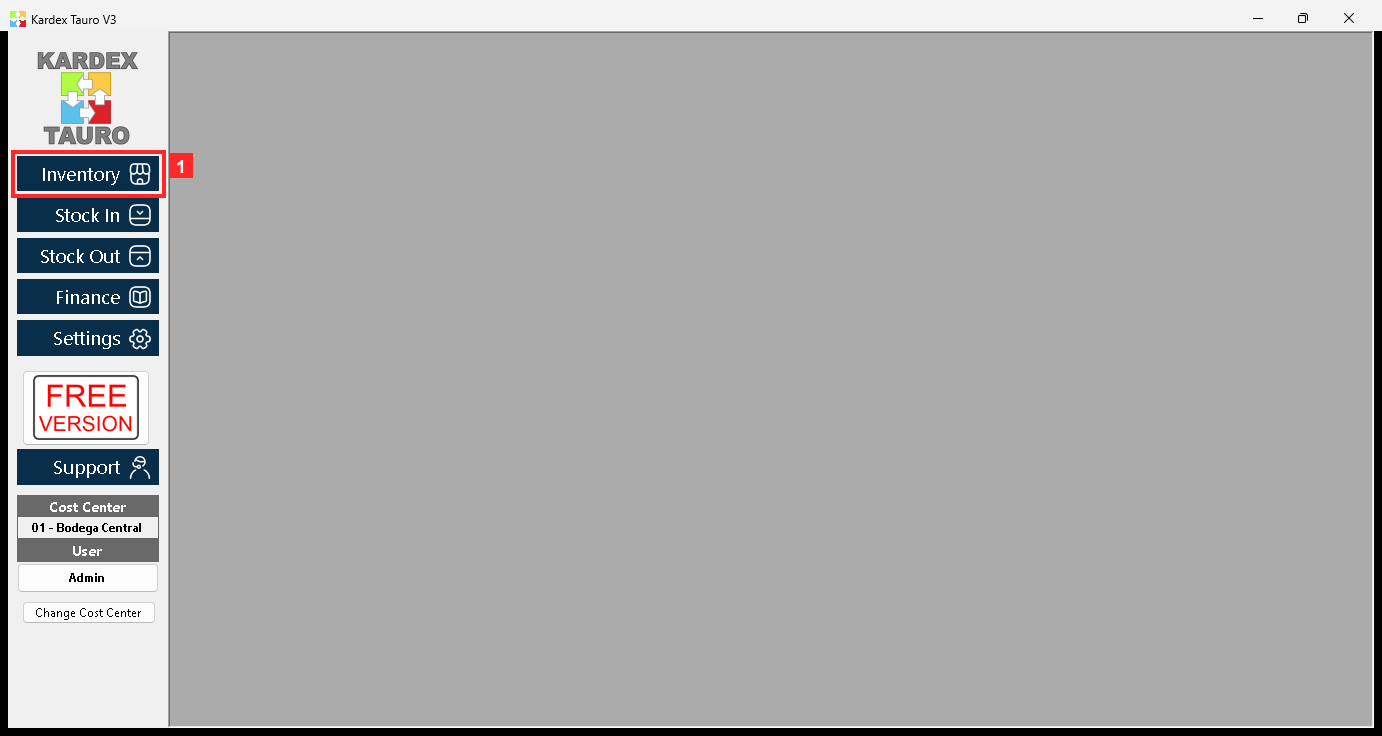
KardexTauro V3 opens in this window. The left sidebar groups all the system modules and the central area is the working area, where the program windows open. The lower part of the sidebar shows the active Cost Center, the name of the logged-in User and the «Change Cost Center» button. Every product you create is stored in the active cost center.
In the image:
- 1) Button «Inventory»: opens the inventory module menu (Inventory, Stock Ledger and Groups).
Texts on screen: «Inventory», «Stock In», «Stock Out», «Finance», «Settings», «Support», «Change Cost Center»
Action: Press the «Inventory» button in the sidebar to enter the inventory module.
Step 2 — The inventory module menu
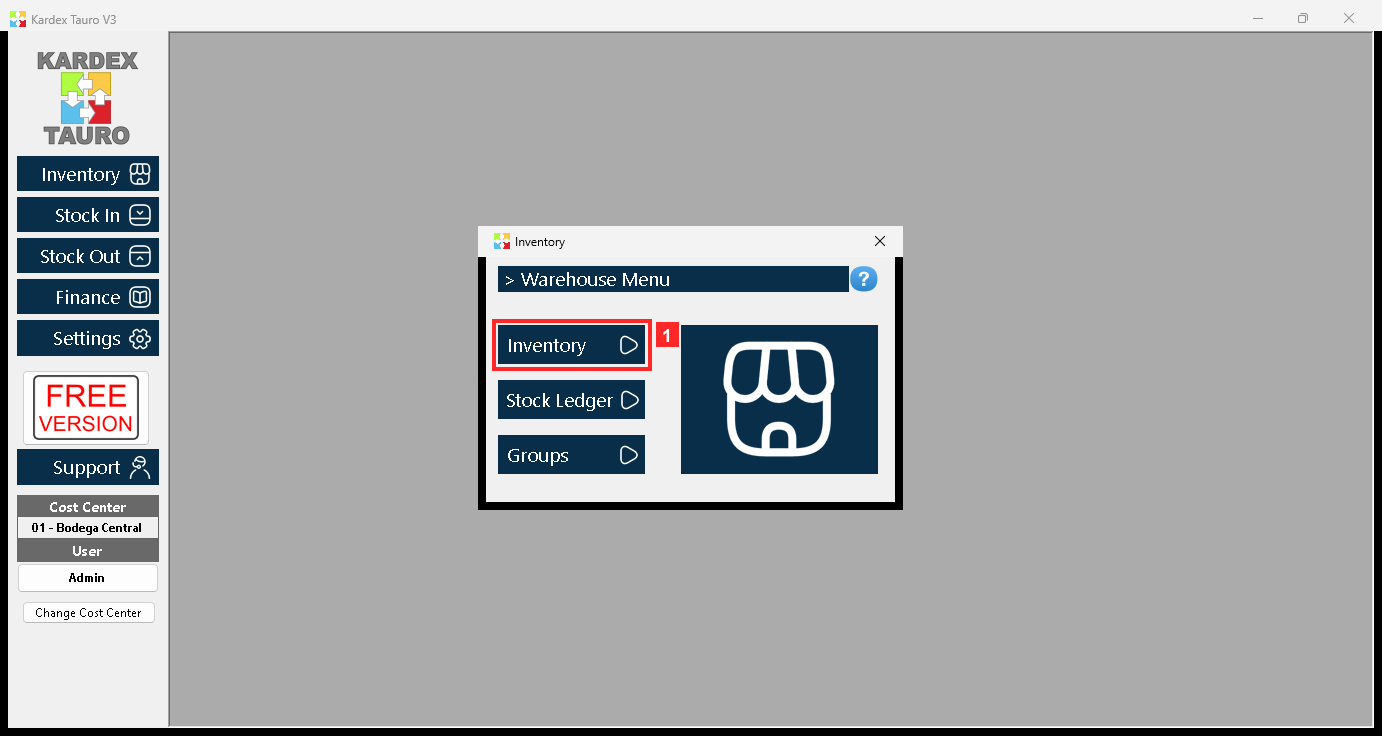
Pressing «Inventory» opens the «Inventory» window with the three options of the module: «Inventory», «Stock Ledger» and «Groups». «Inventory» is the product list, «Stock Ledger» shows the stock movements and «Groups» manages the classifications.
In the image:
- 1) Button «Inventory»: opens the product list.
Texts on screen: «Inventory», «Stock Ledger», «Groups»
Action: Press «Inventory» to see the product list.
Step 3 — The product list (Inventory)
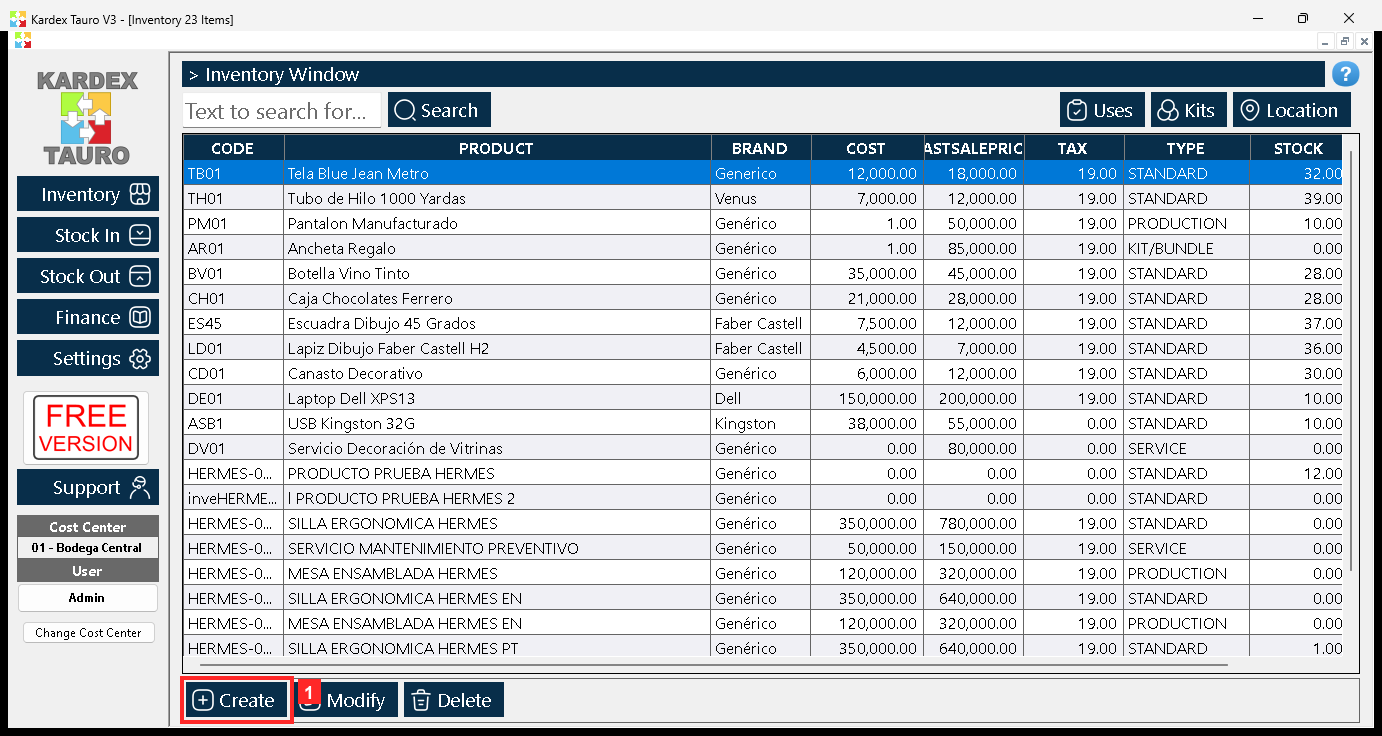
The «Inventory 23 Items» window opens inside the working area with all the products of the system. The columns are «CODE», «PRODUCT», «BRAND», «COST», «ASTSALEPRIC», «TAX», «TYPE» and «STOCK» (stock on hand). At the top you find the search box «Text to search for...» with the «Search» button; at the top right, «Uses», «Kits» and «Location». The bottom bar holds the actions for the selected product: «Create», «Modify» and «Delete».
In the image:
- 1) Button «Create»: opens the form to create a product.
Texts on screen: «Search», «Uses», «Kits», «Location», «Create», «Modify», «Delete»
Action: Press «Create» to open the form of a new product.
Step 4 — The product form: «General Information» tab
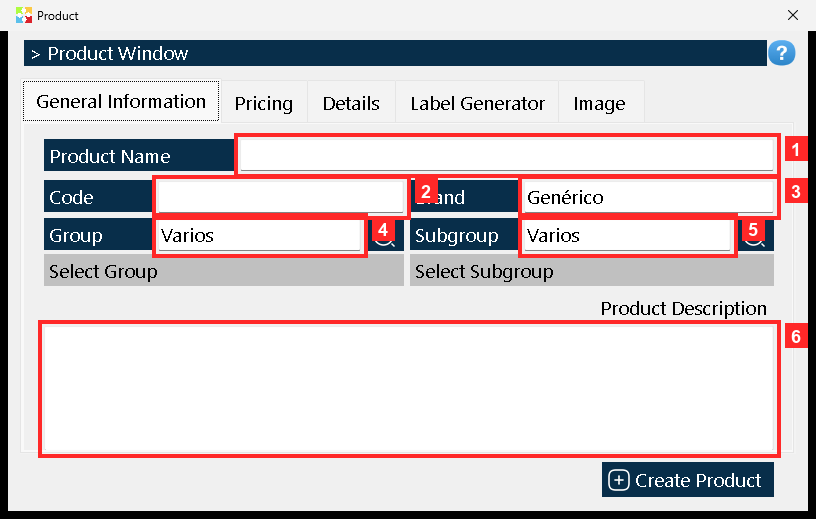
The «Product» window opens with five tabs: «General Information», «Pricing», «Details», «Label Generator» and «Image». The «General Information» tab identifies the product: «Product Name», «Code», «Brand», «Group», «Subgroup» and «Product Description». The code is mandatory and cannot be repeated; the group and subgroup can be typed or chosen with the magnifier of each field. The «Create Product» button, at the bottom right, saves the product.
In the image:
- 1) Field «Product Name»: name shown for the product in the documents.
- 2) Field «Code»: unique code of the product.
- 3) Field «Brand»: manufacturer or brand.
- 4) Field «Group»: main classification. It is typed or chosen with the magnifier (button «Product Description»).
- 5) Field «Subgroup»: secondary classification, also with its magnifier.
- 6) Field «Product Description»: free text describing the product.
Texts on screen: «General Information», «Pricing», «Details», «Label Generator», «Image», «Create Product»
Action: Type «Product Name», «Code», «Brand», «Group» and «Subgroup»; then move to the «Pricing» tab.
Step 5 — The «General Information» tab with the data filled in
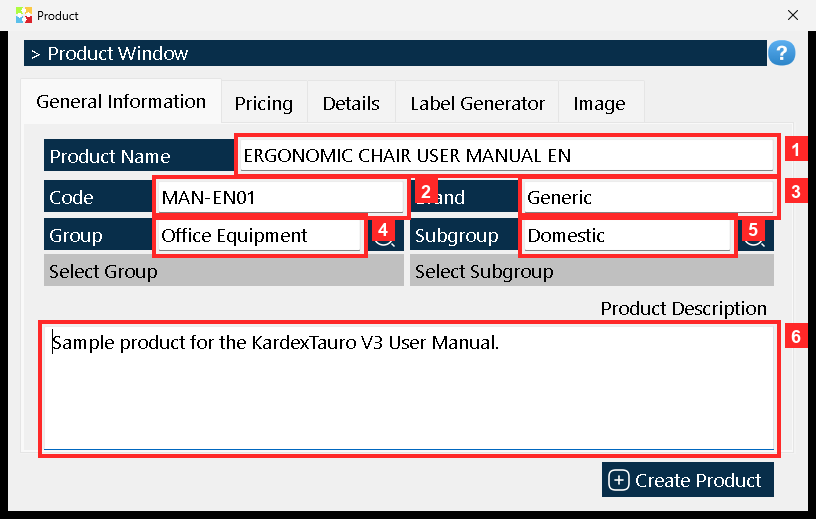
This is how the «General Information» tab looks with the sample product data: «Product Name» = ERGONOMIC CHAIR USER MANUAL EN; «Code» = MAN-EN01; «Brand» = Generic; «Group» = Office Equipment; «Subgroup» = Domestic; and the notes in «Product Description».
In the image:
- 1) «Product Name» = ERGONOMIC CHAIR USER MANUAL EN
- 2) «Code» = MAN-EN01
- 3) «Brand» = Generic
- 4) «Group» = Office Equipment
- 5) «Subgroup» = Domestic
- 6) «Product Description»: product notes.
Action: Check that the data is correct and move to the «Pricing» tab.
Step 6 — The «Pricing» tab: prices and sales methods
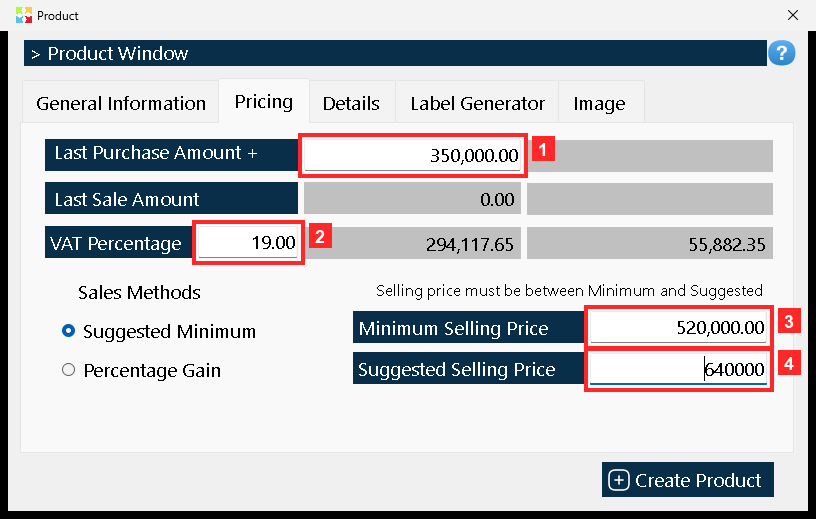
The «Pricing» tab holds the prices. «Last Purchase Amount + VAT» and «VAT Percentage» are the cost reference; «Minimum Selling Price» and «Suggested Selling Price» set the sales range. The «Suggested Minimum» and «Percentage Gain» radio buttons define how the program calculates and suggests the sales price.
In the image:
- 1) «Last Purchase Amount + VAT»: last purchase value = 350000.
- 2) «VAT Percentage»: TAX percentage = 19.
- 3) «Minimum Selling Price»: minimum sales price = 520000.
- 4) «Suggested Selling Price»: suggested sales price = 640000.
Texts on screen: «Suggested Minimum», «Percentage Gain»
Action: Type the values and continue with the «Details» tab.
Step 7 — The «Details» tab: dimensions, stock and category
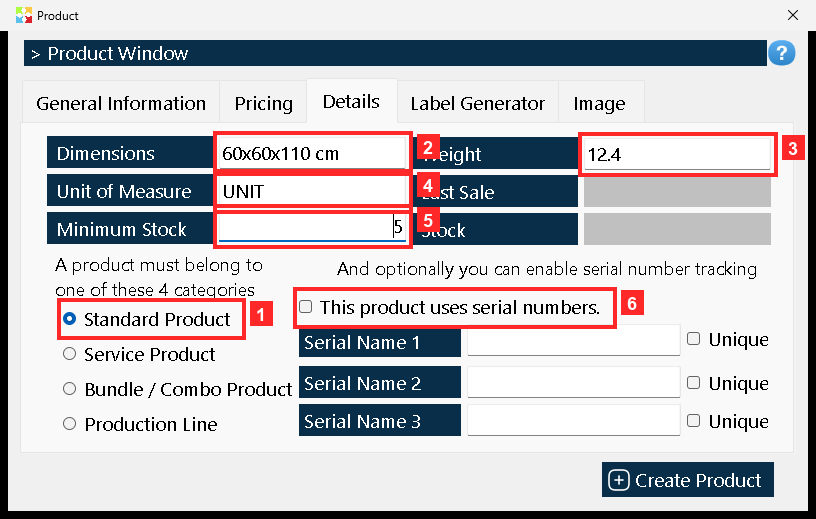
The «Details» tab stores «Dimensions», «Weight», «Unit of Measure» and «Minimum Stock» (restocking warning). At the bottom you choose the product category —«Standard Product», «Service Product», «Bundle / Combo Product» or «Production Line»— and the «This product uses serial numbers.» check box, which allows up to three serial number names.
In the image:
- 1) Option «Standard Product»: product bought and sold with stock on hand (the category used in this example).
- 2) «Dimensions» = 60x60x110 cm.
- 3) «Weight» = 12.4.
- 4) «Unit of Measure» = UNIT.
- 5) «Minimum Stock» = 5: minimum quantity before the program warns that you must restock.
- 6) Check box «This product uses serial numbers.»: enables serial number tracking (not used in this example).
Texts on screen: «Standard Product», «Service Product», «Bundle / Combo Product», «Production Line», «This product uses serial numbers.», «Create Product»
Action: Choose «Standard Product», type the dimensions, weight, unit of measure and minimum stock, and press «Create Product».
Step 8 — Saving the product
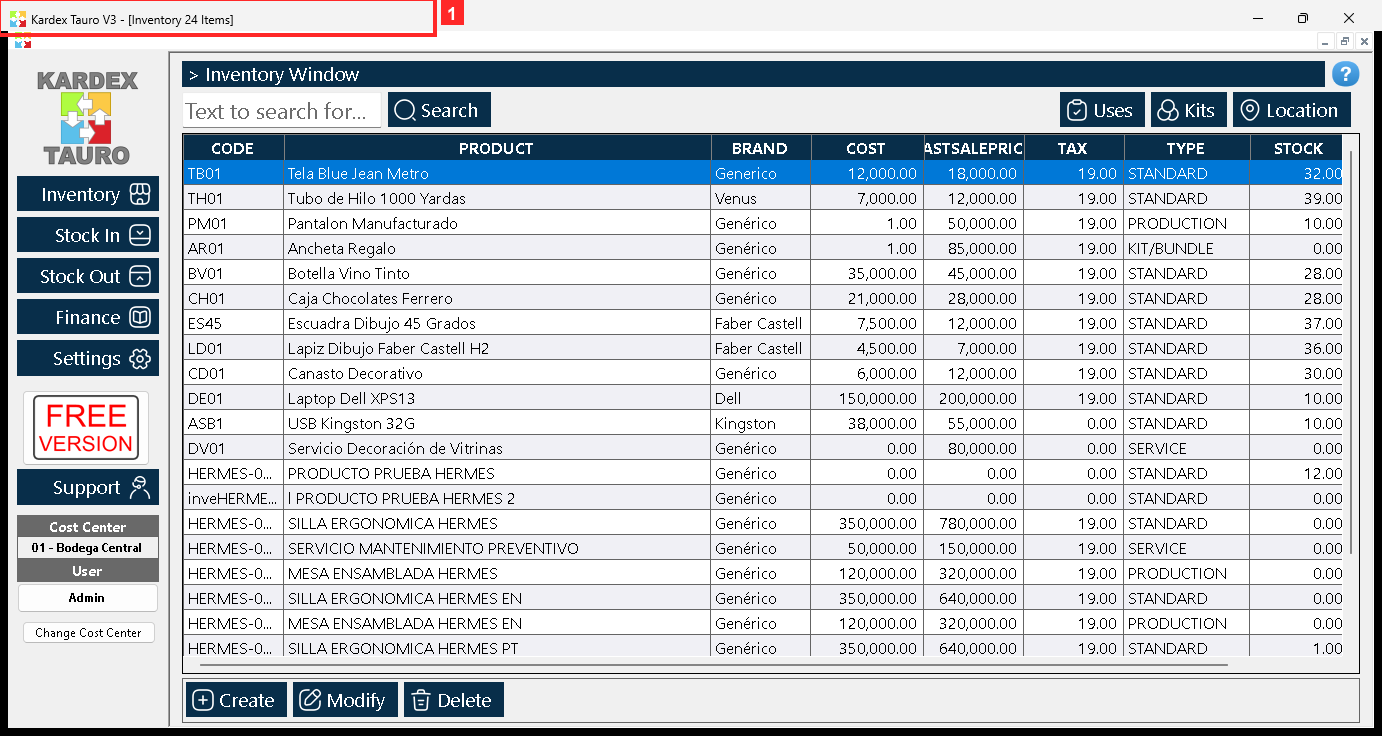
Pressing «Create Product» stores the product and closes the window: the list is refreshed and the counter in the title bar goes from 23 to 24 products. If a mandatory field were missing or the code already existed, the program would show a warning instead of saving.
In the image:
- 1) Title bar: the inventory went from 23 to 24 products.
Action: The product is saved in the inventory of the active cost center; the list is refreshed with the new row.
Step 9 — Checking the product list
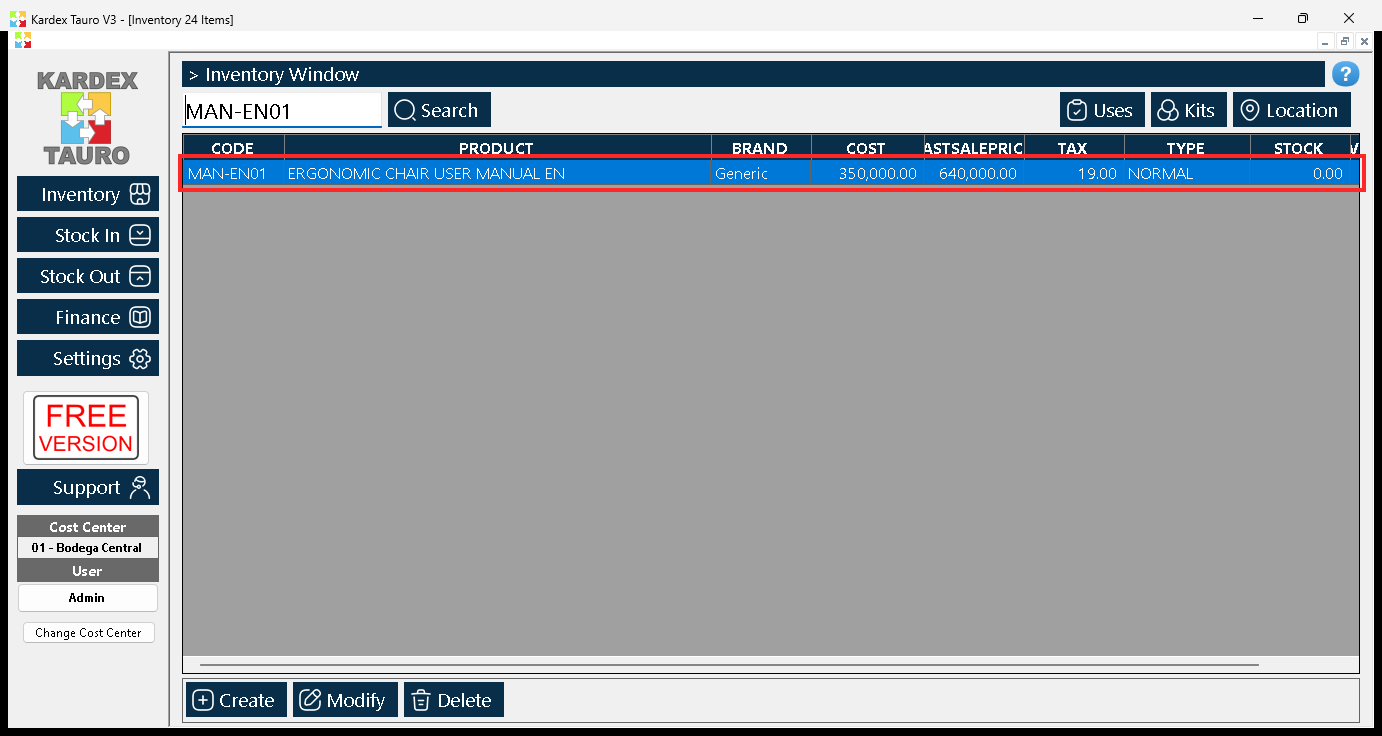
Back in «Inventory», type the code in «Text to search for...», press «Search» and check that the product appears in the list with its brand, values and type.
In the image:
- 1) Row of the newly created product MAN-EN01: ERGONOMIC CHAIR USER MANUAL EN.
Texts on screen: «MAN-EN01», «Search»
Action: The product was created in cost center 01 - Bodega Central and can now be used in purchases, sales, consumptions and transfers.
Result
The product is saved in the inventory of the active cost center, the counter in the title bar moved from 23 to 24 and the new row shows up when you search for the code. The result was verified by reading the program's database, not just the screen.
Best practices
- Settle on a coding rule before your first product (family prefix plus a sequence number). Fixing codes after a year of movements costs far more than thinking them through once.
- Enter the last purchase amount before typing the suggested price: that way the margin on screen is real and not an estimate.
- Set the minimum stock while you create the product. That is the figure that later triggers the reorder warning, and nobody goes back to fill it in.
- Use group and subgroup from the start. Reclassifying hundreds of products once the list is a mess is a separate job.
Frequently asked questions
What happens if I repeat a code or leave a required field empty?
The program does not save it and shows a warning instead of storing the product. The code is the one field that cannot be repeated, so it is worth checking the list first if you suspect it already exists.
Can I create a service or a bundle instead of a stocked product?
Yes. On the «Details» tab you choose the category: «Standard Product», «Service Product», «Bundle / Combo Product» or «Production Line». For a service you pick «Service Product»; stock handling and minimum stock only make sense for items you buy and sell.
When can I use the product in documents?
As soon as it is saved. Once created it is available for purchases, sales, internal consumption and transfers inside the cost center where it was created.
This article is part of the Kardex Tauro V3 User Manual, which gathers every process in the system, explained step by step.
