How to Create a Contact (Customer or Supplier), Step by Step
How to Create a Contact (Customer or Supplier), Step by Step
A partner is the record the system uses to identify everyone you buy from and everyone you sell to: without it there is nobody to charge a receivable to or to pay a payable from. What sets Kardex Tauro V3 apart is that you do not pick a type when you create one, because the same partner acts as a customer or as a supplier depending on the document it is used in, so the quality of these details shows up later across the whole accounting operation.
This guide walks through the whole entry on the application, with one screenshot per screen and the meaning of every numbered red box. The example creates partner 901 with tax id 901234567-8 in cost center 01 - Bodega Central, going through «Finance» and «Partners»: the same eight steps work for a walk-in customer, a raw material supplier or any other counterparty.
Before you start
- Permission to create and edit partners in the «Finance» module.
- The right cost center active: it is switched with «Change Cost Center».
- The short code and the partner name decided in advance: they are the first two fields of the entry form.
- The partner's tax id and the basic contact details (address, city, phone) at hand.
Step by step
Step 1 — The main window
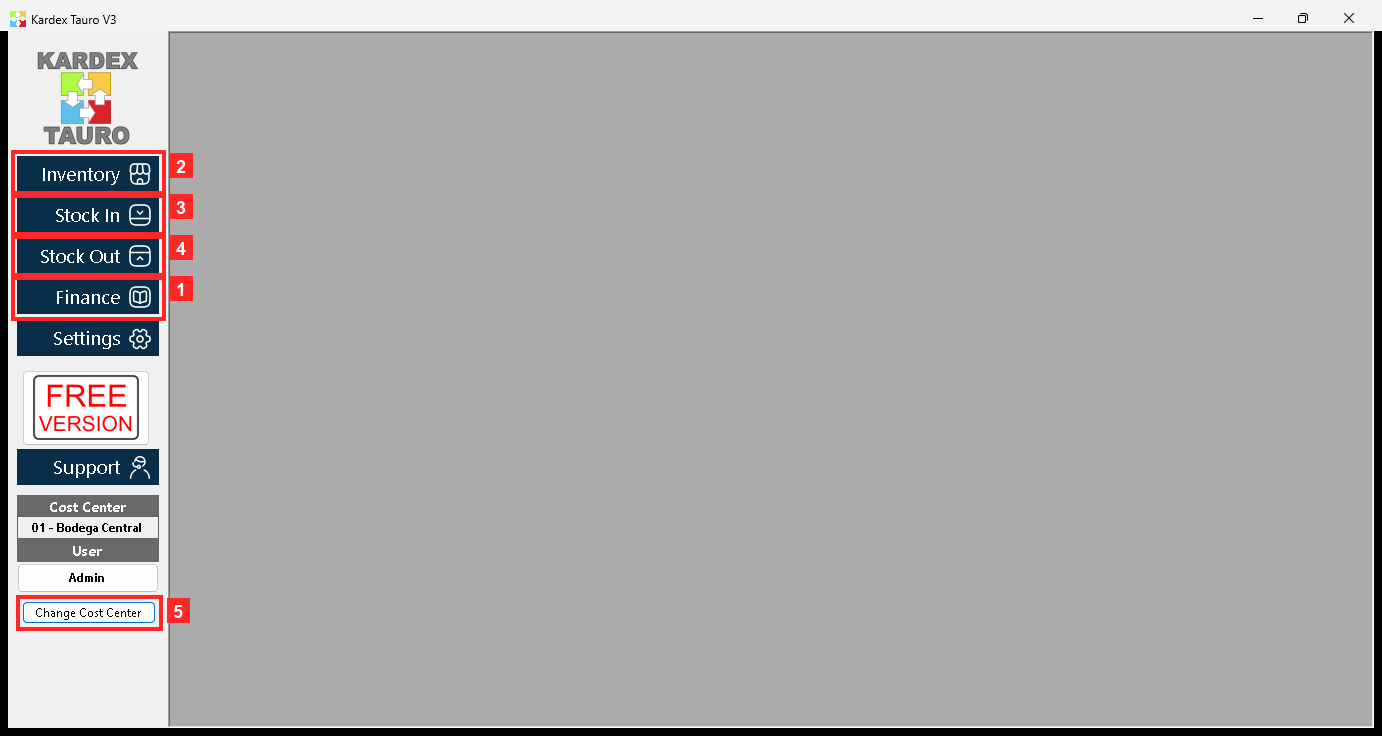
When the program opens you see the main window with the modules on the left. Before starting, check the active cost center (01 - Bodega Central) and the language (Change Cost Center switches the cost center).
In the image:
- 1) Module «Finance»: Finance lives here.
- 2) «Inventory»: the warehousing module.
- 3) «Stock In»: the entries.
- 4) «Stock Out»: the exits.
- 5) «Change Cost Center»: switches the active cost center.
Texts on screen: «Finance», «Inventory», «Stock In», «Stock Out»
Action: Check that you are on the right cost center.
Step 2 — The accounting module menu
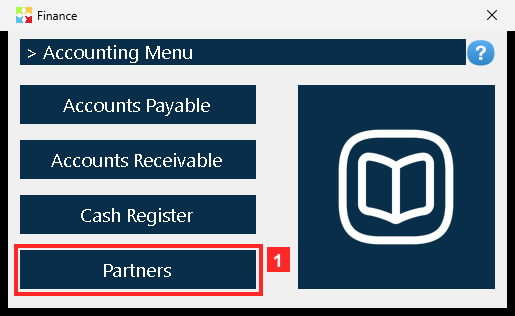
Press «Finance» to open the Finance menu: its options are «Partners», «Accounts Receivable», «Cash Register» and «Accounts Payable». This manual uses «Partners». There is no partner type to choose: the same partner works as a customer or as a supplier depending on the document it is used in.
In the image:
- 1) Button «Partners»: opens the partner list.
Texts on screen: «Accounts Payable», «Accounts Receivable», «Cash Register», «Partners»
Action: Press «Partners».
Step 3 — The partner list
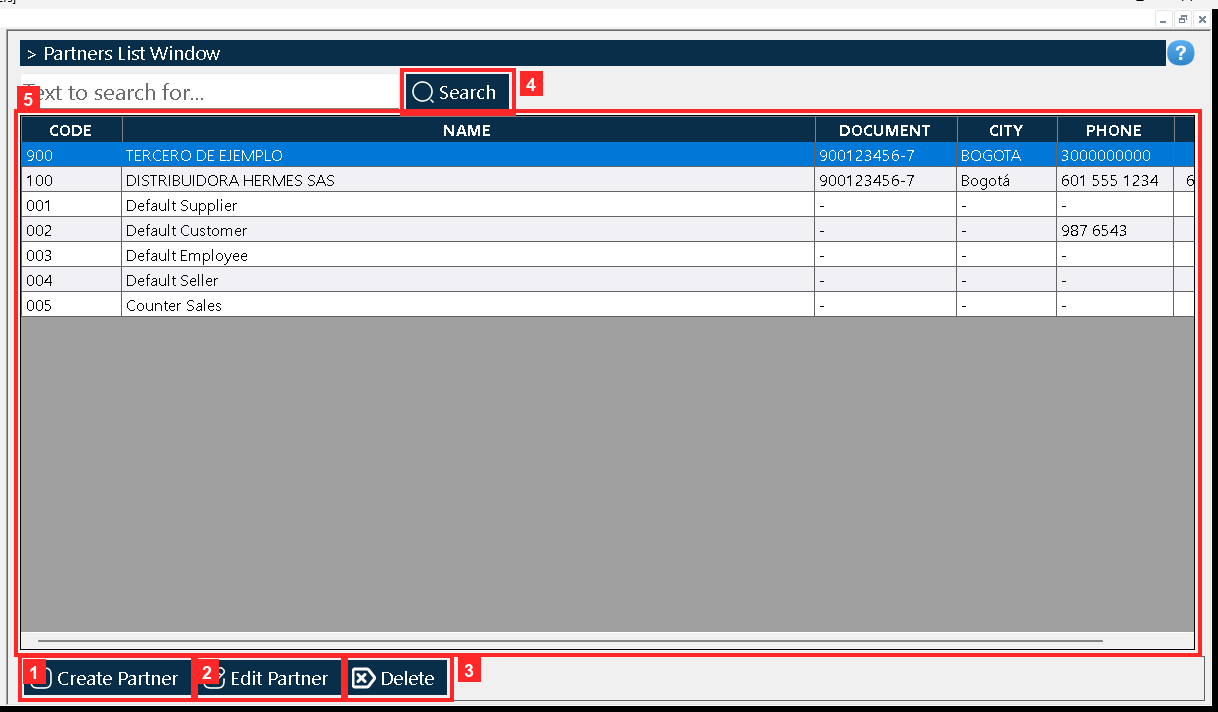
The list opens with the partner grid: every row carries «CODE», «NAME», «DOCUMENT», «CITY», «PHONE» y «DEBT». On the left are the buttons «Create Partner» (opens a blank partner), «Edit Partner» (opens the selected one) and «Delete»; on the right, «Search» with its search box.
In the image:
- 1) Button «Create Partner»: opens a blank record.
- 2) «Edit Partner»: opens the selected partner.
- 3) «Delete»: deletes the selected one.
- 4) «Search»: refreshes the list.
- 5) The grid: «CODE», «NAME», «DOCUMENT», «CITY», «PHONE» y «DEBT».
Texts on screen: «Create Partner», «Edit Partner», «Delete», «Search»
Action: Press «Create Partner» to create a partner.
Step 4 — The code and the name
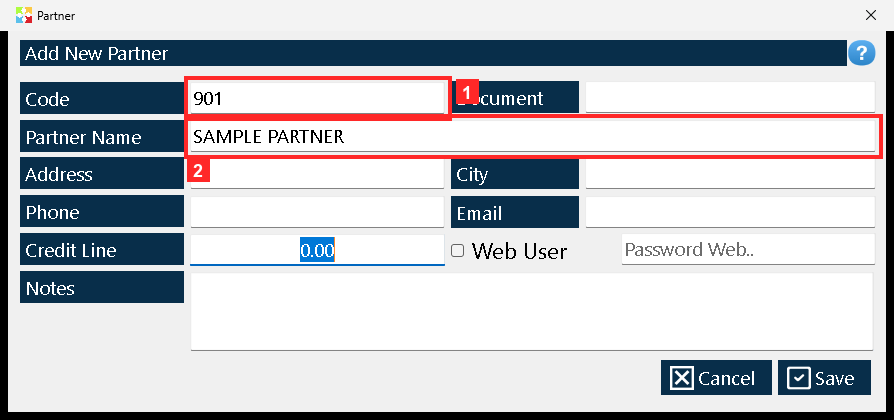
The window to add a partner opens. At the top you type «Code» —a short reference of your own, in the example 901— and «Partner Name», the partner name (in the example «SAMPLE PARTNER»).
In the image:
- 1) — «Code»: the short reference (901).
- 2) «Partner Name»: the name (SAMPLE PARTNER).
Texts on screen: «Code», «Partner Name»
Action: Type the code and the partner name.
Step 5 — The contact details
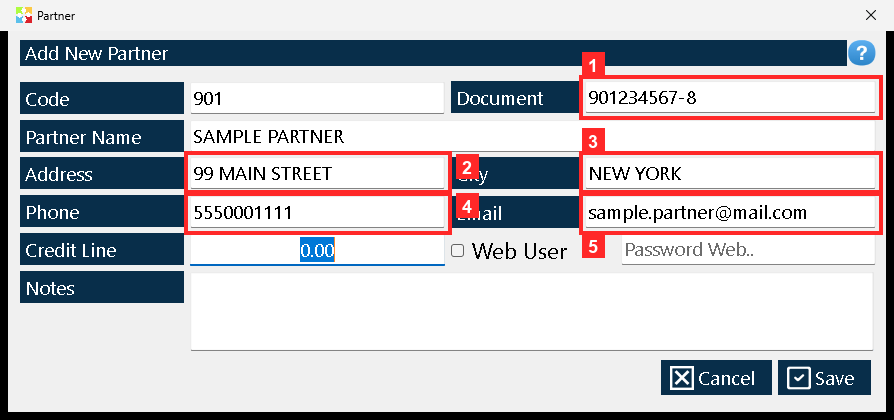
Below go the partner details: «Document» (tax id, in the example 901234567-8), «Address» (99 MAIN STREET), «City» (NEW YORK), «Phone» (5550001111) and «Email» (sample.partner@mail.com).
In the image:
- 1) «Document»: tax id (901234567-8).
- 2) «Address»: 99 MAIN STREET.
- 3) «City»: NEW YORK.
- 4) «Phone»: 5550001111.
- 5) «Email»: sample.partner@mail.com.
Texts on screen: «Document», «Address», «City», «Phone», «Email»
Action: Complete the contact details.
Step 6 — The credit line, web access and notes
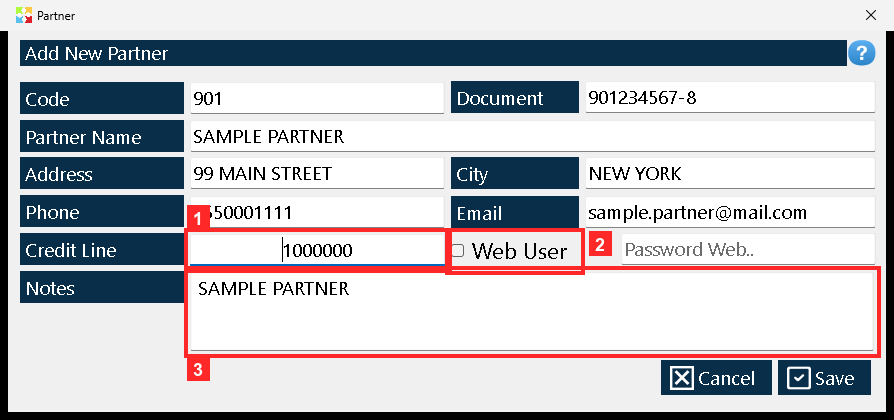
«Credit Line» is the credit line given to the partner (in the example 1000000): it is the amount the program takes into account when selling to it on credit. Next to it is «Web User»: if it is checked, the partner web access is enabled and a password must be given in the box beside it (it is not displayed). Below, «Notes» keeps a free note (in the example «SAMPLE PARTNER»).
In the image:
- 1) «Credit Line»: the credit line (1000000).
- 2) «Web User»: enables the partner web access.
- 3) «Notes»: a free note («SAMPLE PARTNER»).
Texts on screen: «Credit Line», «Web User», «Notes»
Action: Set the credit line and, if needed, complete the notes.
Step 7 — Saving the partner
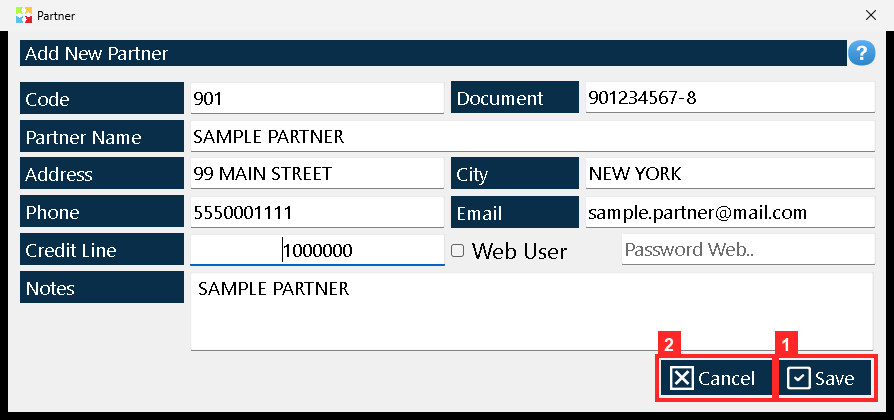
The record is saved with «Save»: there is no finalize dialog here, it saves in one go. «Cancel» closes the window without saving.
In the image:
- 1) Button «Save»: saves the partner.
- 2) «Cancel»: closes without saving.
Texts on screen: «Save», «Cancel»
Action: Press «Save».
Step 8 — The partner created
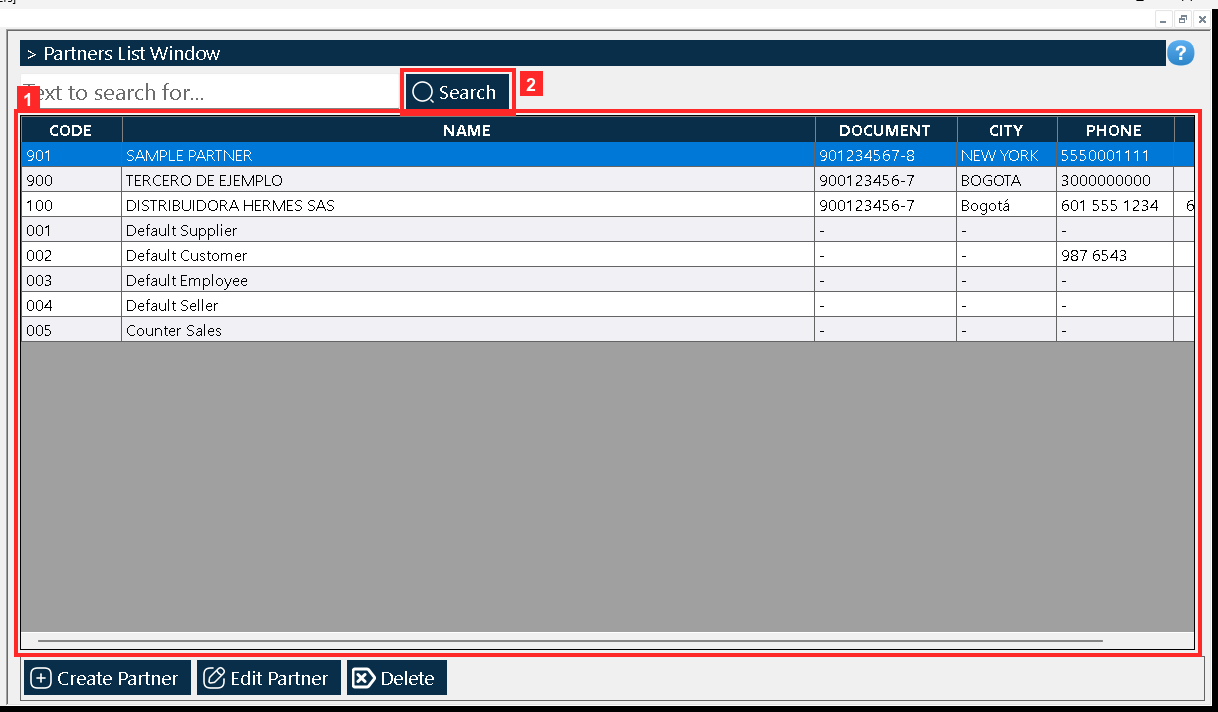
The window closes and the new partner stays in the list: «901 | SAMPLE PARTNER | 901234567-8 | NEW YORK | 5550001111 | 0.00». If the list holds many partners, use «Search» and the search box to find it.
In the image:
- 1) The new row of the partner (901).
- 2) «Search»: refreshes the list.
Texts on screen: «Search»
Action: Check the row of the partner just created.
Result
The partner is saved and shows up in the grid as the row «901 | SAMPLE PARTNER | 901234567-8 | NEW YORK | 5550001111 | 0.00». The result was verified by reading the program's database (kardex.db), not just the screen.
Best practices
- Settle on a short coding rule for partners (a running number or a prefix per relationship type) so the code stays a stable reference that is easy to dictate over the phone.
- Search before you create, using «Search» and its search box: because the same record serves as both a customer and a supplier, there is no need to keep two entries for the same counterparty.
- Always fill in the «Document» field (tax id): that is the column that identifies the partner without ambiguity when two names look alike.
- Set the credit line deliberately, since it is the amount the program takes into account when selling to that partner on credit.
Frequently asked questions
Do I have to decide whether the partner is a customer or a supplier?
No. There is no partner type to choose: the same record works as a customer or as a supplier depending on the document it is used in.
What happens if I tick «Web User»?
It enables the partner's web access and you must give a password in the box beside it, which is not displayed on screen. If you have not saved yet, «Cancel» closes the window without saving anything.
How do I correct or remove a partner that already exists?
From the list: «Edit Partner» opens the selected record and «Delete» removes the one that is highlighted. Changes are confirmed with «Save», which stores them in one go because this window has no finalize dialog.
This article is part of the Kardex Tauro V3 User Manual, which gathers every process in the system, explained step by step.
