How to Create a User and Grant Permissions, Step by Step
How to Create a User and Grant Permissions, Step by Step
Every document posted in Kardex Tauro is signed by the user who posted it: who logged in, who approved and who changed a figure are questions you answer from the records, not from the team's memory. That is why setting up a user is not a startup chore but part of your internal control. And the delicate part is not typing the name, it is choosing the permissions: a user with none can still log in and yet cannot get any work done.
This guide walks through the whole process on the application, with one screenshot per screen and the meaning of every numbered red box. The example creates user manual_en, of type USER, in cost center 01 - Bodega Central, with the email user.manual@mail.com, and assigns it CAJA-VER and CONSUMOS-VER: the same nine steps work for any account, whether it belongs to a warehouse, a checkout desk or an office.
Before you start
- An ADMIN account, or one with access to «Settings»: the «Users» tab is not in the day-to-day menu.
- The cost center where the user will work, already created and active: 01 in the example.
- The user name decided and checked before you start: it is the login name and it cannot be repeated.
- The password defined and written down somewhere safe: the program stores it encrypted and never shows it again.
Step by step
Step 1 — The main window
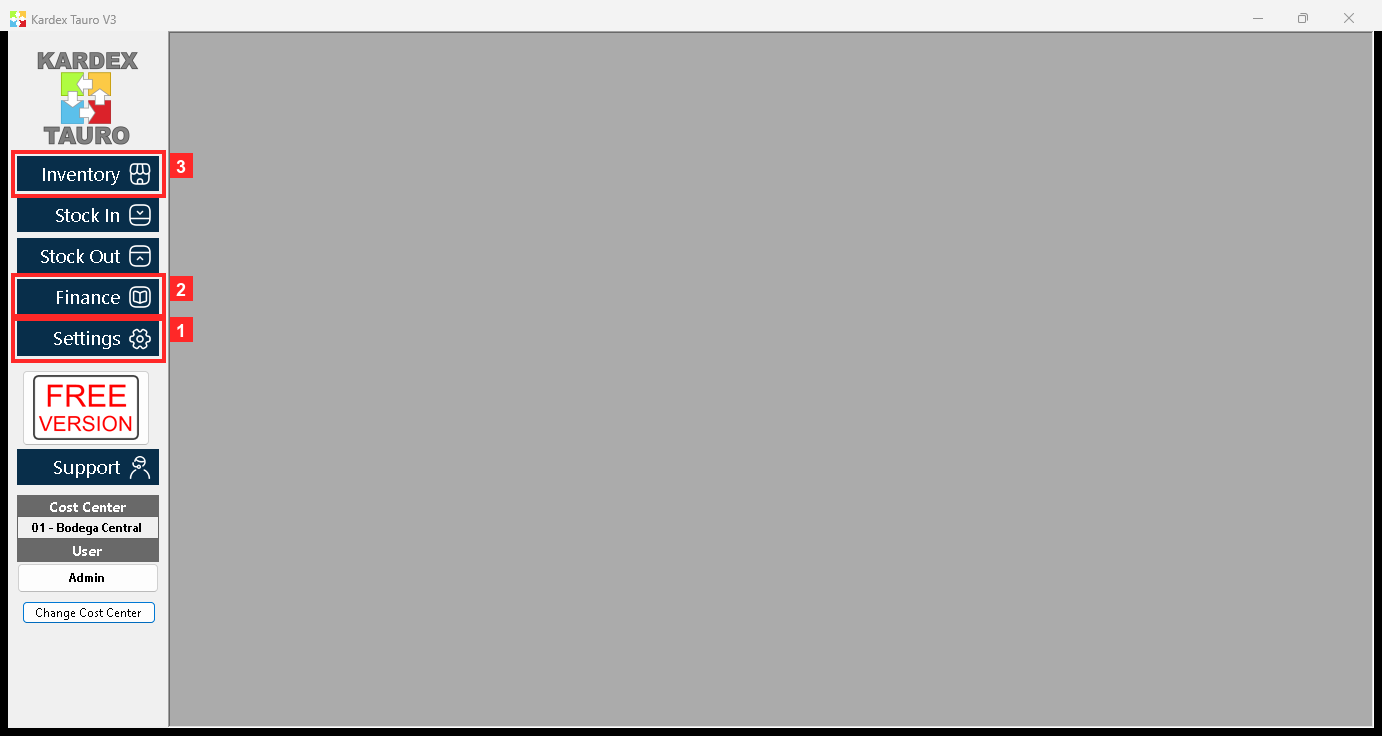
When the program opens you see the main window. Users are managed inside «Settings», the settings window: bottom left.
In the image:
- 1) Button «Settings»: opens the settings.
- 2) «Finance»: the accounting module.
- 3) «Inventory»: the warehousing module.
Texts on screen: «Settings», «Inventory», «Stock In», «Stock Out», «Finance»
Action: Press «Settings».
Step 2 — The Users tab
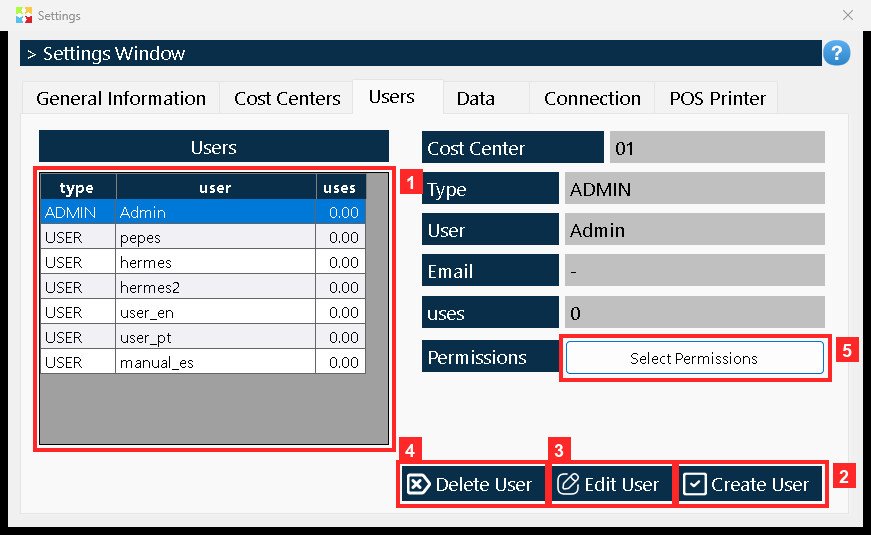
The settings window opens. Click the «Users» tab: there is the grid with every user of the program (the «Type» column says whether it is ADMIN or USER) and the buttons «Create User», «Edit User» and «Delete User». Bottom right, «Select Permissions» opens the permissions of the selected user.
In the image:
- 1) The users grid (7 in total).
- 2) Button «Create User»: opens a blank record.
- 3) «Edit User»: edits the selected user.
- 4) «Delete User»: deletes the selected user.
- 5) «Select Permissions»: opens the user permissions.
Texts on screen: «Create User», «Edit User», «Delete User», «Select Permissions»
Action: Press «Create User» to create a user.
Step 3 — The cost center, the type and the name
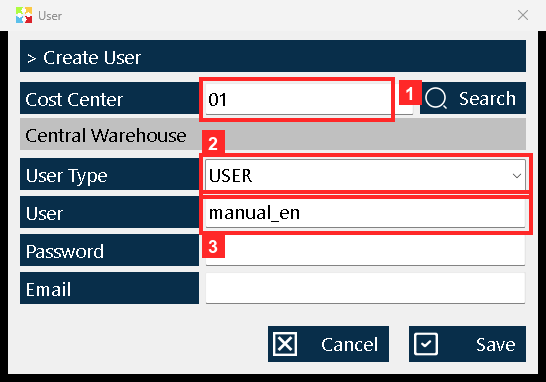
The window to create the user opens. First comes «Cost Center» (the cost center or warehouse where it will work —in the example 01—; «Search» looks it up in the list), «Type» (the user type: USER for a normal user, ADMIN for an administrator) and «User», the name it will log in with (in the example «manual_en»).
In the image:
- 1) «»: the cost center (01).
- 2) «User Type»: the type (USER).
- 3) «User»: the login name (manual_en).
Texts on screen: «Cost Center», «User Type», «User», «Search»
Action: Type the cost center, the type and the user name.
Step 4 — The password and the email
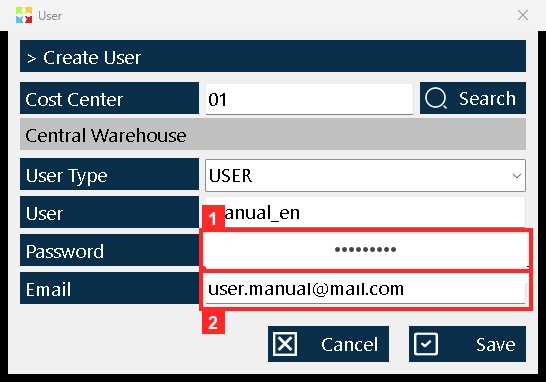
Below are «Password», the password it will log in with (typed here and stored encrypted by the program in the user record) and «Email», its email (in the example «user.manual@mail.com»).
In the image:
- 1) «Password»: the user password (encrypted).
- 2) «Email»: the email (user.manual@mail.com).
Texts on screen: «Password», «Email»
Action: Type the password and the email. Write the password down: without it the user cannot log in.
Step 5 — Saving the user
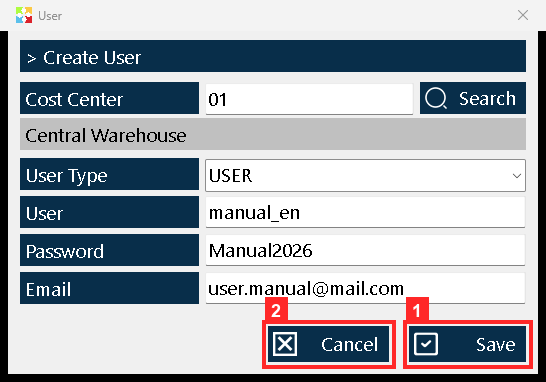
The record is saved with «Save»: it saves in one go, no extra steps. «Cancel» closes without creating the user. Careful: if the name already exists the program says nothing — it does not save and leaves the window open; change the name.
In the image:
- 1) Button «Save»: creates the user.
- 2) «Cancel»: closes without creating it.
Texts on screen: «Save», «Cancel»
Action: Press «Save» to create the user.
Step 6 — The new user in the list
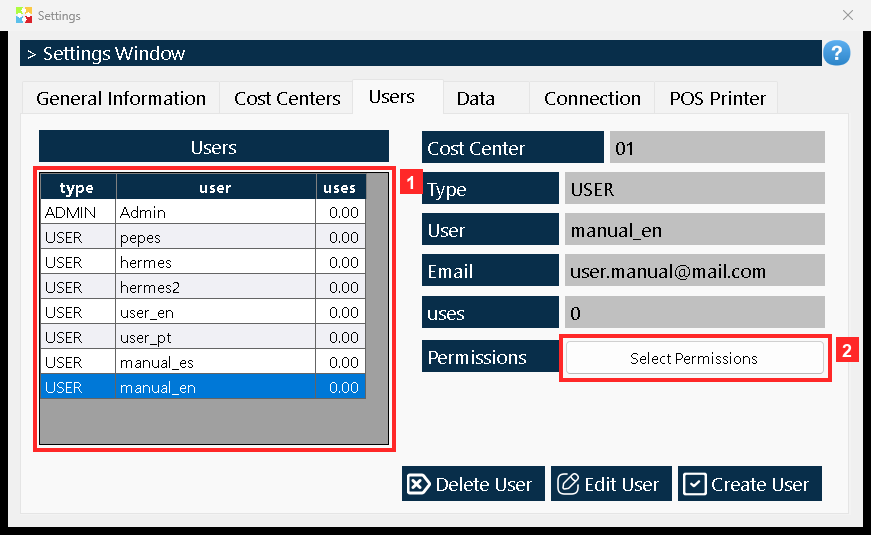
The window closes and the new user stays in the grid: «USER | manual_en | 0.00». When it is selected its details appear below: «User» (manual_en), «Type», «Cost Center» and «Email». It can already log in, still without permissions.
In the image:
- 1) The new row of the user (manual_en).
- 2) «Select Permissions»: opens its permissions.
Texts on screen: «User», «Type», «Cost Center», «Email»
Action: Select the user just created.
Step 7 — The permissions window
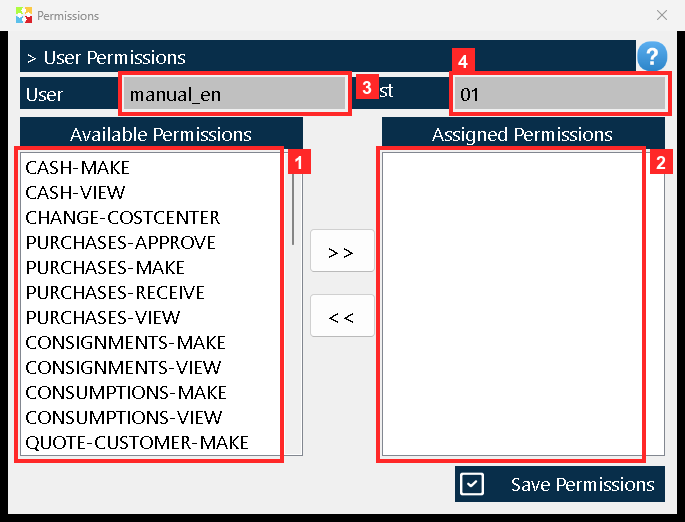
Press «» and «> User Permissions» opens for that user: at the top you see who is being set up («User» and «Cost Centers») and below are the two lists, «Available Permissions» (the permissions that exist and it does not have) and «Assigned Permissions» (the ones it already has). The permissions decide which parts of the program it may use.
In the image:
- 1) «»: the permissions it may have.
- 2) «»: the ones it has (0).
- 3) «User»: the user (manual_en).
- 4) «Cost Centers»: its cost center (01).
Texts on screen: «Available Permissions», «Assigned Permissions», «User», «Cost Centers»
Action: Look at both lists before moving anything.
Step 8 — Moving the permissions it needs
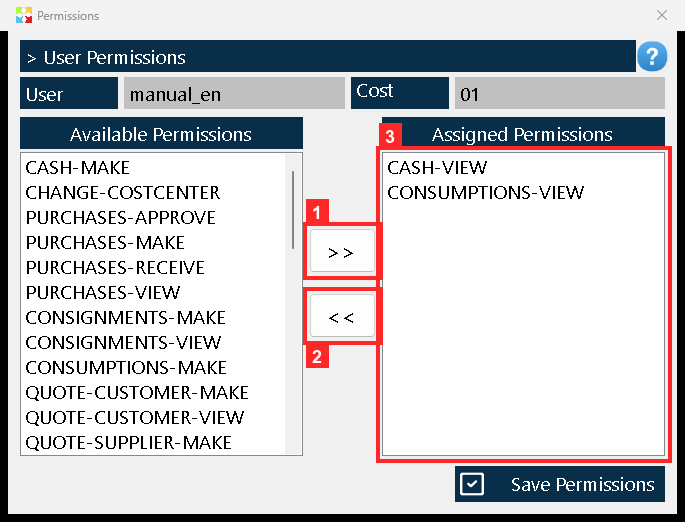
A permission is marked in «Available Permissions» and moved with the «>>» arrow; «<<» returns one from «Assigned Permissions». In the example CAJA-VER, CONSUMOS-VER were moved: view-only permissions, which let the user look but not change anything. Permissions are named by module and action (CAJA-VER, CONSUMOS-HACER, COMPRAS-APROBAR…).
In the image:
- 1) «>>» arrow: moves the marked permission.
- 2) «<<»: returns it to the available list.
- 3) Already assigned: CAJA-VER, CONSUMOS-VER.
Texts on screen: «>>», «<<», «Assigned Permissions», «Available Permissions»
Action: Mark each permission and press the «>>» arrow.
Step 9 — Saving the permissions
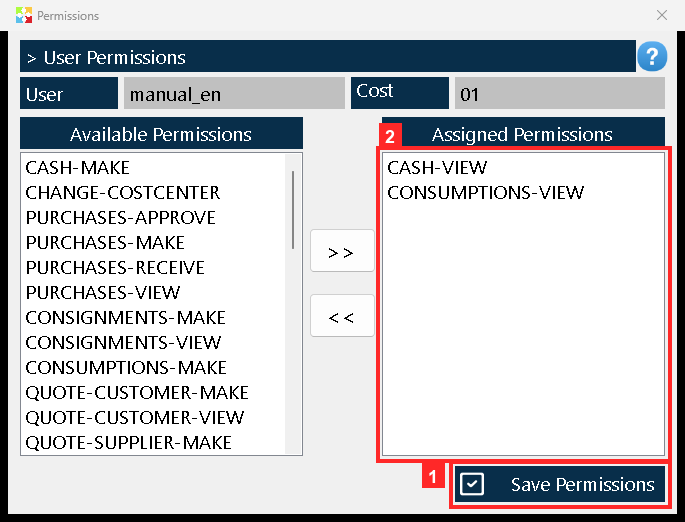
With the permissions already in «Assigned Permissions», press «Save Permissions»: they are saved in the user record. If the window is closed without saving, the permissions do not change. The new user is left with «CAJA-VER, CONSUMOS-VER» and can already work with those parts of the program.
In the image:
- 1) Button «Save Permissions»: saves the permissions on the user.
- 2) What is saved: CAJA-VER, CONSUMOS-VER.
Texts on screen: «Save Permissions», «Assigned Permissions»
Action: Press «Save Permissions» to leave them saved.
Result
The user was left in the «Users» grid as «USER | manual_en | 0.00», with its cost center and email visible once it is selected, and the CAJA-VER and CONSUMOS-VER permissions were saved in its record: with them it can log in from the sign-in window and work in those parts of the program. The result was verified by reading the program database (kardex.db), not just the screen.
Best practices
- Write the password down while you create the account: the program stores it encrypted and there is no way to look it up later, so a lost password means editing the user with «Edit User» and typing a new one.
- Create the account as type USER and keep ADMIN for the administration accounts: the type is chosen when the record is created and it is what separates a normal user from an administrator.
- Start with the view-only permissions (-VER) and add the action ones only when the role demands them: permissions are named by module and action, and one extra permission is a change nobody authorized.
- After moving permissions press «Save Permissions»: if you close the window without saving, your changes are lost and the user stays exactly as it was.
Frequently asked questions
Can the user log in before it has any permissions?
Yes. Once it is saved it stays in the grid and can already log in with its user name and password from the sign-in window, but with no permissions it cannot work in any part of the program.
What happens if the user name already exists?
The program gives no warning: it does not save and leaves the creation window open. Change the name and press «Save» again, which is why it pays to check the grid before creating the account.
How do I take away a permission it already has?
With the «<<» arrow: the permission goes back to «Available Permissions» and is no longer assigned. The change only sticks if you then press «Save Permissions».
This article is part of the Kardex Tauro V3 User Manual, which gathers every process in the system, explained step by step.
