How to Create a Cost Center, Step by Step
How to Create a Cost Center, Step by Step
Every movement in the program happens inside a cost center. Each center keeps its own stock, so the only way to keep two warehouses, two branches or two work areas apart is to give each one its own center. The code you type here is what identifies the center across the whole system, and what shows at the end of the description on documents and warehouse movements.
This guide walks through the whole setup in seven steps, with one screenshot per screen and the meaning of every numbered red box. The example creates center MC2 named «SAMPLE WAREHOUSE» with the note «CENTER CREATED IN THE MANUAL», starting from «Settings» and the «Cost Centers» tab: the same steps work for any center you need, whether it is a plant warehouse, a sales point or a transit site.
Before you start
- Permission to open «Settings» and work in the «Cost Centers» tab.
- The code decided in advance: at least two characters long and containing a letter, because a numbers-only code is not accepted.
- The name the center should show in the grid, next to the code.
- The active cost center checked before you start: it is shown on the top bar of the main window.
Step by step
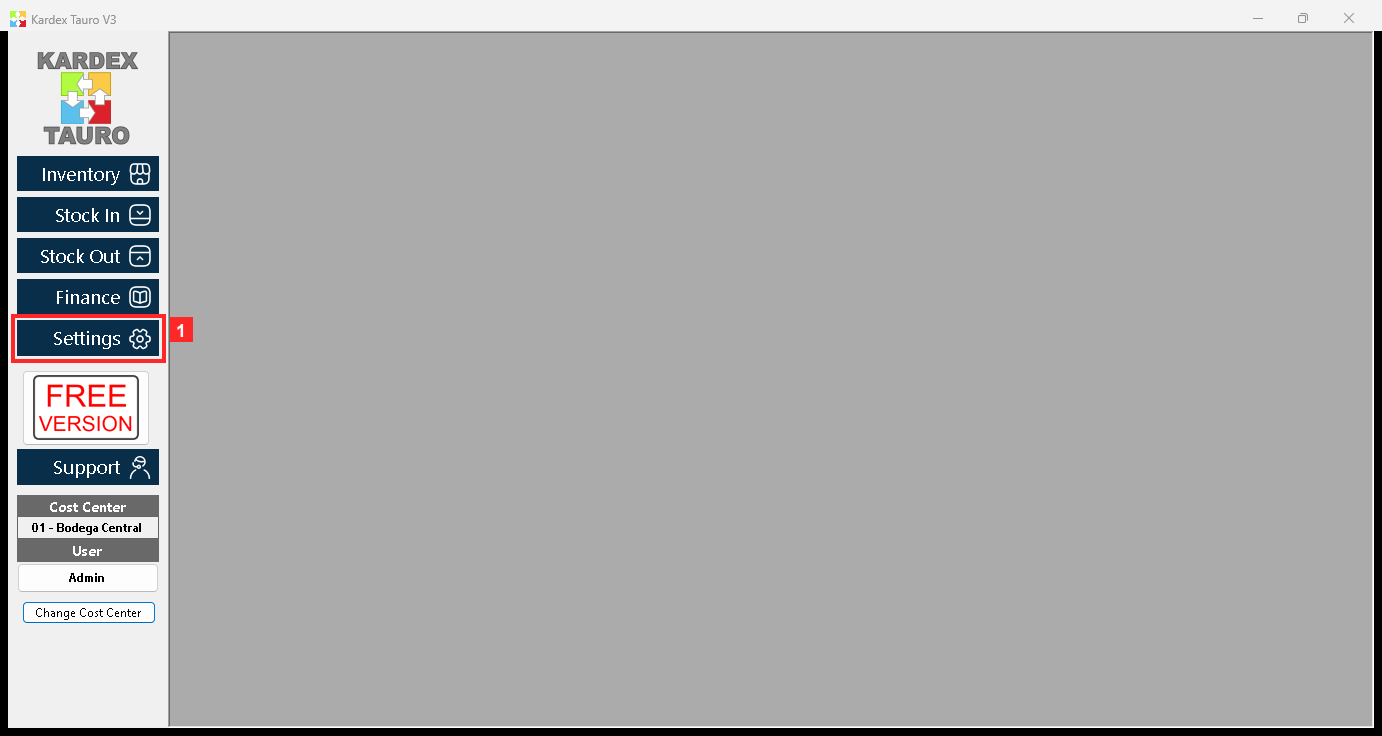
Step 1 — The main window
Before creating a cost center, look at the active one: it is shown on the top bar of the main window. The program works by cost center and each center keeps its own stock.
In the image:
- 1) The «Settings» button.
Action: Check the active cost center and open «Settings».
Step 2 — The Cost Centers tab
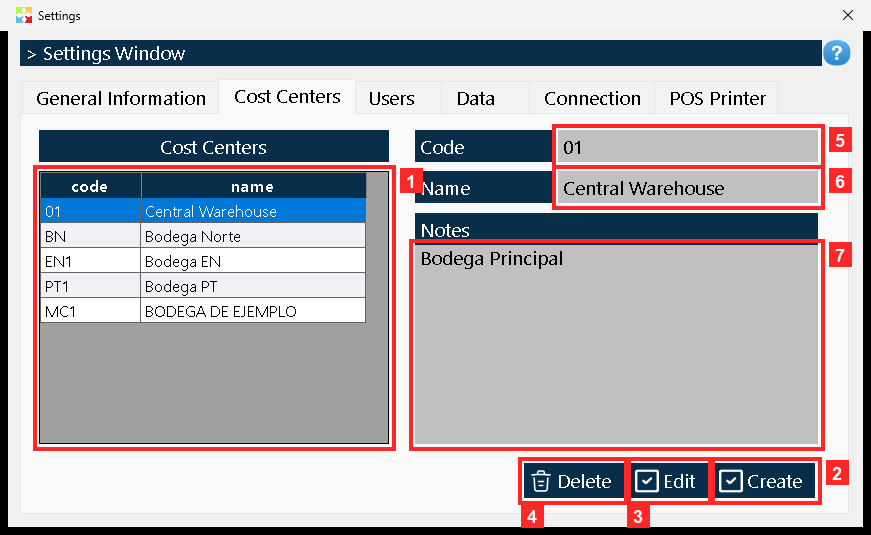
Opening «Settings» shows the settings window; pick the «Cost Centers» tab. The grid lists the centers with their «Code» and «Name» (in the example: 01 | Central Warehouse · BN | Bodega Norte · EN1 | Bodega EN · PT1 | Bodega PT); below are the data of the selected center: «Code» (01), «Name» (Central Warehouse) and «Notes» (Main Warehouse). On the left: «Create» (opens a blank center), «Edit» (opens the selected one) and «Delete».
In the image:
- 1) The cost center grid.
- 2) The «Create» button.
- 3) The «Edit» button.
- 4) The «Delete» button.
- 5) The «Code» of the selected cost center.
- 6) The «Name» of the selected cost center.
- 7) The «Notes» of the selected cost center.
Action: Press «Create» to create a new center.
Step 3 — The cost center form
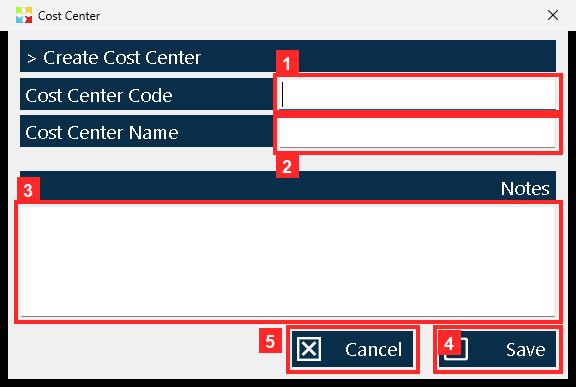
The «> Create Cost Center» window opens with three fields: «Cost Center Code» —the short reference of the center, it can be a number or a few letters—, «Cost Center Name» and «Notes», a free note to remember what the center is for. Below, «Save» saves and «Cancel» closes without creating anything.
In the image:
- 1) The «Cost Center Code».
- 2) The «Cost Center Name».
- 3) The «Notes» of the cost center.
- 4) The «Save» button.
- 5) The «Cancel» button.
Action: Fill in the code and the name.
Step 4 — The code and the name
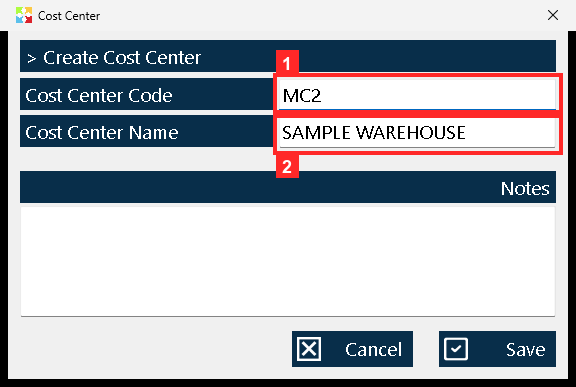
In the example the code is MC2 and the name is «SAMPLE WAREHOUSE». The code identifies the center in the rest of the program; in documents and warehouse movements it shows at the end of the description (that is why the documents of center 01 end in «01»). Note: the code must be at least two characters long and must include a letter; a numbers-only code —like «91»— is not accepted: the form closes without creating anything and without any warning.
In the image:
- 1) The code you typed (MC2).
- 2) The name you typed (SAMPLE WAREHOUSE).
Action: Type the code and the name of the center.
Step 5 — The notes and saving
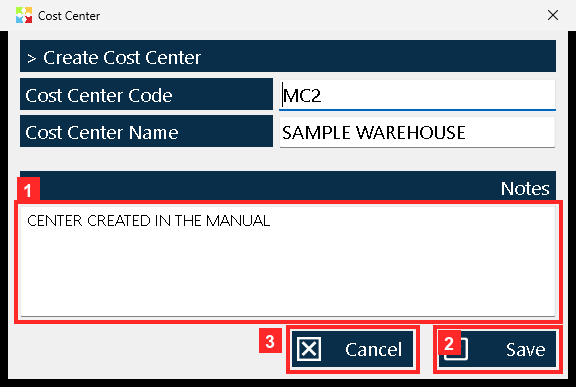
«Notes» keeps a free description; in the example, «CENTER CREATED IN THE MANUAL». The center is confirmed with «Save»; «Cancel» closes the window without creating it.
In the image:
- 1) The notes you typed (CENTER CREATED IN THE MANUAL).
- 2) The «Save» button.
- 3) The «Cancel» button.
Action: Press «Save» to create the center.
Step 6 — The center in the grid
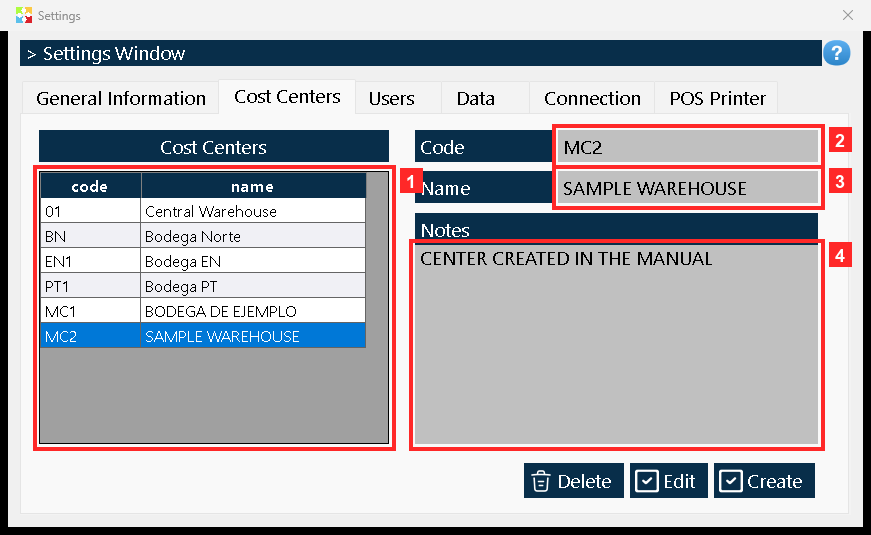
The window closes and the new center shows in the grid with its row (MC2 | SAMPLE WAREHOUSE). Selecting it, its data appears below: «Code», «Name» and «Notes». The center is really stored in the program database.
In the image:
- 1) The grid with the new cost center.
- 2) The «Code» of the new cost center.
- 3) The «Name» of the new cost center.
- 4) The «Notes» of the new cost center.
Action: Check the row of the center just created.
Step 7 — Checking the stored data
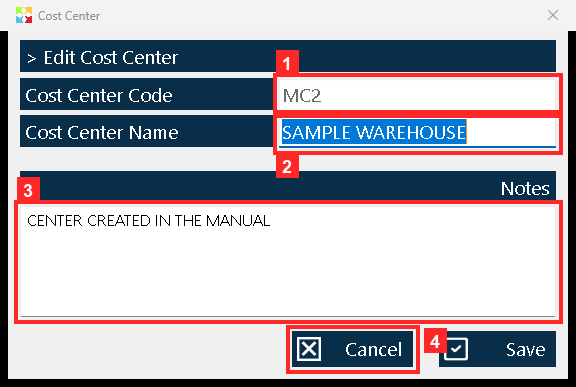
To finish, select the center and press «Edit»: it opens with the data as stored —«Cost Center Code» MC2, «Cost Center Name» «SAMPLE WAREHOUSE» and «Notes» «CENTER CREATED IN THE MANUAL»—. Close with «Cancel» without changing anything. Besides this form, «Delete» deletes the selected center.
In the image:
- 1) The saved code (MC2).
- 2) The saved name (SAMPLE WAREHOUSE).
- 3) The saved notes (CENTER CREATED IN THE MANUAL).
- 4) The «Cancel» button.
Action: Check the data and close with «Cancel».
Result
The center now sits in the grid with its row (MC2 | SAMPLE WAREHOUSE) and, when you select it, its data shows below in «Code», «Name» and «Notes». The result was verified by reading the program database (kardex.db), not just the screen.
Best practices
- Check the top bar before you start. The program works by cost center and each center keeps its own stock, so every movement lands in whichever center is active.
- Keep codes short and stable (one letter plus a number). The code shows at the end of the description on documents and warehouse movements, so renaming it later breaks the trail.
- Use «Notes» to write down what the center is for while you create it. That is the only place the context is kept, and it saves the next user from having to ask.
- Create the center before you need it and confirm with «Edit» that it was saved; keep in mind that «Delete» removes the selected center.
Frequently asked questions
The program closed the form without creating the center and never warned me. Why?
Because the code does not meet the rules: it must be at least two characters long and include a letter. A numbers-only code such as «91» is not accepted: the form closes without creating anything and without any warning.
How do I know the center was really saved?
Select the center and press «Edit»: it opens with the data exactly as stored —«Cost Center Code» MC2, «Cost Center Name» «SAMPLE WAREHOUSE» and «Notes» «CENTER CREATED IN THE MANUAL»—. In the example the check was done by reading the program database (kardex.db), not just the screen.
Can I change or delete a center after creating it?
Yes. «Edit» opens the selected center with its data and «Delete» removes the selected center. It is worth confirming with «Edit» that you have the right one before deleting it.
This article is part of the Kardex Tauro V3 User Manual, which gathers every process in the system, explained step by step.
