How to Set Up the System, Step by Step
How to Set Up the System, Step by Step
Initial setup is the one task in the system you do once and then live with: the company name, the tax id, the currency and the decimal places are printed on every document, the cost center you leave active is the one every other window works in, and where the database lives decides which computers can get in. Changing any of it later means revisiting documents that are already issued, so give it one calm session.
This guide walks the six tabs of the «Settings» window — «General Information», «Cost Centers», «Users», «Data», «Connection» and «POS Printer» — with one screenshot per screen and the meaning of every numbered red box. The example follows the real data of the application: the company «Mi Empresa», the user «Admin» and cost center 01 - Bodega Central, which is the one left active at the end. The «Data» tab is shown but left alone: nothing is imported, deleted or restored.
Before you start
- An account with administration rights: the «Settings» window is where users are created and permissions handed out.
- The company's real details at hand (name, «TIN», «Address», «Email», «Phone», «Country», «Status» and «City»): they are printed on the documents.
- The cost center structure already decided, and which one stays active, because every other window works in that one.
- A recent backup before you go into «Data»: «Delete Data» warns that the operation cannot be undone.
Step by step
Step 1 — The main window
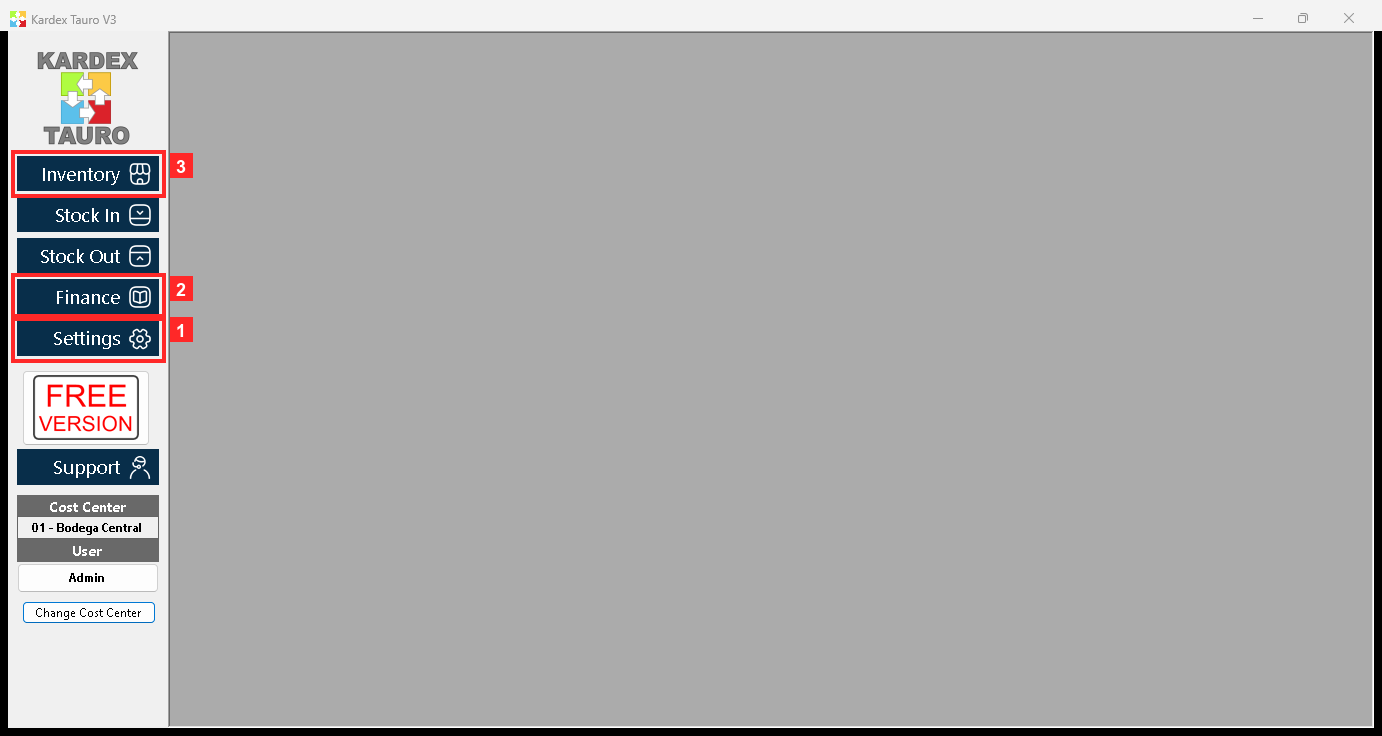
When the program opens you see the main window with the modules on the left. At the bottom is «Settings», where the company, the users, the database and the printer are set up.
In the image:
- 1) Button «Settings»: opens the settings window.
- 2) «Finance»: the accounting module.
- 3) «Inventory»: the warehousing module.
Texts on screen: «Settings», «Inventory», «Stock In», «Stock Out», «Finance»
Action: Press «Settings».
Step 2 — The settings window
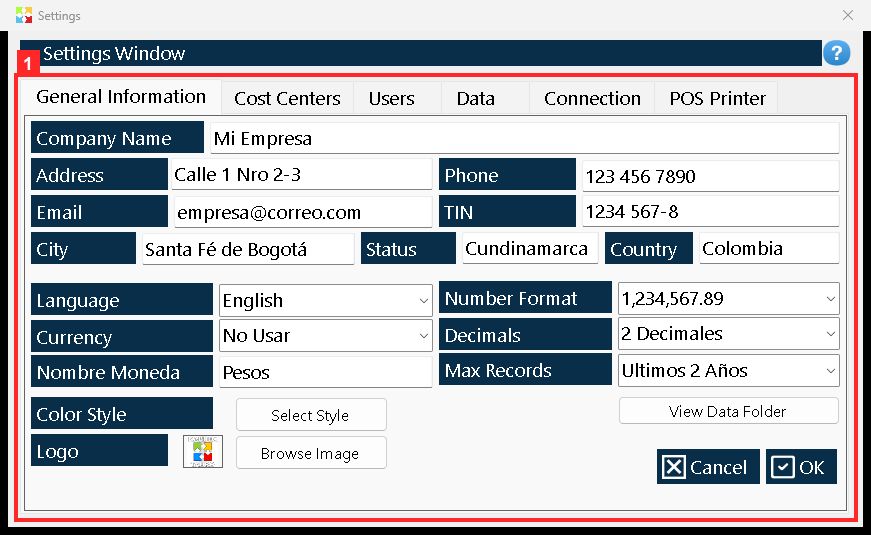
The settings window opens with «General Information», «Cost Centers», «Users», «Data», «Connection» and «POS Printer». Each tab changes the content below and the changes are confirmed inside each tab: in «General Information» with «OK», in «Connection» and «POS Printer» with «».
In the image:
- 1) The tabs: «General Information», «Cost Centers», «Users», «Data», «Connection» and «POS Printer».
Action: Click the tab you want to review.
Step 3 — General tab (1): the company details
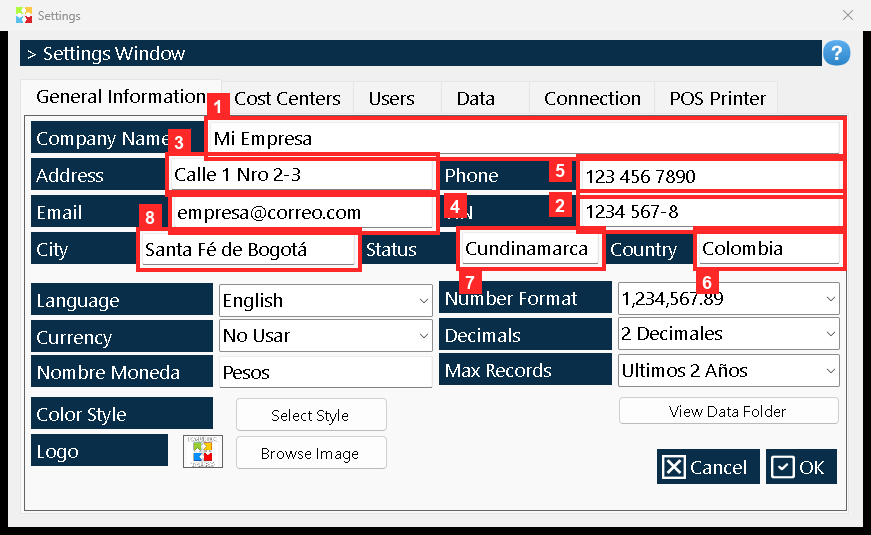
The first tab gathers the company details that appear on the documents: «Company Name» (Mi Empresa), «Address», «Email», «Phone», «TIN», «Country», «Status» (the state or province) and «City».
In the image:
- 1) «Company Name»: the company name.
- 2) «TIN»: the tax id.
- 3) «Address»: the address.
- 4) «Email»: the email.
- 5) «Phone»: the phone.
- 6) «Country»: the country.
- 7) «Status»: the state or province.
- 8) «City»: the city.
Texts on screen: «Company Name», «TIN», «Address», «Email», «Phone», «Country», «Status», «City»
Action: Review the company details.
Step 4 — General tab (2): look, currency and numbers
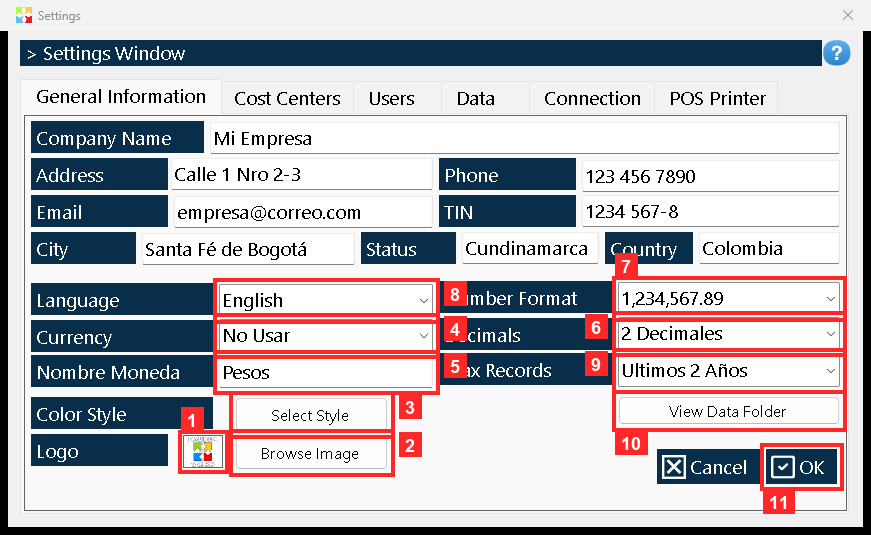
Below are the «Logo» and «Browse Image» (picks the image file), the «Color Style» with «Select Style», the «Currency» and the «Nombre Moneda», the «Decimals», the «Number Format», the «Language» and the «Max Records» (how many records the Products list shows). «View Data Folder» opens the folder where the database lives and «OK» saves the changes of this tab.
In the image:
- 1) «Logo»: the company logo.
- 2) «Browse Image»: picks the logo image.
- 3) «Select Style»: chooses the colour style.
- 4) «Currency»: the currency.
- 5) «Nombre Moneda»: how the symbol is written.
- 6) «Decimals»: how many decimals to use.
- 7) «Number Format»: the number format.
- 8) «Language»: the program language.
- 9) «Max Records»: how many records the list shows.
- 10) «View Data Folder»: opens the data folder.
- 11) Button «OK»: saves the General changes.
Texts on screen: «Logo», «Currency», «Decimals», «Number Format», «Language», «Max Records», «OK», «Cancel»
Action: Review the look, the currency and the number format.
Step 5 — Cost Centers tab
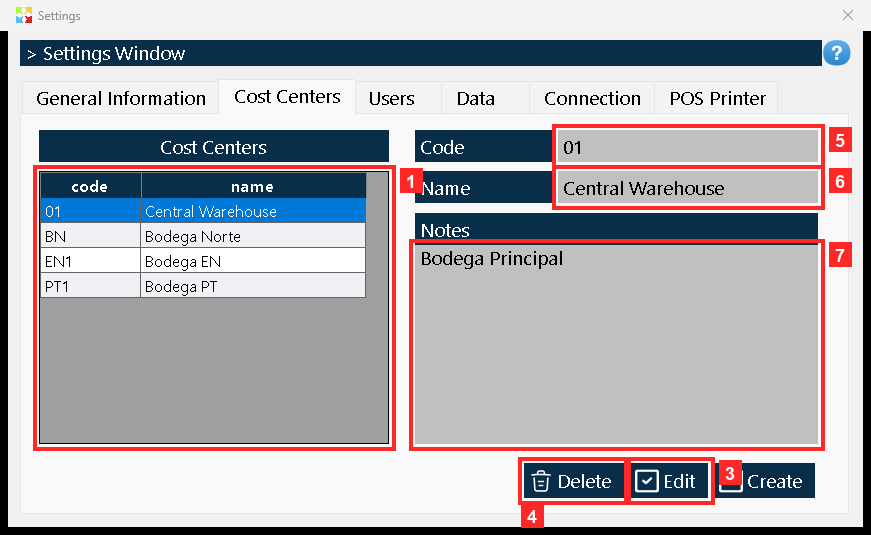
Here the cost centers (the warehouses) are managed: the grid below lists them with their «Code», «Name» and «Notes», and the buttons «», «Edit» and «Delete» create, edit and delete them. The center chosen below, in «Change Cost Center», is the one every other window uses.
In the image:
- 1) The grid: Settings.
- 2) «»: creates a cost center.
- 3) «Edit»: edits the selected one.
- 4) «Delete»: deletes the selected one.
- 5) «Code»: the center code.
- 6) «Name»: the center name.
- 7) «Notes»: a note for the center.
Texts on screen: «Edit», «Delete», «Code», «Name», «Notes»
Action: Review the cost centers and which one is active.
Step 6 — Users tab
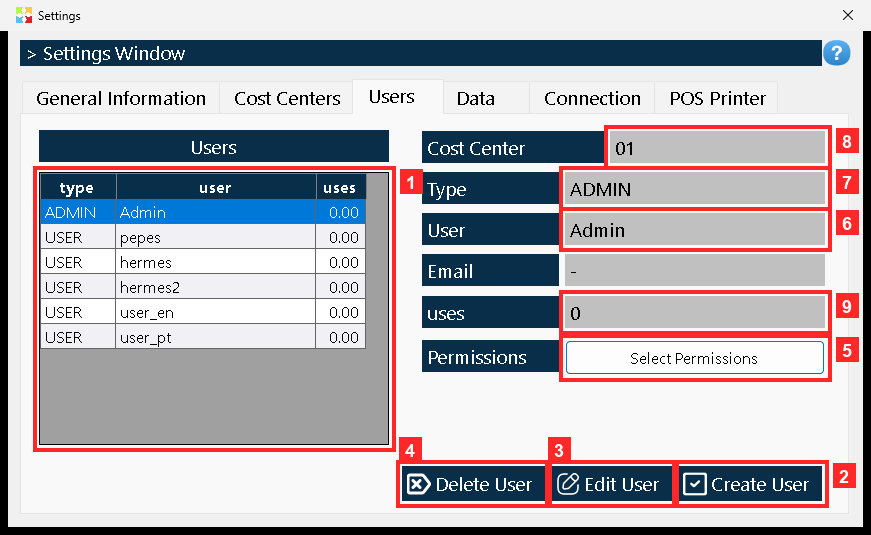
The grid «Settings» lists the program users and, when one is selected, its details appear below: «User», «Type», «Cost Center», «Email», the «uses» and the «Permissions». The buttons «Create User», «Edit User» and «Delete User» manage them, and «Select Permissions» opens the window to choose what each user may enter.
In the image:
- 1) The grid: Settings.
- 2) «Create User»: creates a user.
- 3) «Edit User»: edits the selected one.
- 4) «Delete User»: deletes the selected one.
- 5) «Select Permissions»: chooses the user permissions.
- 6) «User»: the selected user.
- 7) «Type»: its type (ADMIN, SELLER, …).
- 8) «Cost Center»: its cost center.
- 9) «uses»: how many times it logged in.
Texts on screen: «Create User», «Edit User», «Delete User», «User», «Type», «Cost Center», «Email», «uses», «Permissions»
Action: Review the users and their permissions.
Step 7 — Data tab ▸ Import
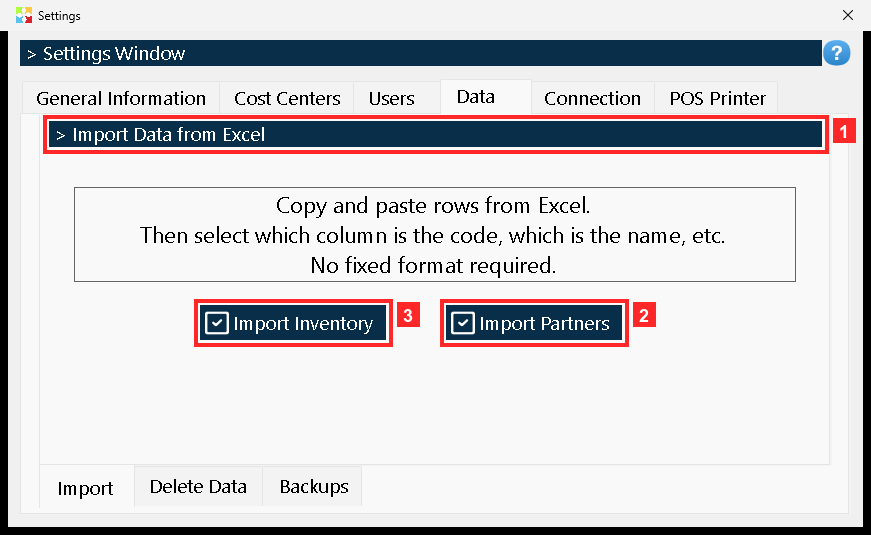
The «Data» tab holds three tabs inside. The first is «Import»: it loads lists from Excel (you copy the rows and paste them; each column is mapped afterwards, so no fixed format is needed). «Import Partners» loads the partners list and «Import Inventory» the products one.
In the image:
- 1) «> Import Data from Excel»: the importer title.
- 2) «Import Partners»: imports partners.
- 3) «Import Inventory»: imports inventory.
Texts on screen: «Import Partners», «Import Inventory»
Action: Choose which list you want to import.
Step 8 — Data tab ▸ Delete Data
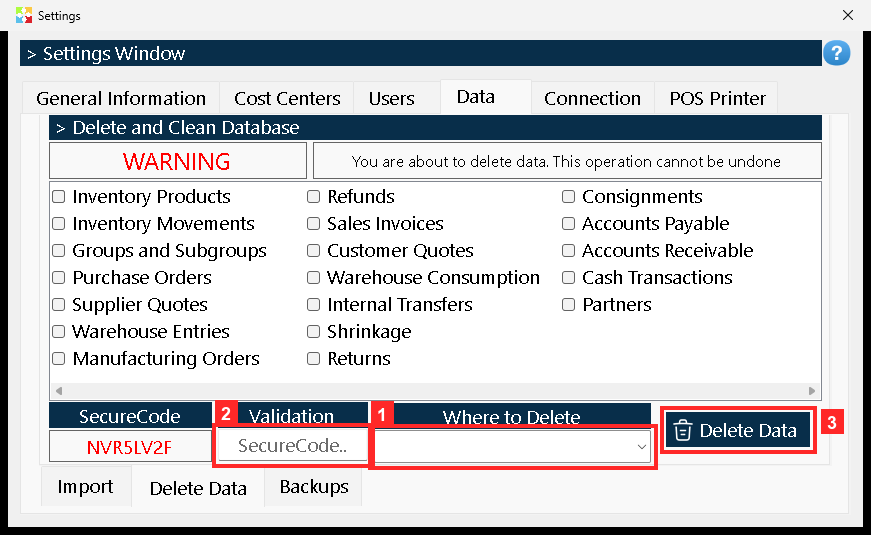
The second tab is «Delete Data»: with «Where to Delete» you choose where to delete from, in «Validation» you type the code the program asks for and «Delete Data» runs the deletion. Careful: the warning says it clearly — «You are about to delete data. This operation cannot be undone». This manual does NOT press that button.
In the image:
- 1) «Where to Delete»: where to delete from.
- 2) «Validation»: the validation code it asks for.
- 3) «Delete Data»: deletes the data (no undo!).
Texts on screen: «Where to Delete», «Delete Data», «Validation»
Action: Read the warning and delete nothing.
Step 9 — Data tab ▸ Backups
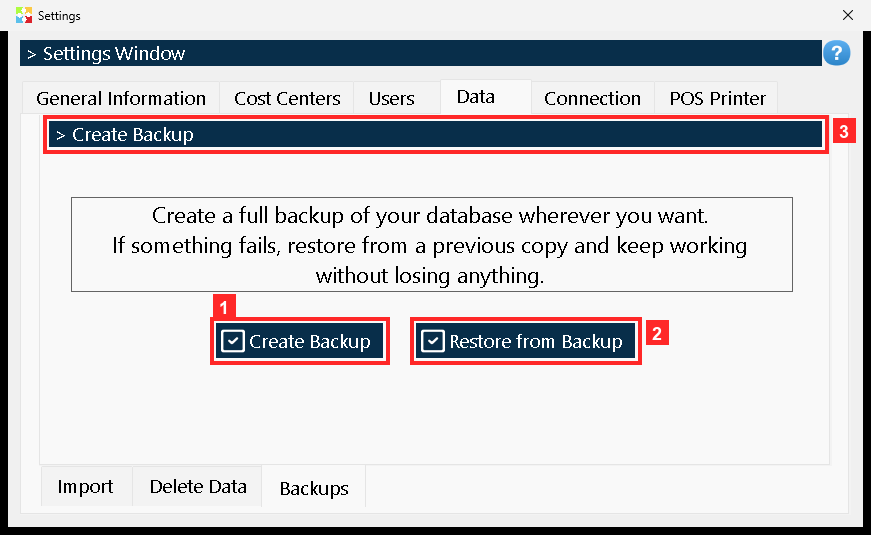
The third tab is «Backups»: «Create Backup» saves a full copy of the database wherever you want and «Restore from Backup» restores it if something goes wrong. It is the safety net of the system: use it before importing or deleting data. This manual does NOT press those buttons.
In the image:
- 1) «Create Backup»: saves a copy of the database.
- 2) «Restore from Backup»: restores from an earlier copy.
- 3) «> Create Backup»: the tab title.
Texts on screen: «Create Backup», «Restore from Backup»
Action: Know where the backup and the restore are.
Step 10 — Connection tab
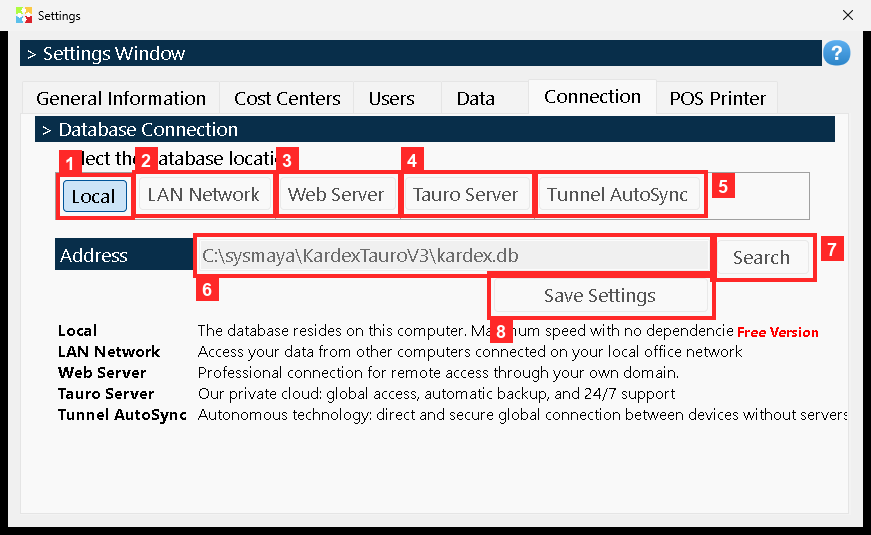
Here you decide where the database lives. The options are «Local» (on this computer, the fastest), «LAN Network» (on the local network), «Web Server», «Tauro Server» and «Tunnel AutoSync». «» shows the address for the chosen option, «Search» searches for it on the network and «Save Settings» saves the change. To work on a single computer nothing has to be touched here.
In the image:
- 1) «Local»: the database on this computer.
- 2) «LAN Network»: on another computer of the local network.
- 3) «Web Server».
- 4) «Tauro Server»: the private cloud.
- 5) «Tunnel AutoSync»: global connection without servers.
- 6) «Address»: the database address.
- 7) «Search»: searches for the database on the network.
- 8) Button «Save Settings»: saves the connection.
Texts on screen: «Local», «LAN Network», «Tauro Server», «Address», «Search», «Save Settings»
Action: If you work on a single computer, leave «Local».
Step 11 — POS Printer tab
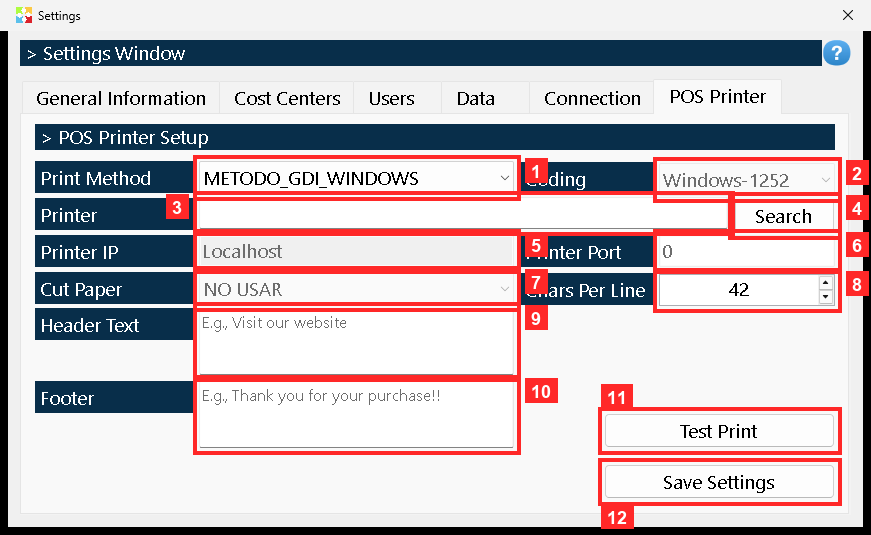
The data of the receipt printer: «Print Method», «Coding», «Printer Port» with «Search», «Printer IP», «Printer Port», «Cut Paper», «Chars Per Line» (characters per line), «Header Text» and «Footer» (the texts printed at the top and the bottom). «Test Print» prints a test and «Save Settings» saves the settings. This manual does NOT print or save.
In the image:
- 1) «Print Method»: the print method.
- 2) «Coding»: the coding.
- 3) «Printer»: the printer.
- 4) «Search»: searches for printers.
- 5) «Printer IP»: the printer IP.
- 6) «Printer Port»: the port.
- 7) «Cut Paper»: whether it cuts the paper.
- 8) «Chars Per Line»: characters per line.
- 9) «Header Text»: the top text.
- 10) «Footer»: the bottom text (footer).
- 11) «Test Print»: prints a test (not pressed here).
- 12) Button «Save Settings»: saves the settings.
Texts on screen: «Print Method», «Coding», «Printer», «Printer IP», «Printer Port», «Cut Paper», «Chars Per Line», «Header Text», «Footer», «Test Print», «Save Settings»
Action: Review the printer data.
Result
After walking all eleven screens, the check was done by reading the program database (kardex.db) rather than trusting what the screen shows: the changes of each tab stayed saved once they were confirmed inside that tab, cost center 01 - Bodega Central was still the active one, and the «Data» tab came out untouched — nothing imported, nothing deleted, nothing restored.
Best practices
- Before you touch «Data», make a backup with «Create Backup»: it is the only way back if an import or a deletion goes wrong.
- Settle the details that show on documents (company, «TIN», currency and «Decimals») before you issue the first document; fixing them later means going through them one by one.
- If the program runs on a single machine, leave «Connection» alone: «Local» is the fastest option and the right one for you.
- Go through «Select Permissions» for every user and grant only what the job needs: permissions are set once and then forgotten.
Frequently asked questions
Do I have to confirm each tab separately?
Yes. Each tab changes the content below it and the changes are confirmed inside it: in «General Information» with «OK», in «Connection» and «POS Printer» with «Save Settings».
Can a deletion be undone?
No. The warning on «Delete Data» says so: «You are about to delete data. This operation cannot be undone». The only way back is «Restore from Backup», on the «Backups» tab.
Where does the database live, and do I have to change anything on a single computer?
In «General Information», «View Data Folder» opens the folder where it lives; in «Connection» you choose between «Local», «LAN Network», «Web Server», «Tauro Server» and «Tunnel AutoSync». On a single computer you leave «Local» and touch nothing else.
This article is part of the Kardex Tauro V3 User Manual, which gathers every process in the system, explained step by step.
