How to Create a Purchase Order, Step by Step
How to Create a Purchase Order, Step by Step
The purchase order is the document that turns a need into a commitment: it records what is being bought, from which supplier and in what quantity, and later authorises those goods into inventory. The sequence matters because nothing is binding until the order is approved: a saved but unapproved order cannot be used to receive goods, and every receipt leaves its entry in the product's stock ledger.
This guide walks through the four stages of the process on the real application — create it, approve it, print it and receive it — with one screenshot per screen. The example uses order 01-CMP-13 from supplier 001 — Default Supplier for 25 units of MAN-EN01, of which 10 are received first: you will see how the program allows receiving in parts, leaves the order in the status PARTIAL and keeps it open waiting for the rest.
Before you start
- Permission to create and approve purchase orders in the «Stock In» module.
- The right cost center active («Change Cost Center»); in the example, 01 - Bodega Central.
- The supplier code (001 — Default Supplier) and the code of the product you are buying (MAN-EN01).
- Knowing whether the goods arrive complete or in parts, because the entry reference has to explain the movement (for example, «PARTIAL RECEIPT 10 OF 25»).
Step by step
Step 1 — The main window
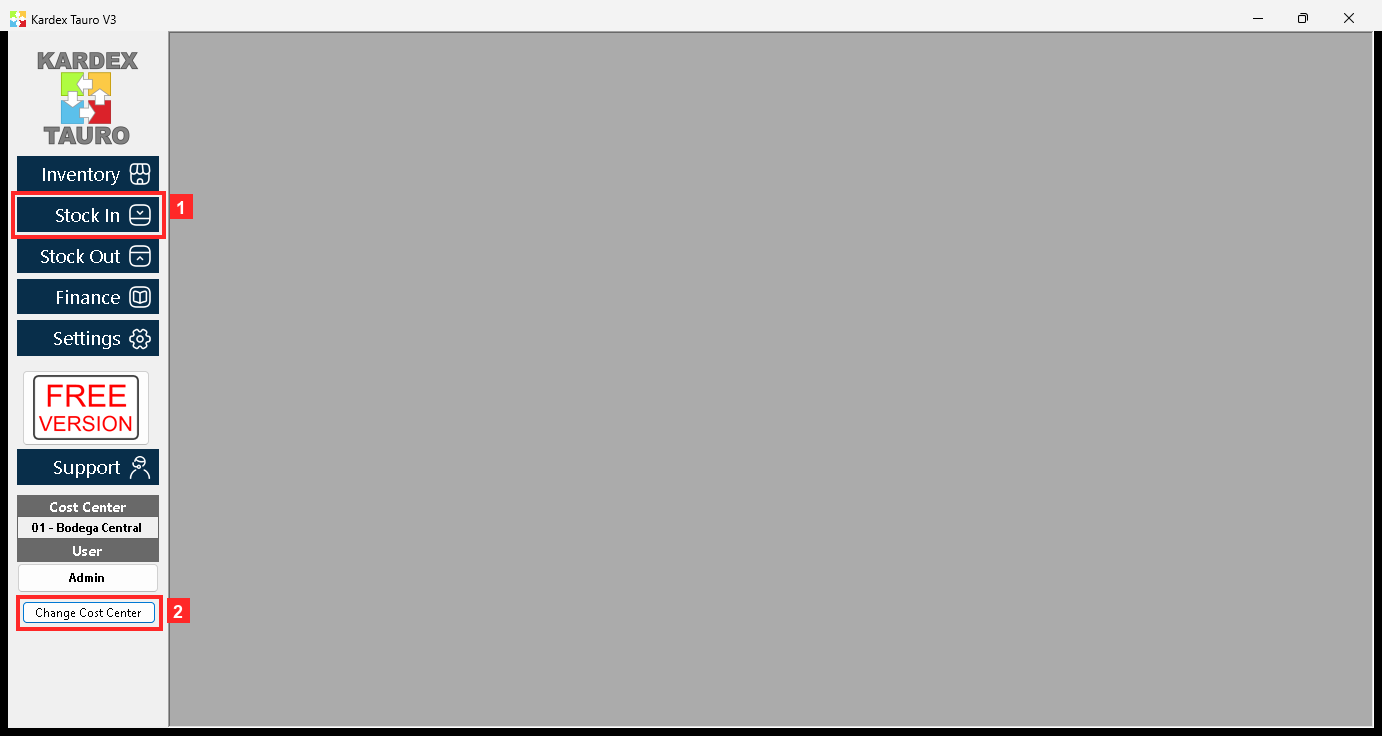
KardexTauro V3 opens in this window. The modules are on the left and the active cost center is at the top («Change Cost Center» changes it). This purchase order is made in cost center 01 - Bodega Central.
Texts on screen: «Stock In», «Inventory», «Stock Out», «Finance», «Change Cost Center»
Action: The side buttons open each module; these steps are done in «Stock In».
Step 2 — The stock-in menu
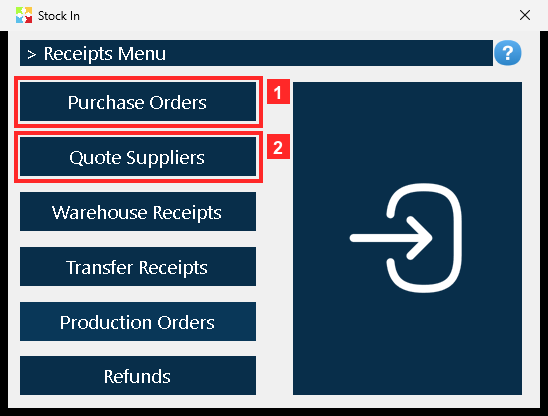
Pressing «Stock In» opens the menu of stock-in operations. The first option, «Purchase Orders», is the one used here; the others are different stock-in documents.
Texts on screen: «Purchase Orders», «Quote Suppliers», «Warehouse Receipts», «Production Orders», «Refunds»
Action: Press «Purchase Orders» to open the purchase order list.
Step 3 — The purchase documents list
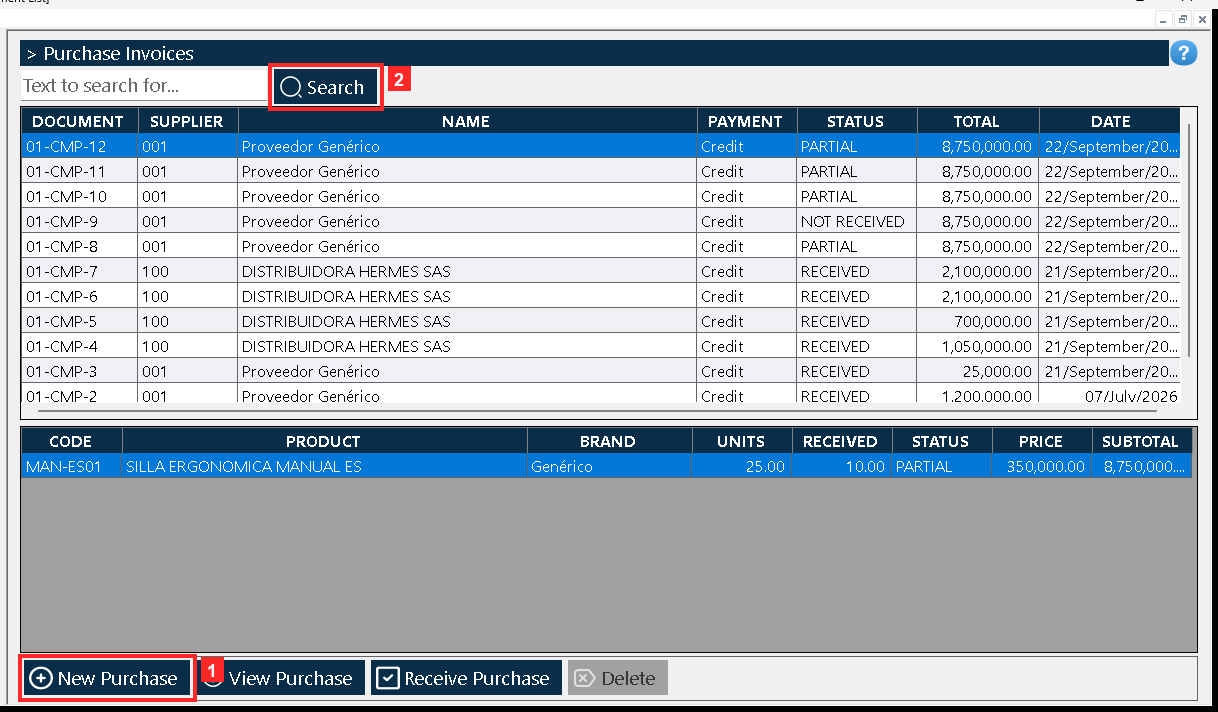
«Document List» opens: every row is a purchase order with its reference, the supplier, the payment term, the STATUS and the total. The search box is on top and the buttons act on the selected row.
Texts on screen: «New Purchase», «View Purchase», «Receive Purchase», «Delete», «Search»
Action: Press «New Purchase» to create a new order.
Step 4 — The document: the supplier
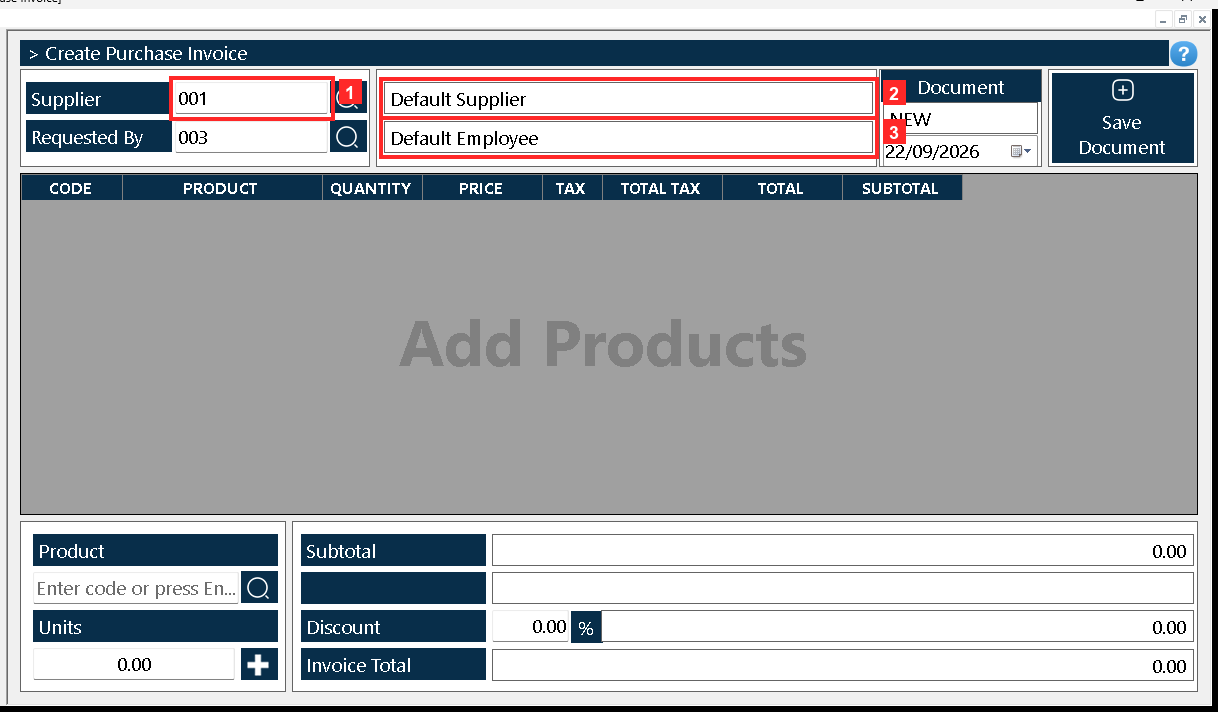
The document «Purchase Invoice» opens. In the header, «Supplier» comes with the default supplier (001 — Default Supplier) and «Requested By» with the employee who requests it (Default Employee). «Document» is the document number.
In the image:
- 1) «Supplier»: supplier code (001).
- 3) «Requested By»: requested by (Default Employee).
Texts on screen: «Supplier», «Requested By», «Document»
Action: Type the supplier code in «Supplier» (or look it up with the magnifier button).
Step 5 — The document: the product and the units
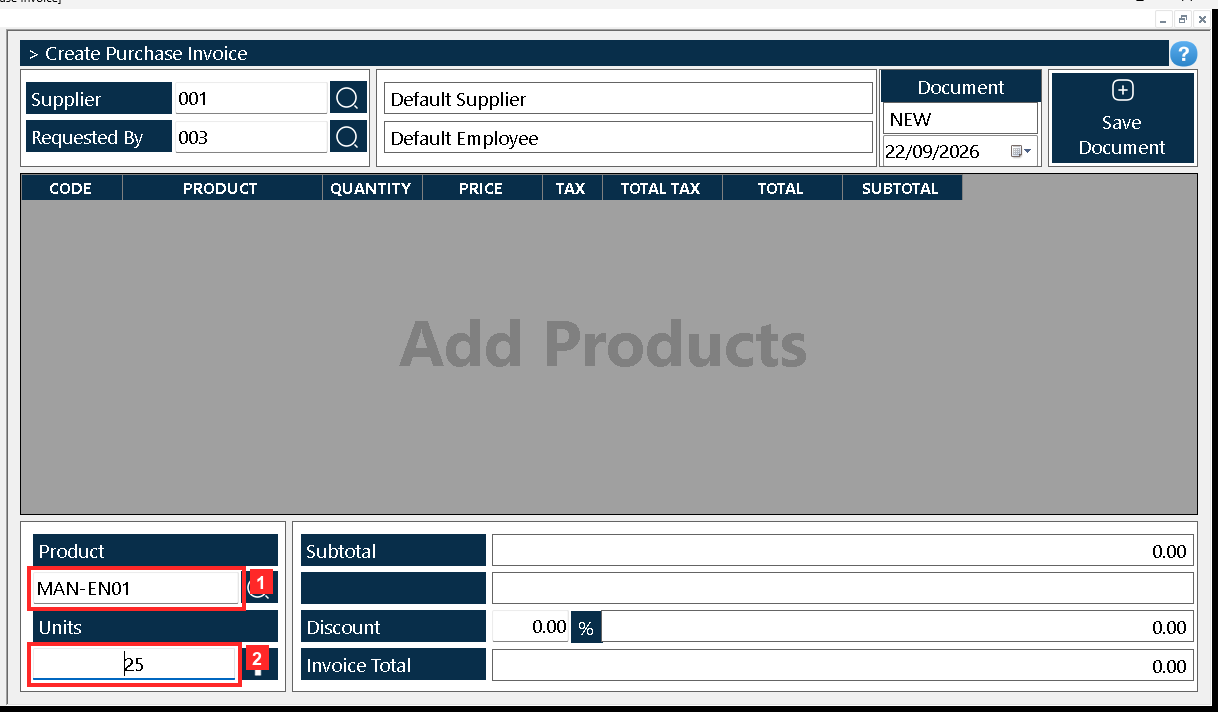
The body of the document holds the list of what is being purchased: «Product» is the product code and «Units» the ordered quantity. Next to them is the button that adds the line to the grid.
In the image:
- 1) «Product»: product code (MAN-EN01).
- 2) «Units»: ordered quantity (25).
Texts on screen: «Product», «Units»
Action: Type the product («MAN-EN01») and the units («25») and press the add button: the line appears in the grid.
Step 6 — The line added to the grid
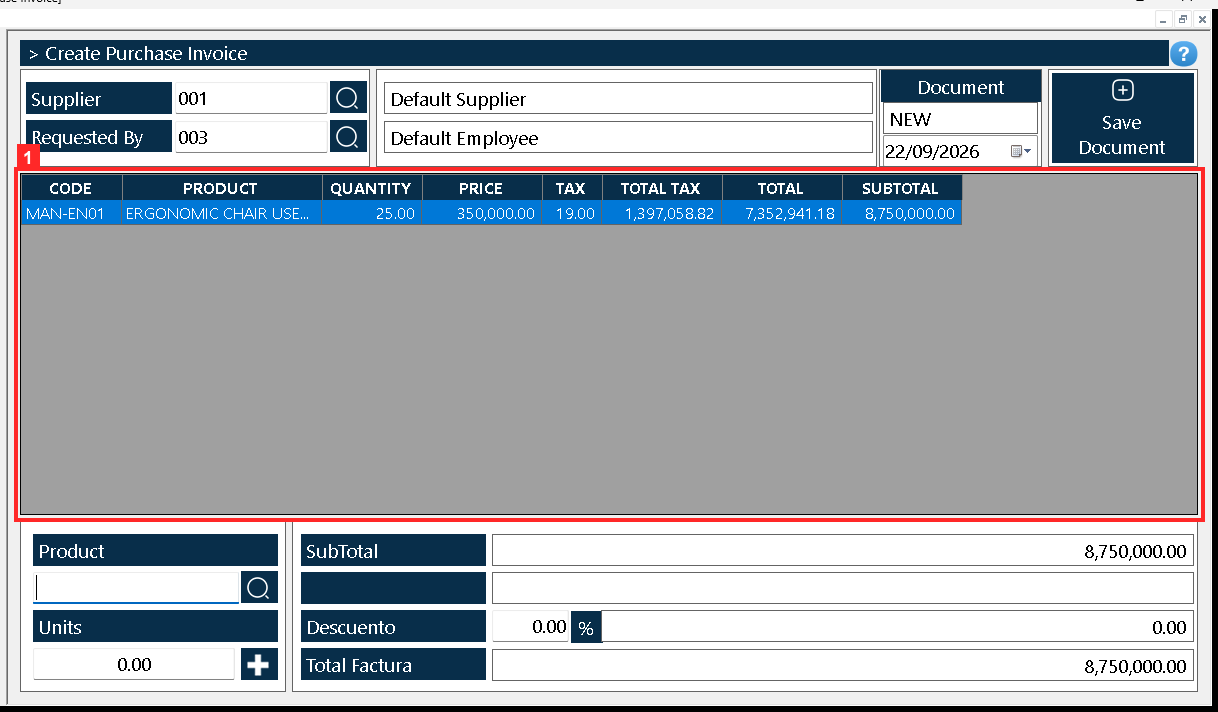
The grid shows the line with the product, the units, the unit price, the tax and the total. «Total Factura» summarises the value of the order.
Texts on screen: «SubTotal», «Descuento», «Total Factura»
Action: Check the line (product, units and price) before saving the document.
Step 7 — Save the document
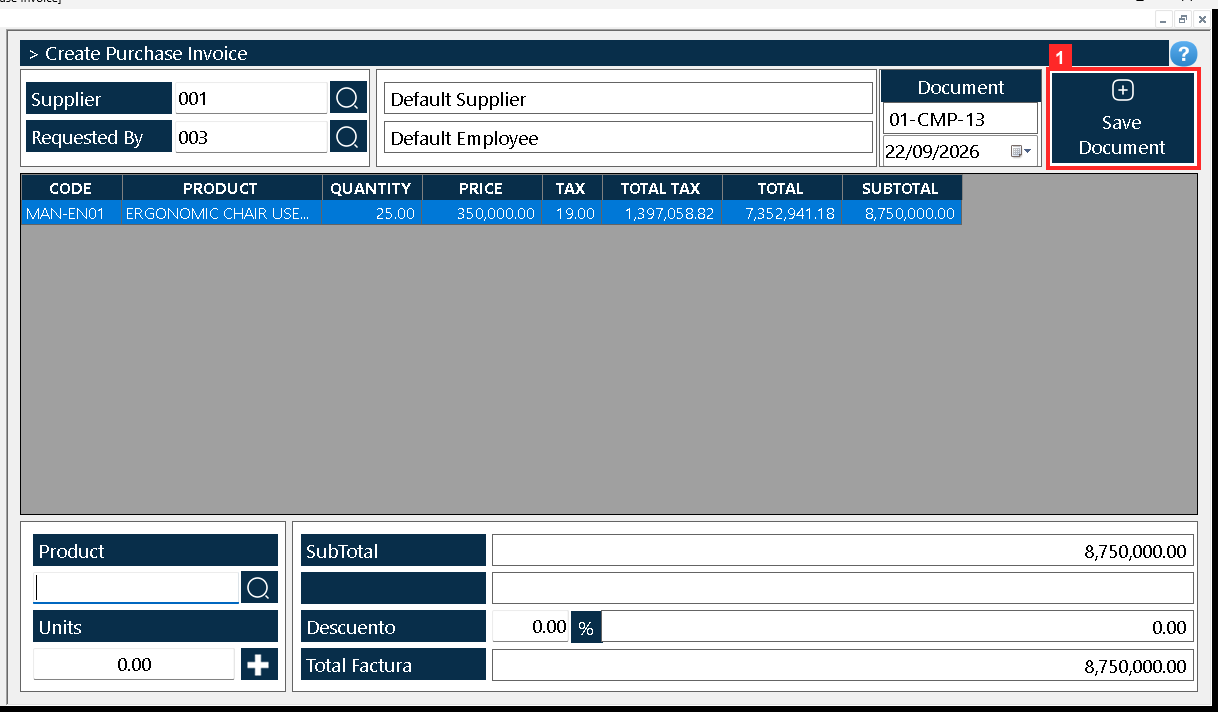
Until it is saved the document does not exist for the program. The program reports «Document processed successfully» once the document is registered.
Texts on screen: «Save Document»
Action: Press «Save Document»: the document is registered with the status NOT APPROVED.
Step 8 — The order in the list
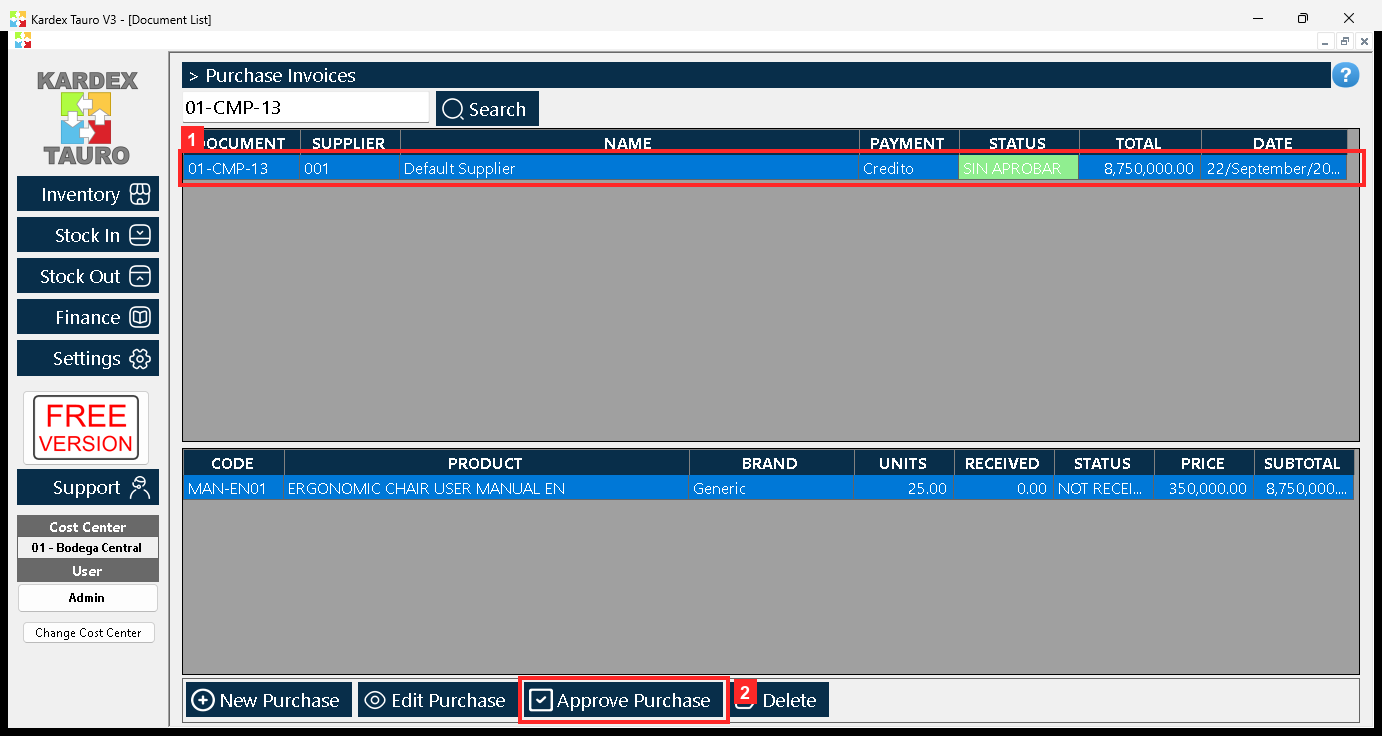
Back in «Document List», the new order appears as «01-CMP-13» with the status NOT APPROVED. With the row selected the buttons of the bar become available.
Texts on screen: «Approve Purchase», «Edit Purchase», «Search»
Action: Search the reference «01-CMP-13» and select its row.
Step 9 — Approve the order: the confirmation
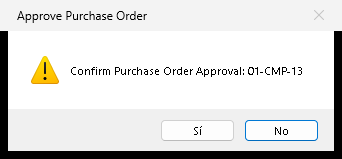
Approving is the step that authorises the purchase. The program asks for confirmation with the message «Approve Purchase Order»: «Confirm Purchase Order Approval: 01-CMP-13».
Action: Press «Sí»/«Yes» in the dialog: the order is approved and ready to receive the goods.
Step 10 — The approved order and the button that changes
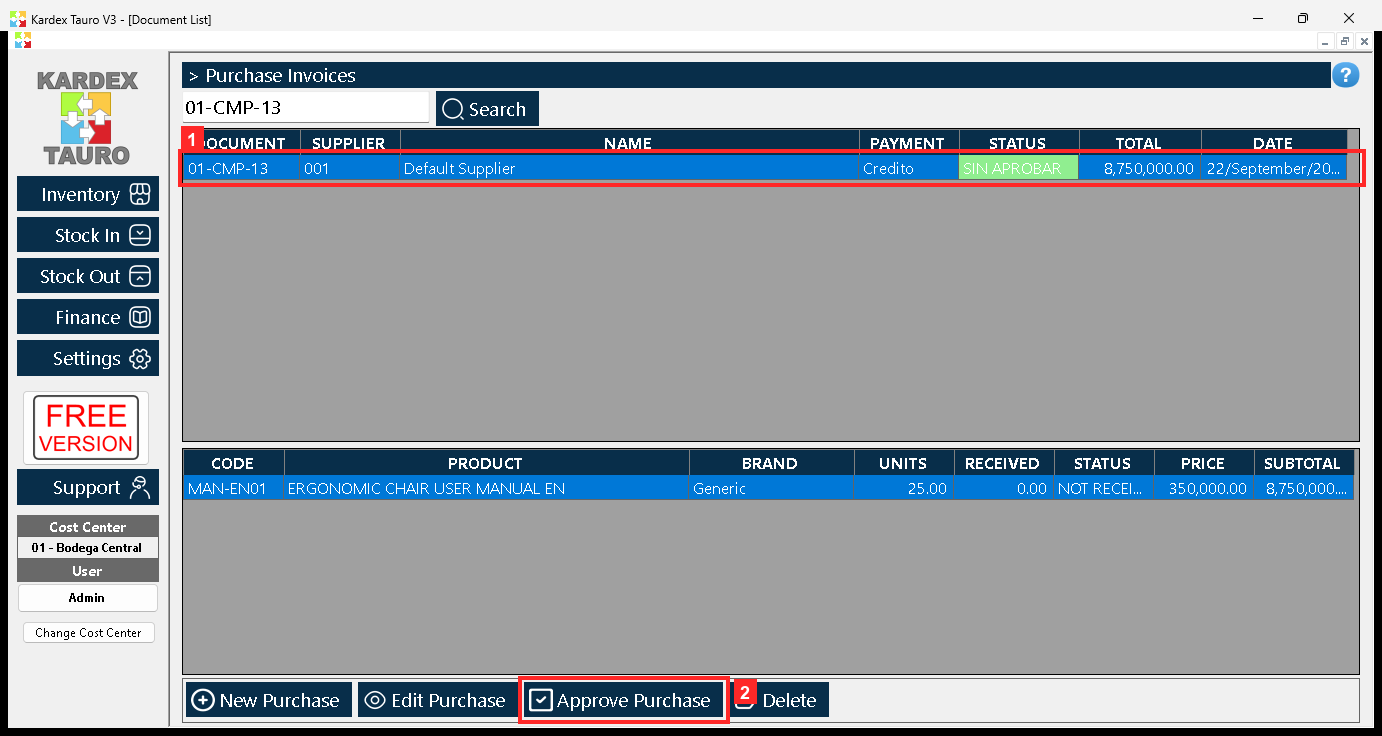
After approving, the order shows the status NOT RECEIVED and the SAME button of the bar is now labelled «Approve Purchase»: it opens the reception of the goods. The other button, «Edit Purchase», says «View Purchase» again.
Texts on screen: «Approve Purchase», «Edit Purchase»
Action: With the row selected, press «Approve Purchase» to receive the goods.
Step 11 — Viewing the order before printing it
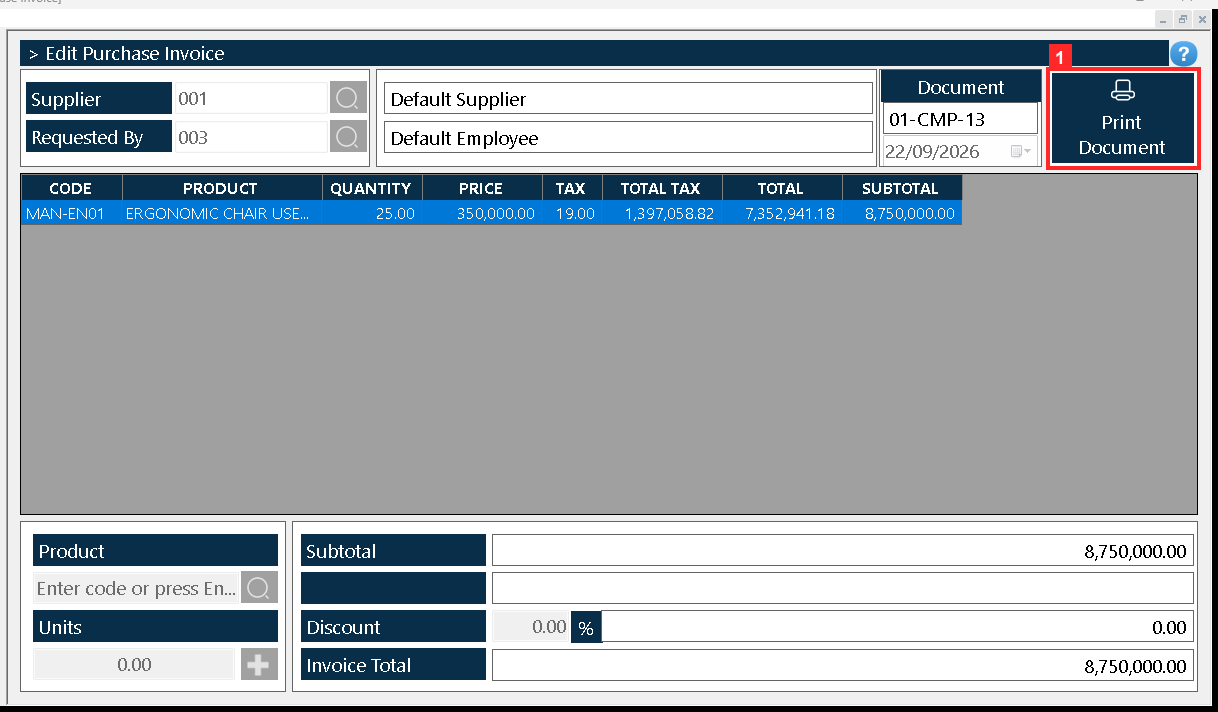
«Edit Purchase» reopens the selected document. Because the order is approved, the document opens in read-only mode and its save button is now labelled «Print Document»: that is what you press to see it before printing.
Texts on screen: «Print Document»
Action: Press «Print Document» to open the print preview.
Step 12 — The preview (before printing)
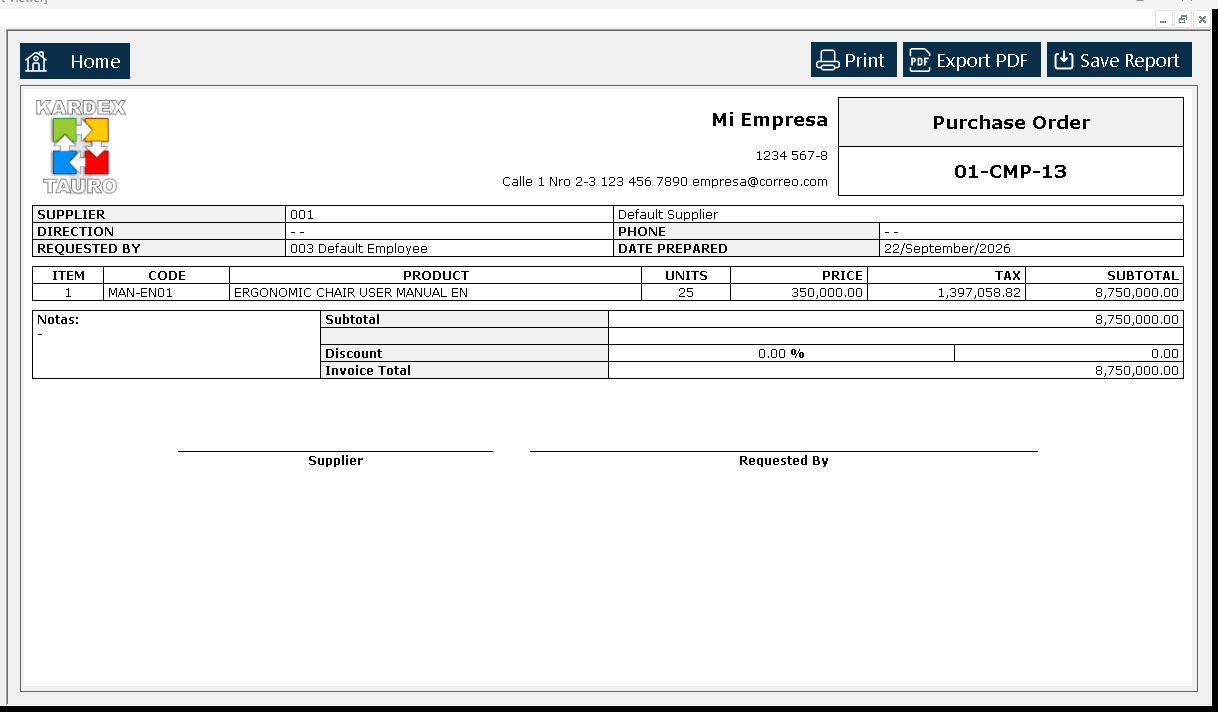
The «Report Viewer» opens with the document exactly as it would be printed: header, supplier, the purchased line and the totals. Its top bar offers «Save Report, Export PDF, Print».
Action: Check the document and use those buttons if you want to print or save it. Close the viewer to go back to the list (the order is already saved).
Step 13 — Receiving the goods: the reception window
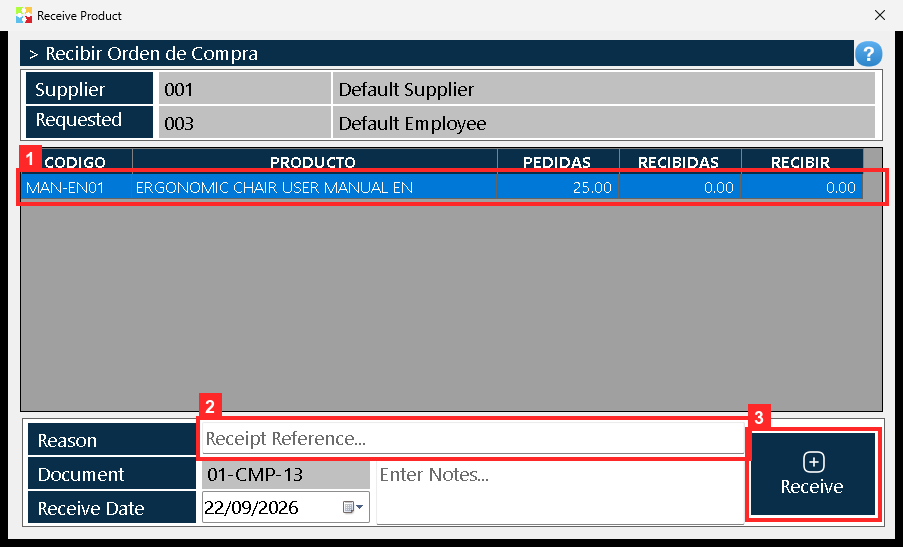
Pressing «Receive Purchase» on an approved order opens «Receive Product». The grid compares «PEDIDAS» (ordered), «RECIBIDAS» (already received) and «RECIBIR» (what is being received now).
In the image:
- 2) «Reason»: reason for the entry (required).
Texts on screen: «Receive», «Reason», «Supplier», «Requested By»
Action: Type in the «RECIBIR» column the units that arrived and a «Reason» explaining the movement.
Step 14 — Receiving only part of it (partial receipt)
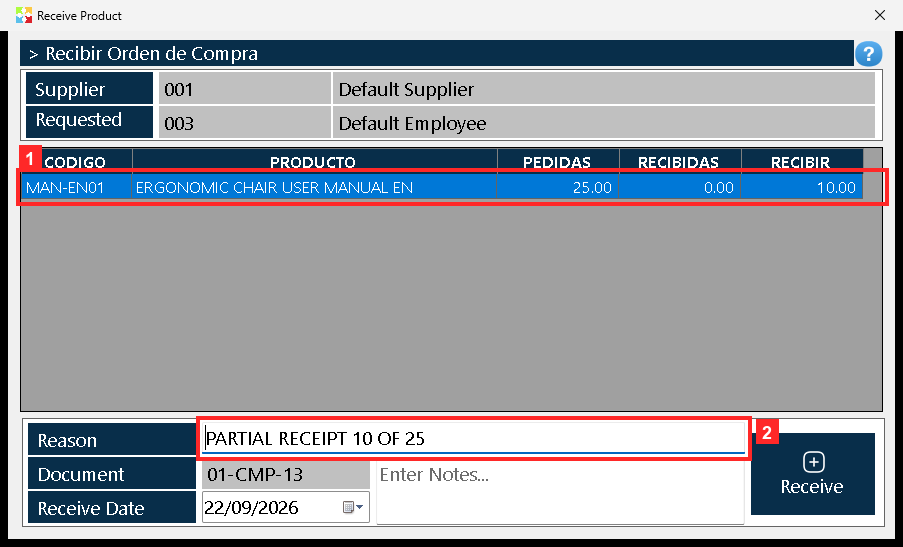
Out of the 25 units ordered, 10 are received now: the program allows receiving in parts, so the order stays open waiting for the rest. The reference «PARTIAL RECEIPT 10 OF 25» records that it was a partial receipt.
Texts on screen: «Receive», «Reason»
Action: With the quantity typed in «RECIBIR» and the reference filled in, press «Receive».
Step 15 — The order turns PARTIAL
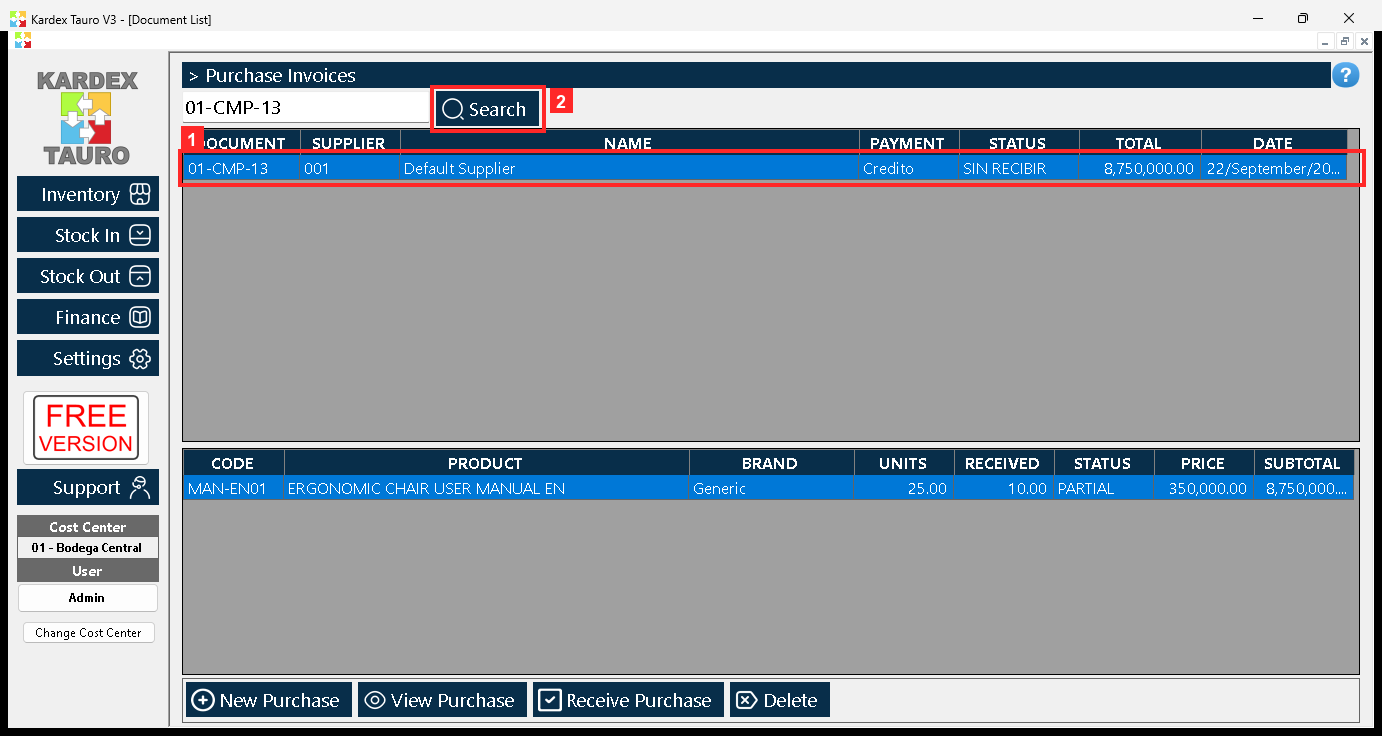
After receiving 10 of 25 units the order changes status: it now reads PARTIAL, and the stock of the product grows by exactly what was received. The rest is received by repeating these last three steps.
Texts on screen: «Search»
Action: Check the status of the order and the stock of the product.
Step 16 — The entry in the product ledger
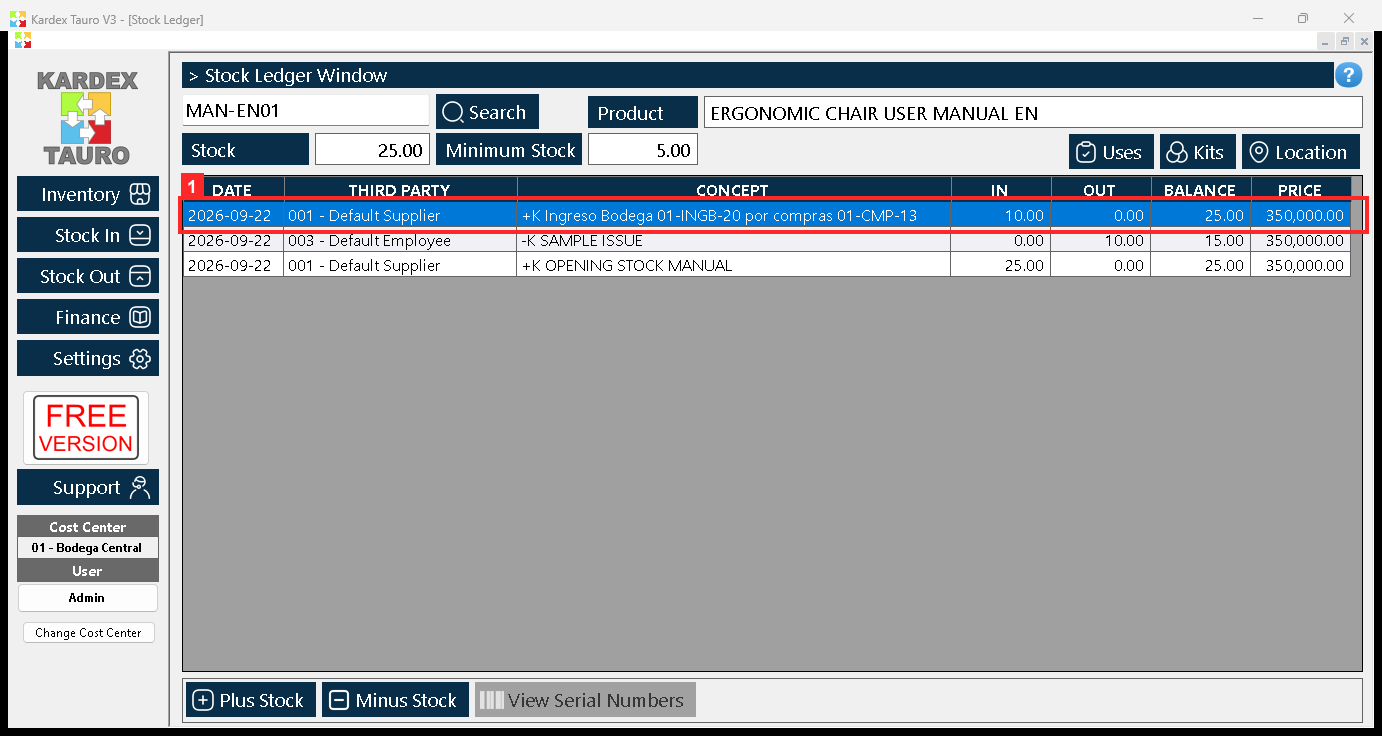
Every receipt leaves its entry in the ledger. In «Stock Ledger», searching the product, the first row is the movement this purchase has just created: «+K Ingreso Bodega 01-INGB-20 por compras 01-CMP-13 · 001 - Default Supplier · entra=10.0 · saldo=25.0».
Texts on screen: «Search», «25.00»
Action: Open the product ledger (Inventory ▸ «Stock Ledger»), search «MAN-EN01» and check the entry of the reception.
Result
After receiving 10 of the 25 units ordered, order 01-CMP-13 was left in the status PARTIAL and the product's stock grew by exactly what was received, up to 25.0. The result was checked by reading the program's database (kardex.db), not just the screen, and the matching entry appears in the product's stock ledger: receipt reference 01-INGB-20, 10.0 units coming in and a resulting balance of 25.0. The rest of the goods is received by repeating the same three steps.
Best practices
- Get the order approved before the goods arrive: the program only opens reception («Approve Purchase») on approved orders.
- Write an entry reference that explains the movement on every receipt («PARTIAL RECEIPT 10 OF 25»): it is required, and it is what makes the entry understandable afterwards.
- Check the line (product, units and price) before saving: the document does not exist for the program until you press «Save Document».
- Check the stock ledger entry after receiving: every receipt leaves its movement and that is the sign that stock went up.
Frequently asked questions
Can I receive fewer units than I ordered?
Yes. The program allows receiving in parts: in the example 10 of the 25 units ordered are received, the order is left in the status PARTIAL and stays open waiting for the rest, which is received by repeating the same operation.
How do I view or print the order once it is approved?
Reopen it with «Edit Purchase»: because the order is already approved the document opens in read-only mode and its save button is now «Print Document», which opens the «Report Viewer» with the document as it would be printed and the options «Save Report, Export PDF, Print».
Where do I check that the goods were received?
In the product's stock ledger (Inventory ▸ «Stock Ledger»), searching for its code: the first row is the movement this purchase has just created, with the units coming in and the resulting balance.
This article is part of the Kardex Tauro V3 User Manual, which gathers every process in the system, explained step by step.
