How to Record a Return to Vendor, Step by Step
How to Record a Return to Vendor, Step by Step
Some goods come into the warehouse and then have to go back out: a batch that arrived damaged, an expired item or a delivery that was not what had been ordered. That outward movement is not a sale and not a consumption: it is its own document in the stock-out module, it takes units off the shelf and it leaves a record that the goods left. Left unrecorded, the system keeps counting stock that is no longer in the warehouse and the next purchase is planned against an inflated count.
This guide follows the whole process on the application, with one screenshot per screen and the meaning of every numbered red box. The example returns 2 units of MAN-EN01 — ERGONOMIC CHAIR USER MANUAL EN to supplier 001 — Default Supplier in cost center 01 - Bodega Central: the return is saved as 01-DEV-8 for 700,000.00 and stock drops from 20.0 to 18.0.
Before you start
- Permission to record documents in the stock-out module: the «Returns» option sits under «Stock Out», not under purchasing.
- The right cost center active: it is shown at the top of the window and is changed with «Change Cost Center», because the units come out of that center.
- The supplier the goods go back to already on file, because «Supplier» takes its code (001 — Default Supplier in the example).
- The item with enough stock in that cost center and the quantity to return decided in advance (MAN-EN01, 2 units in the example).
Step by step
Step 1 — The main window
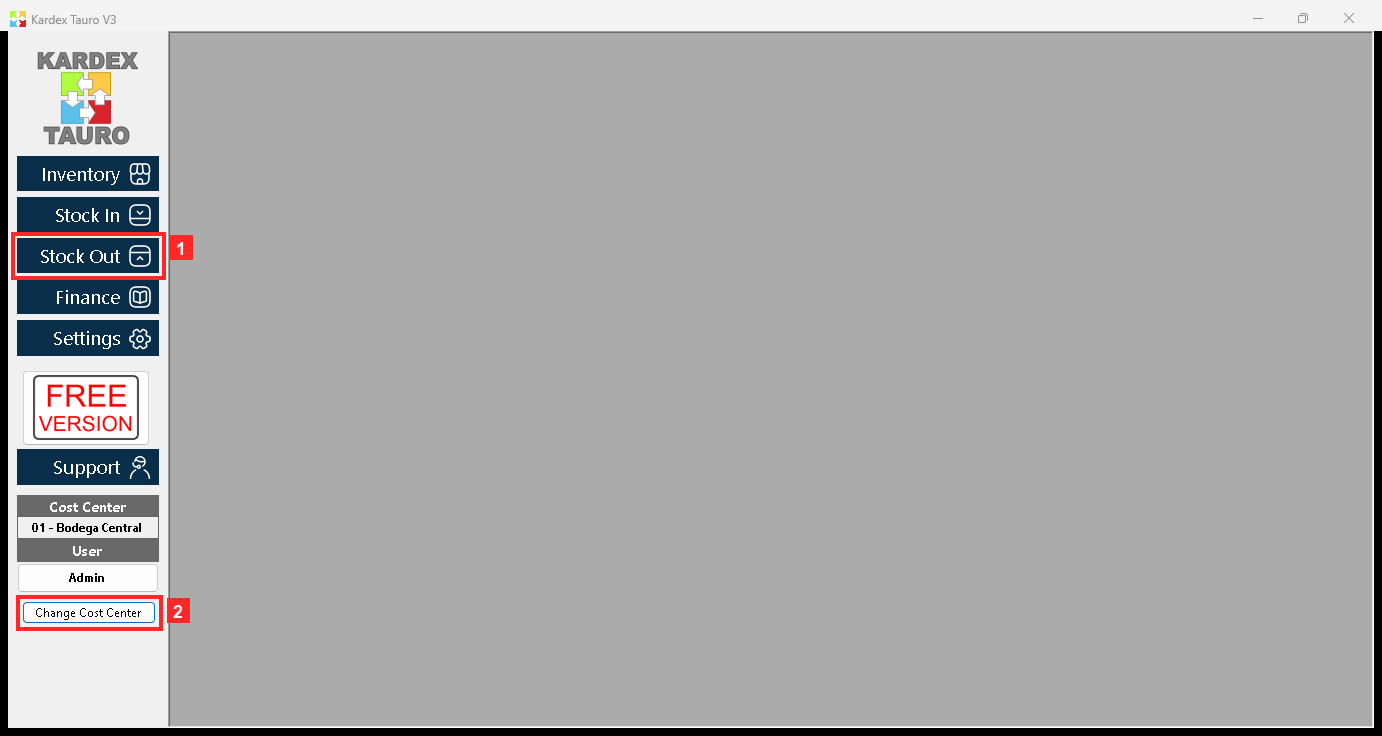
KardexTauro V3 opens in this window. The modules are on the left and the active cost center is at the top («Change Cost Center» changes it). This return is registered in cost center 01 - Bodega Central.
In the image:
- 1) Button «Stock Out»: stock-out module (sales, consumptions, shrinkage).
- 2) «Change Cost Center»: active cost center (01 - Bodega Central).
Texts on screen: «Stock Out», «Inventory», «Stock In», «Finance», «Change Cost Center»
Action: The side buttons open each module; these steps are done in «Stock Out».
Step 2 — The stock-out menu
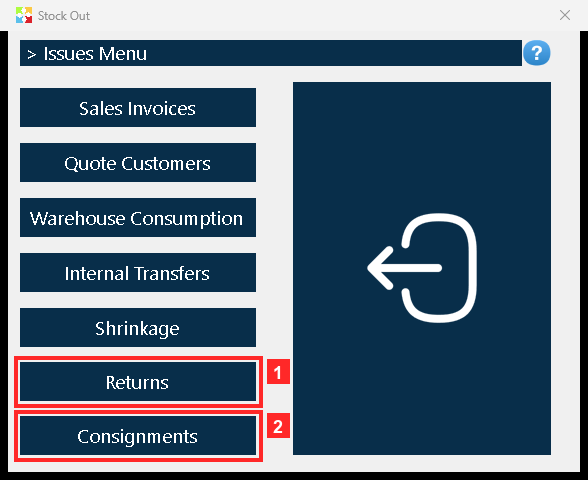
Pressing «Stock Out» opens the menu of stock-out operations. «Returns» is the returns option: it sends goods back to the SUPPLIER (because they arrived damaged, were not what was ordered or were agreed so). One important note: the CUSTOMER return is not here, it is «Returns», in the stock-in menu.
In the image:
- 1) Button «Returns»: opens supplier returns.
- 2) «Consignments»: consignments (another document).
Texts on screen: «Returns», «Consignments», «Shrinkage», «Sales Invoices»
Action: Press «Returns» to open the supplier return list.
Step 3 — The supplier return list
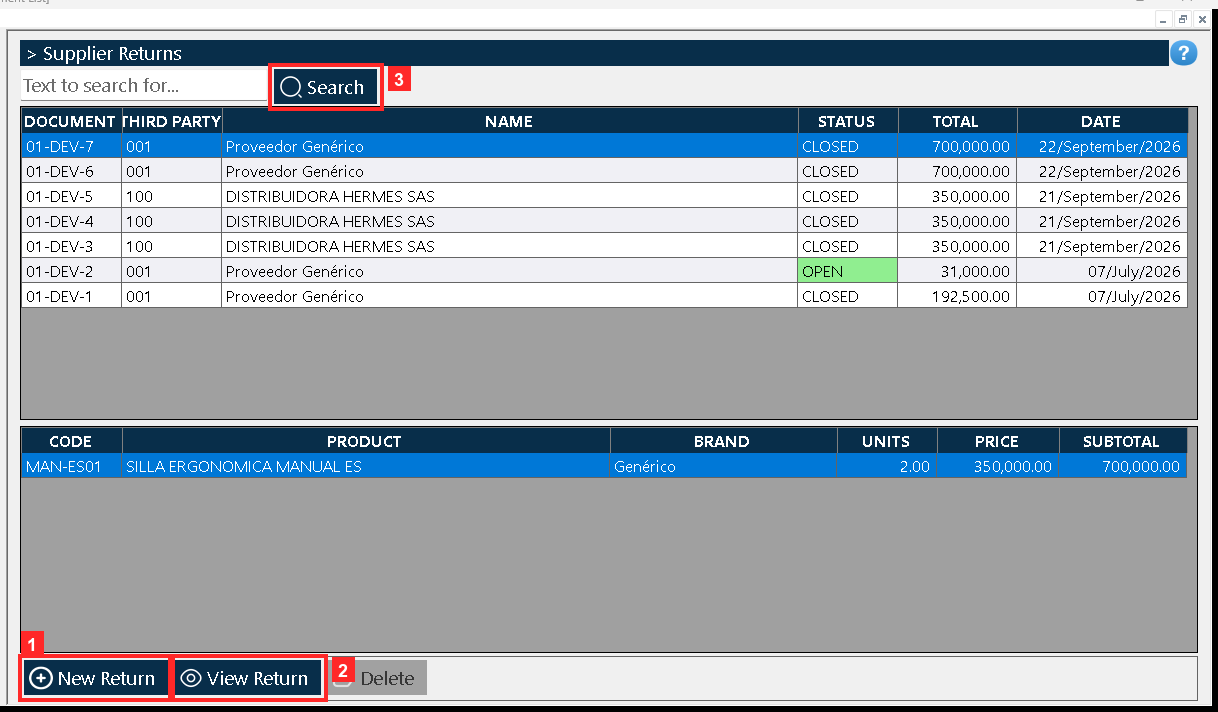
«Document List» opens. The master grid on top lists every document with its reference, the supplier, the STATUS (CLOSED) and the total (01-DEV-7 | 001 | Proveedor Genérico | CLOSED | 700,000.00 | 22/September/2026); below, the detail grid shows the lines of the selected document. The search box and the buttons are on the right.
In the image:
- 1) Button «New Return»: opens a blank return.
- 2) «View Return»: opens the selected document.
- 3) «Search»: refreshes the list.
Texts on screen: «New Return», «View Return», «Delete», «Search»
Action: Press «New Return» to register a new return.
Step 4 — The document: the supplier and who delivers
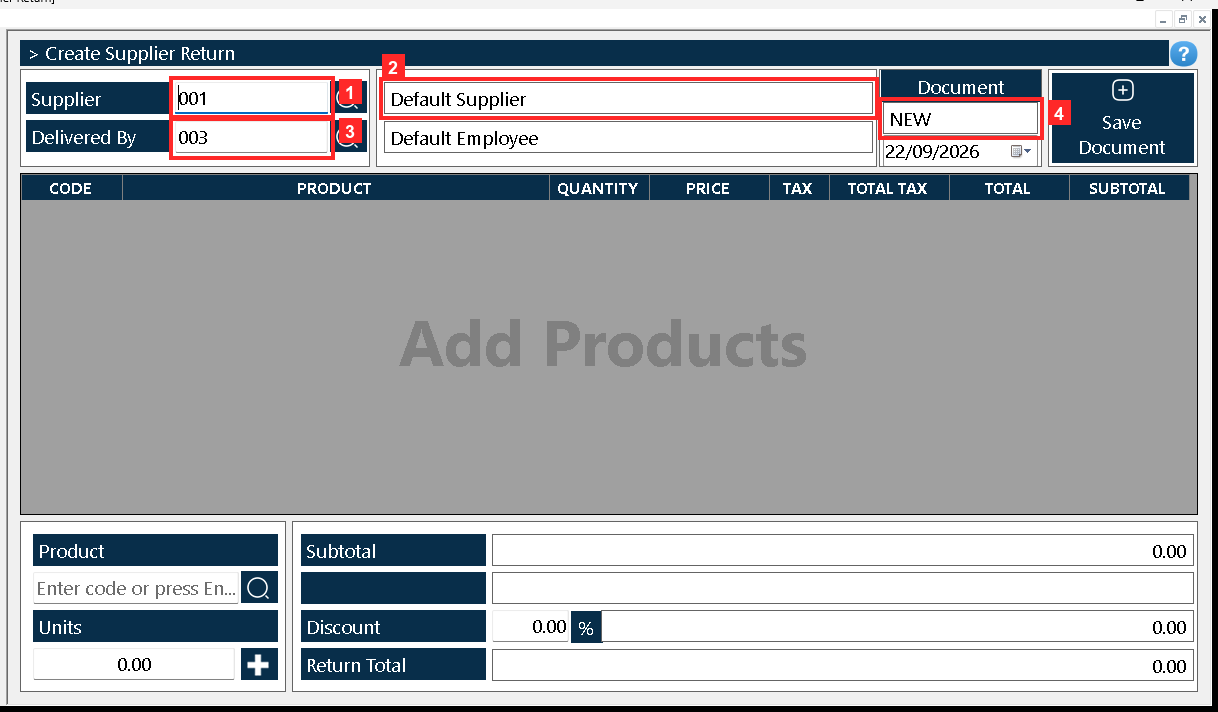
The document «Supplier Return» opens. In the header, «Supplier» is the supplier the goods go back to (001 — Default Supplier) and «Delivered By» who delivers them from the warehouse. «Document» shows the number («NEW»: it is assigned when saving) and the date is on the right (22/09/2026).
In the image:
- 1) «Supplier»: supplier code (001).
- 2) Name (Default Supplier).
- 3) «Delivered By»: delivered by (003).
- 4) «Document»: return number (NEW).
Texts on screen: «Supplier», «Delivered By», «Document», «Supplier»
Action: Type the supplier code in «Supplier» (or look it up with the magnifier).
Step 5 — The document: the product and the units
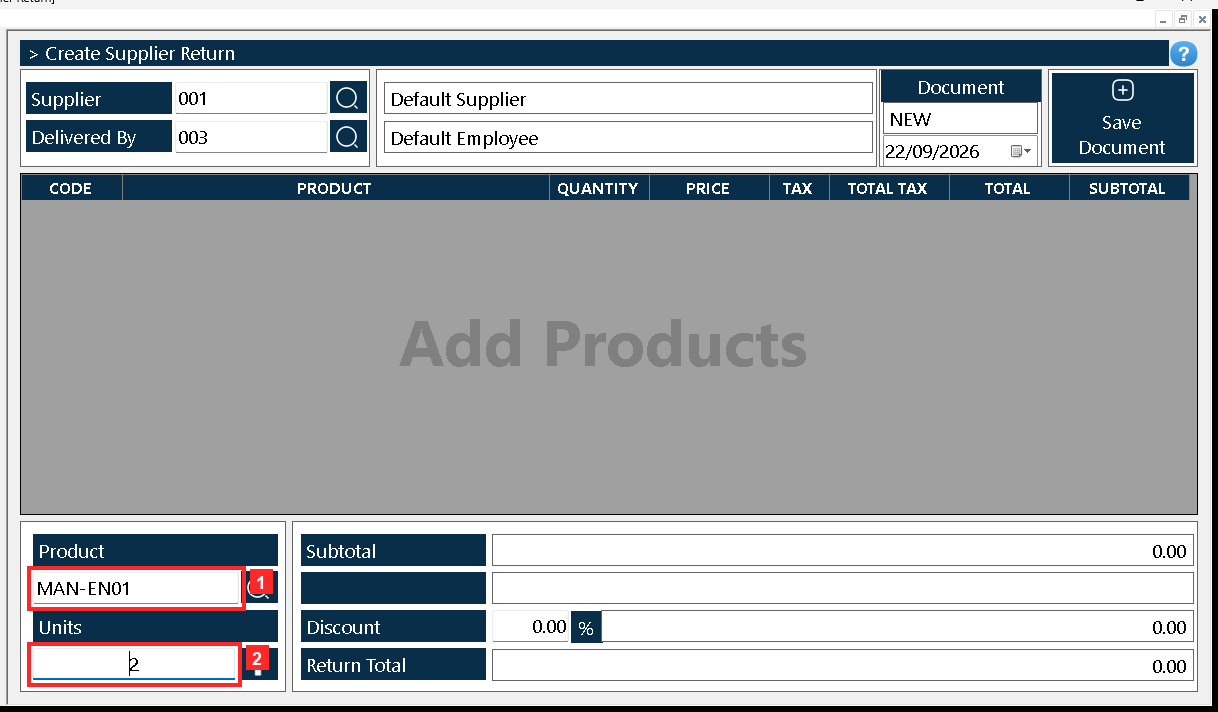
The body of the document holds what is going back: «Product» is the product code and «Units» the quantity returned. Next to them are the product search and the button that adds the line.
In the image:
- 1) «Product»: product code (MAN-EN01).
- 2) «Units»: returned quantity (2).
Texts on screen: «Product», «Units»
Action: Type the product («MAN-EN01») and the units («2») and press the add button: the line enters the grid.
Step 6 — The line added and the total
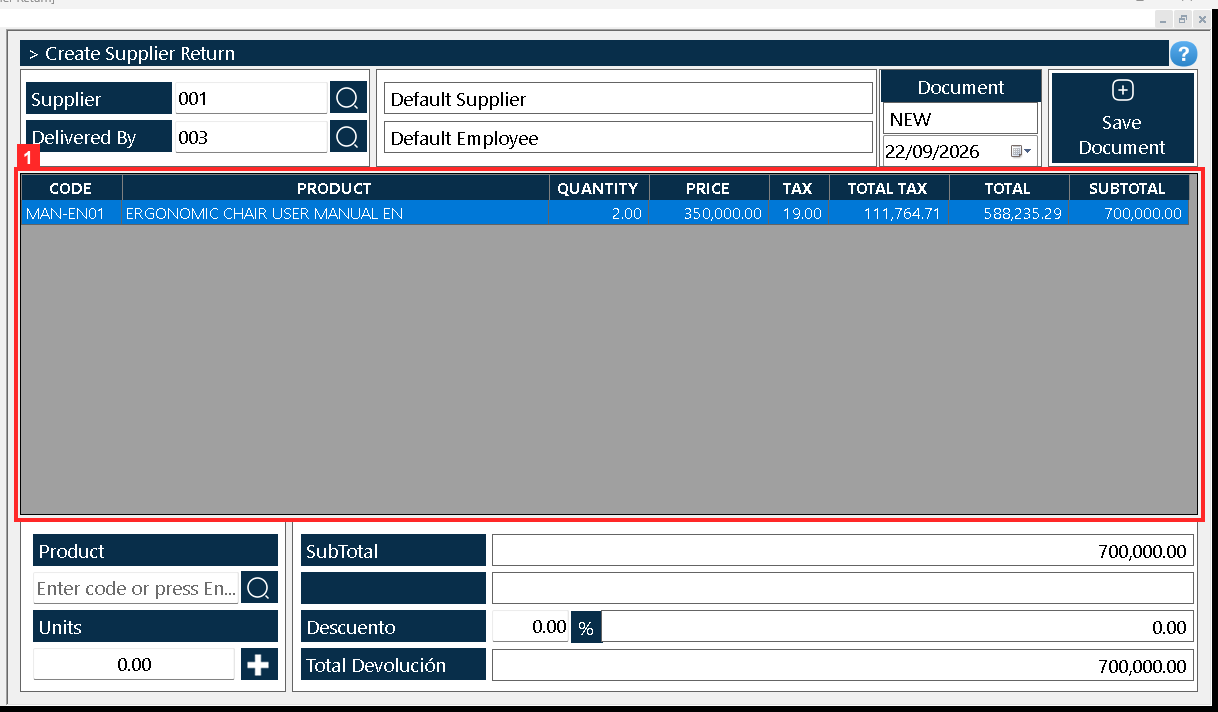
The grid shows the line with the product, the units, the value, the tax and the subtotal. The return values the goods at COST. «Total Devolución» summarises what goes back: 700,000.00.
In the image:
- 1) Grid: the returned line (MAN-EN01 | ERGONOMIC CHAIR USER MANUAL EN | 2.00 | 350,000.00 | 19.00 | 111,764.71 | 588,235.29 | 700,000.00).
Texts on screen: «SubTotal», «Descuento», «Total Devolución»
Action: Check the line and the total before saving.
Step 7 — Saving: the finish dialog
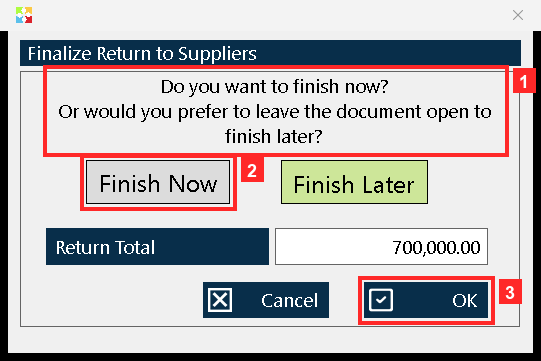
When you press «Save Document» the program asks to finish the return: it asks «Do you want to finish now? Or would you prefer to leave the document open to finish later?» and offers «Finish Now» (saves and closes it so it can be printed) or «Finish Later» (leaves it open to keep editing). «Return Total» is shown above: 700,000.00. This dialog does not ask for a payment method: a supplier return is not charged, the goods leave the warehouse.
In the image:
- 1) «Do you want to finish now? Or would you prefer to leave the document open to finish later?»
- 2) Option «Finish Now».
- 3) Button «OK»: applies the chosen option and saves.
Texts on screen: «OK», «Finish Now», «Finish Later», «Cancel», «Return Total»
Action: Choose «Finish Now» and press «OK»: without «OK» the return is not saved.
Step 8 — The saved return, ready to print
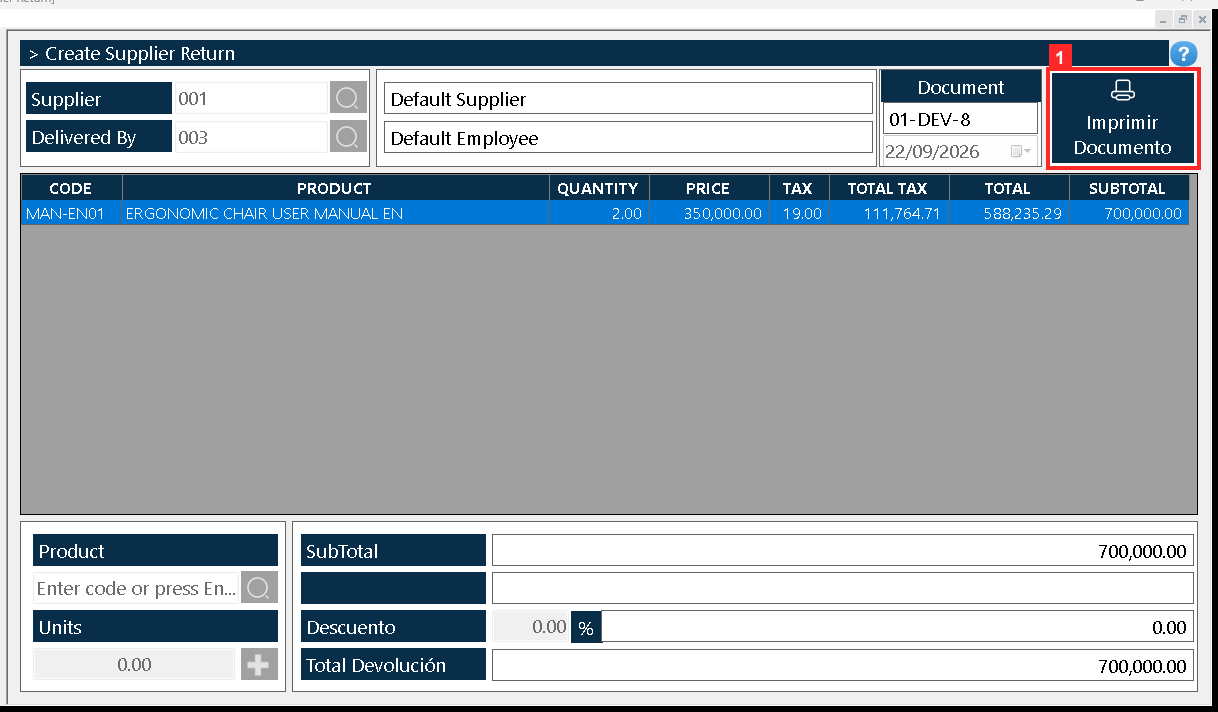
The program reports «Document processed successfully»: the return was registered as «01-DEV-8» and the stock of MAN-EN01 went down from 20.0 to 18.0; the stock ledger posted «-RETURN 01-DEV-8 · entra=0.0 · sale=2.0 · saldo=18.0». The document is still open, now in read-only mode, and its save button is labelled «Imprimir Documento».
In the image:
- 1) Button «Imprimir Documento»: opens the print view of the return.
Texts on screen: «Imprimir Documento»
Action: Press «Imprimir Documento» to open the print view.
Step 9 — The print view
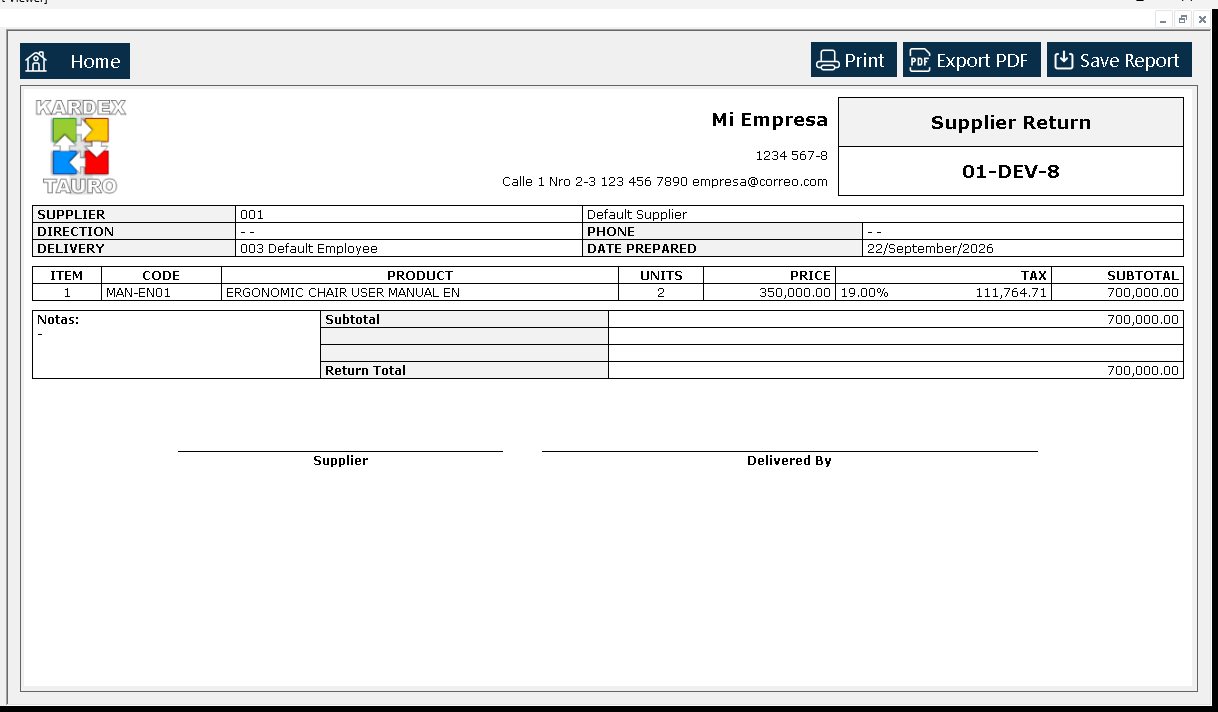
The «Report Viewer» opens with the return exactly as it would be printed: header, the supplier, the returned line and the totals. Its top bar offers «Print, Export PDF, Save Report».
Action: Check the document and use those buttons if you want to print it, export it to PDF or save the report.
Result
The return was saved as 01-DEV-8 with status CLOSED and the stock of MAN-EN01 went down from 20.0 to 18.0 in cost center 01 - Bodega Central; the stock ledger posted «-RETURN 01-DEV-8 · entra=0.0 · sale=2.0 · saldo=18.0». The result was verified by reading the program database (kardex.db), not just the screen.
Best practices
- Keep the two returns apart from the start: the supplier return — the Returns to vendor document — is recorded under «Returns», inside «Stock Out»; the customer return lives in «Refunds», in the stock-in menu, and is not done from this window.
- Check the active cost center before opening the document: the return takes the units out of whichever center is active at that moment.
- Review the line and «Return Total» before saving: a return values the goods at cost, not at the sale price.
- Choose «Finish Now» and press «OK» once the document is ready: without «OK» it is not saved, and closing it turns the save button into the print view, where you check it before printing or exporting to PDF.
Frequently asked questions
Is a return to vendor charged, or does it ask for a payment method?
No. The finish dialog does not ask for a payment method: a supplier return is not charged, the goods leave the warehouse.
Where do I record a customer return?
Not in this window. Customer returns live in «Refunds», in the stock-in menu; «Returns», under «Stock Out», is only for goods going back to a supplier.
At what value do the returned goods go out?
At cost. The grid line is valued at the item cost plus the tax, and «Return Total» sums up what goes back (700,000.00 in the example).
This article is part of the Kardex Tauro V3 User Manual, which gathers every process in the system, explained step by step.
