How to Post a Payment to a Payable, Step by Step
How to Post a Payment to a Payable, Step by Step
Paying is not the same as noting that you paid: it is knocking the amount off the debt. If the money handed over to the supplier is not recorded against the obligation, the balance stays untouched and the next review lists the same bill as outstanding again, with a real risk of paying it twice. The payable account is the only place where the program tracks what has been settled, so the payment belongs there and not in a note, an email or the payer's own book.
This guide walks through the eight screens of the process as it runs in the application, with the meaning of every numbered red box. The example works in cost center 01 - Bodega Central and applies 200000 to account 01-CXP-24, the one described «SAMPLE PAYABLE ACCOUNT»: an obligation of 500,000.00 that is left with status «PARTIAL», 300000.00 still due and movement 01-CEG-1 booked in the cash register.
Before you start
- Permission to enter the finance module and register payments: payments on payable accounts are made from «Finance».
- The cost center the account belongs to active in the top bar: it is the one shown at the top of the window and the one of the account being paid.
- The account found in the list and still carrying a balance: a CLOSED account is already fully paid.
- The payment amount and the description that will identify it decided in advance: the description is mandatory and without it the program does not save the payment.
Step by step
Step 1 — The main window
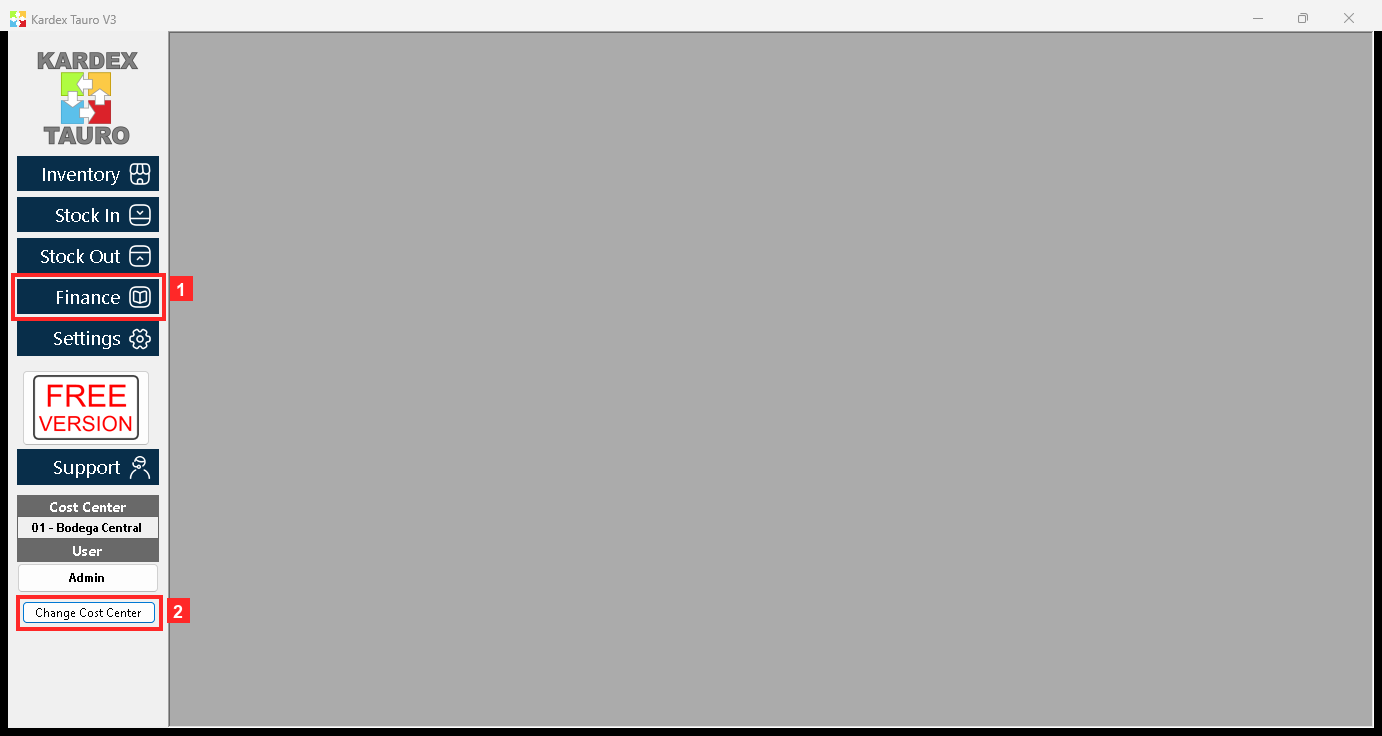
KardexTauro V3 opens in this window. Payments are registered from the finance module, so the first step is to enter «Finance». The active cost center is shown at the top (01 - Bodega Central), which is the one of the account being paid.
Texts on screen: «Finance», «Inventory», «Stock In», «Stock Out», «Change Cost Center»
Action: Press «Finance» to enter the finance module.
Step 2 — The finance menu
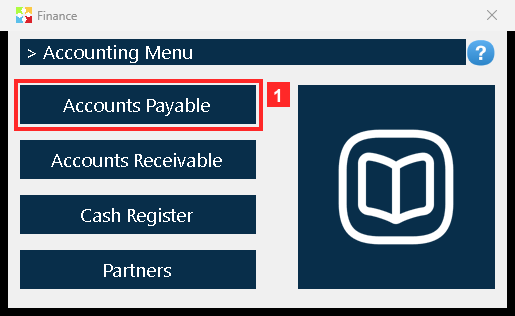
The finance menu opens. The payment is made on a accounts payable account, so you go in through «Accounts Payable» (the other ledger, with its own accounts, is right next to it).
Action: Press «Accounts Payable» to open the accounts payable list.
Step 3 — The accounts payable list
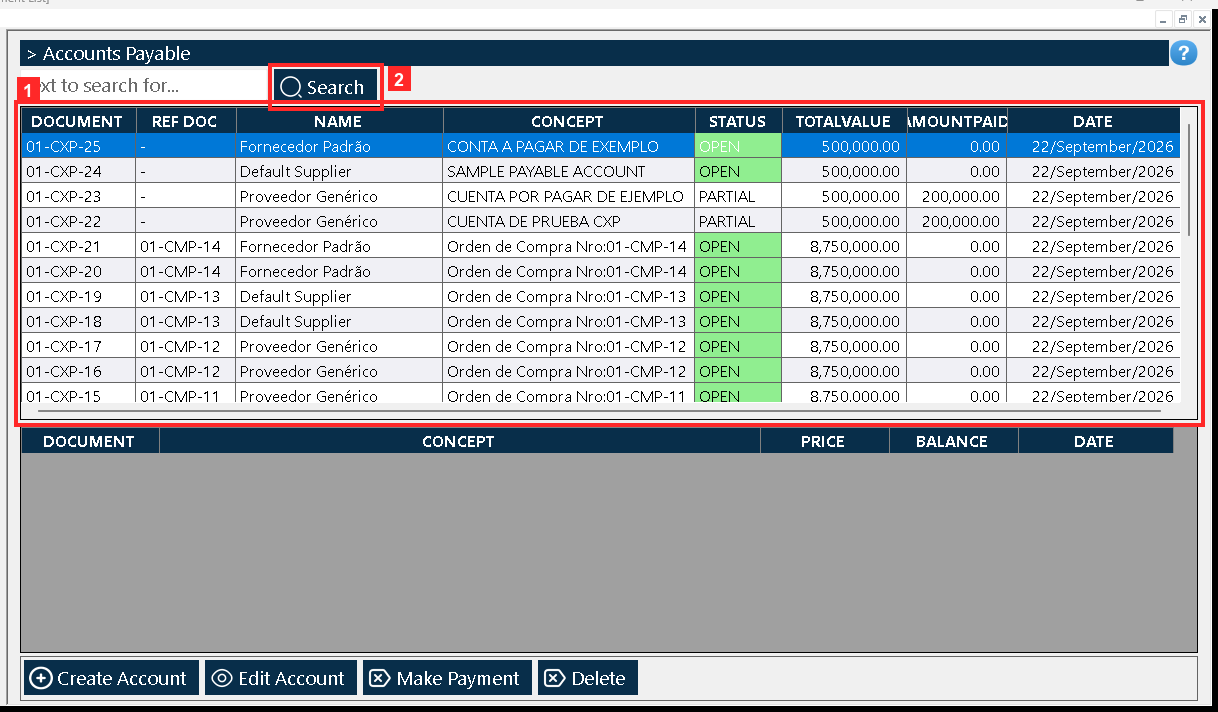
«Document List» opens. Every row is an account with its reference, the partner, the description, the STATUS, the total, the amount paid and the date. Before paying it is worth checking the status and the amount paid: a CLOSED account is already fully paid.
Texts on screen: «Search»
Action: Find the account you are going to pay (in the example, the one described «SAMPLE PAYABLE ACCOUNT»).
Step 4 — Select the account and press «Make Payment»
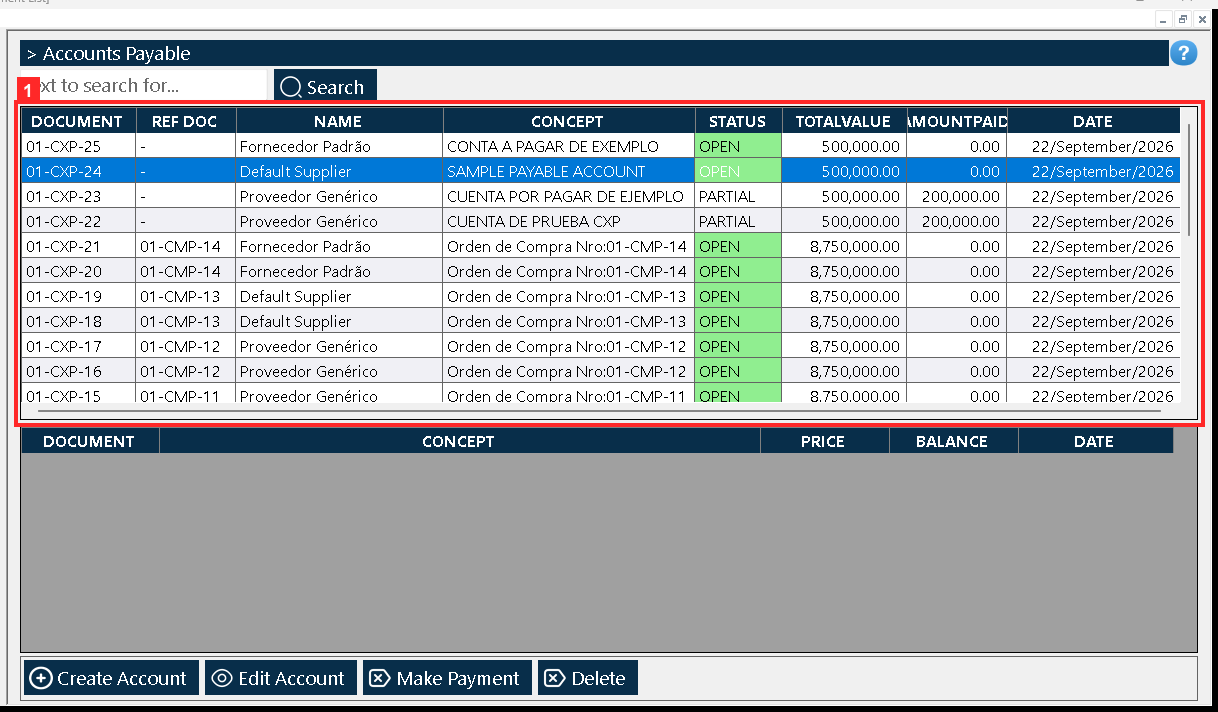
With the account row selected («01-CXP-24 | - | Default Supplier | SAMPLE PAYABLE ACCOUNT | OPEN | 500,000.00 | 0.00 | 22/September/2026») you press «Make Payment». The button always acts on the selected account, so if no row is chosen it does nothing.
Action: Select the row and press «Make Payment».
Step 5 — The payment dialog
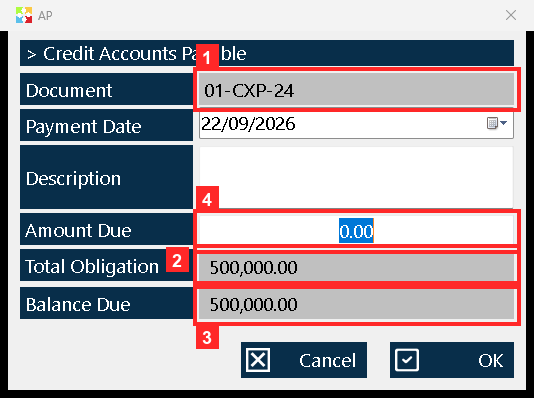
The payment window opens already showing the account data: «Document» (01-CXP-24), «Total Obligation» (500,000.00), «Balance Due» (500,000.00) and the «Payment Date» (22/09/2026). To register the payment you have to fill in «Amount Due», which starts at zero, and the «Description». Mind the caption: this window is titled «Credit Accounts Payable» (this ledger’s wording) but the program uses the SAME caption for receivables too; what identifies the account is the «Document»: an 01-CXP-… number is an account payable.
In the image:
- 1) «Document»: the account being paid (01-CXP-24).
- 2) «Total Obligation»: the full amount due (500,000.00).
- 3) «Balance Due»: what is still owed (500,000.00).
- 4) «Amount Due»: here you type the payment.
Texts on screen: «Document», «Total Obligation», «Balance Due», «Amount Due», «Description», «Payment Date»
Action: Check the account and the balance shown in the dialog.
Step 6 — Type the amount and the description
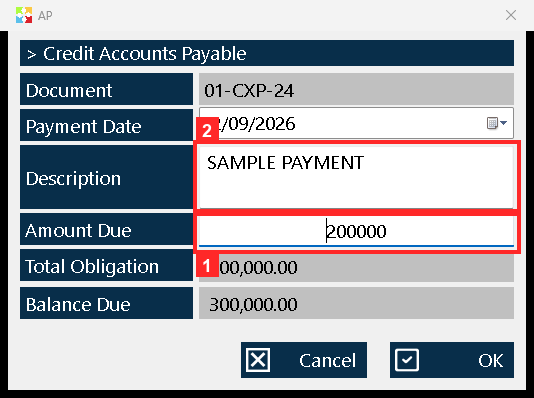
In «Amount Due» you type the amount being paid —in the example 200000, part of the balance— and in «Description» a note to identify it («SAMPLE PAYMENT»). The description is mandatory: without it the program does not save the payment.
In the image:
- 1) «Amount Due»: the amount typed (200000).
- 2) «Description»: the payment note («SAMPLE PAYMENT»).
Texts on screen: «Amount Due», «Description», «Payment Date»
Action: Type the payment amount and its description.
Step 7 — Accepting the payment
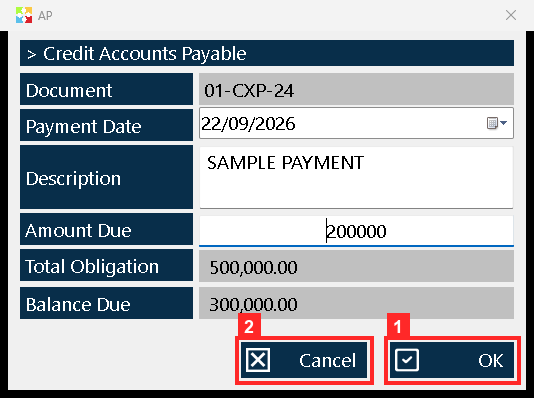
The payment is registered with the «OK» button of the dialog. When accepted, the program adds the amount to the account and leaves the movement in the cash box (an entry when collecting, an exit when paying).
Texts on screen: «OK», «Cancel»
Action: Press «OK» to register the payment.
Step 8 — The account after the payment
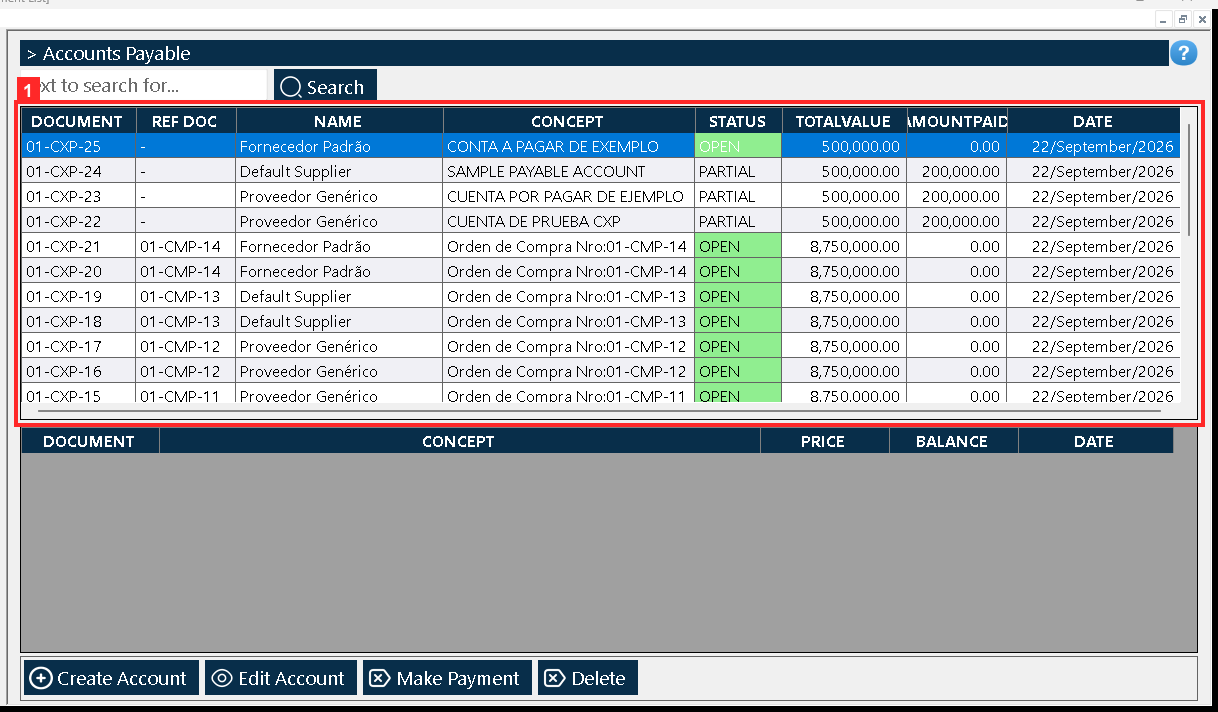
The account is now «01-CXP-24» with status PARTIAL, 200000.0 paid out of 500,000.00 (balance 300000.00) and the cash box kept the movement «01-CEG-1 · Abono a CXP. SAMPLE PAYMENT». If the payment had covered the whole balance, the account would be CLOSED.
Action: Check the status and the amount paid in the list.
Result
The account is left as «01-CXP-24» with status «PARTIAL»: 200000.0 applied out of 500,000.00, with 300000.00 still due instead of the original 500,000.00, and the cash register kept movement 01-CEG-1 for the payment. If the payment had covered the whole balance, the account would have read CLOSED. The figures were checked by reading the program database (kardex.db), not just the screen.
Best practices
- Look at the status and the amount already applied before paying: a CLOSED account is fully paid, and paying it again means paying the same bill twice.
- Select the account row and confirm the active cost center before pressing «Make Payment»: the button acts on the selected row and does nothing when no row is chosen.
- Always write the payment description: it is mandatory, because without it the program saves nothing, and it is what later lets you recognise the movement in the cash register.
- Check the «Document» in the dialog before typing the amount: the window carries the same caption in both ledgers, and it is the 01-CXP-… number that confirms you are paying a payable account.
Frequently asked questions
Does the program save the payment if I leave the description empty?
No. The description is mandatory: without it the payment is not saved, even when the amount is already typed in.
Why is the payment window titled «Credit Accounts Payable» when what I am paying is an accounts payable account?
Because the program gives that window the same caption in both ledgers. What identifies the account is the «Document»: an 01-CXP-… number is a payable one.
What happens if I pay only part of the balance?
The account stays with status «PARTIAL» and keeps the balance still due, and the cash register keeps the matching movement. If the payment covered the whole balance, the account would read CLOSED.
This article is part of the Kardex Tauro V3 User Manual, which gathers every process in the system, explained step by step.
